 Goblin
Settings›Capture›Advanced holds output naming and OCR provider controls. Recognition language, line breaks, collected text and speech live on Capture Text.
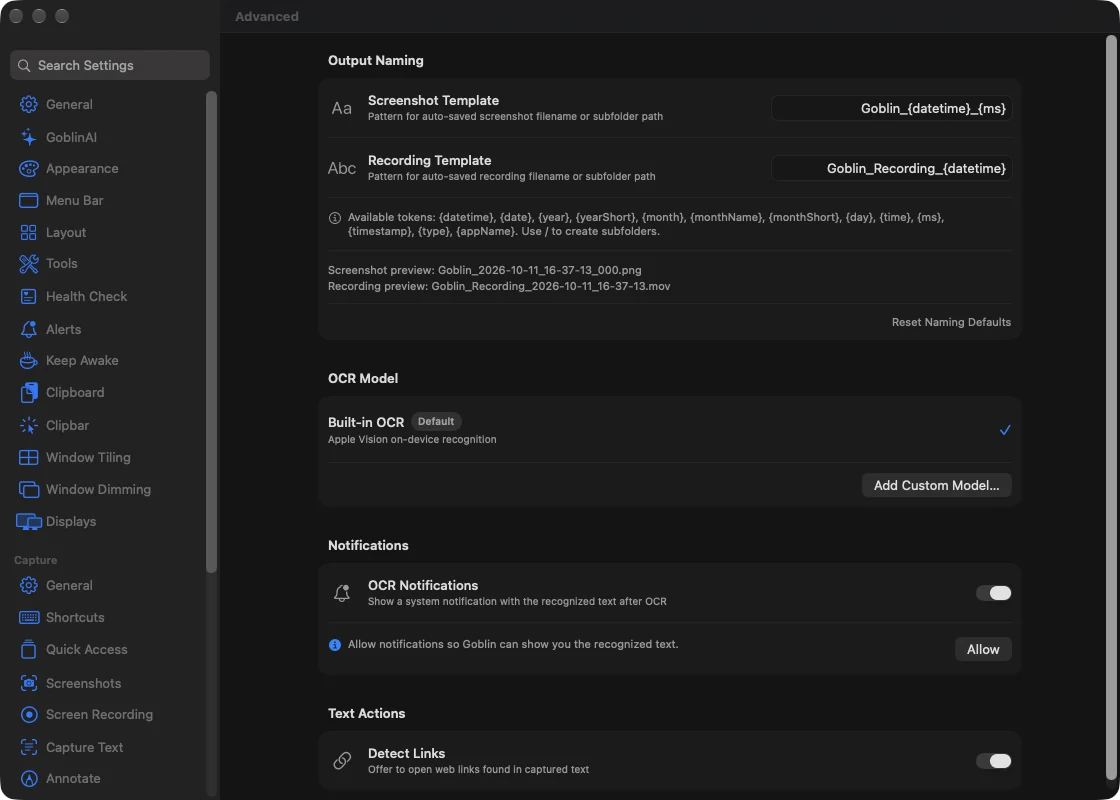
Change how captures are named#
- Open Settings›Capture›Advanced. Find Output Naming.
- Edit Screenshot Template or Recording Template. Type the words you want and drop in tokens from the list below.
- Check the preview under each field. It shows a sample name with the current file format's extension.
- To go back, press Reset Naming Defaults.
| Setting | What it does | Default |
|---|---|---|
| Screenshot Template | Names auto-saved screenshots and optionally creates subfolders. | Goblin_{datetime}_{ms} |
| Recording Template | Names auto-saved recordings and optionally creates subfolders. | Goblin_Recording_{datetime} |
Available tokens are {datetime}, {date}, {year}, {yearShort}, {month}, {monthName}, {monthShort}, {day}, {time}, {ms}, {timestamp}, {type} and {appName}. Use / between path components to create subfolders. For example, {date}/{appName}_{time}_{ms} groups captures under a date folder.
Empty templates use the default. Saving formats and destination folders are set elsewhere (Screenshots, Screen Recording and the Export section of General); a naming pattern does not change the recording format.
OCR Model#
Built-in OCR is Apple's on-device recognition and the default provider. Click a provider's row to select it; a checkmark identifies the selection. A custom row shows its name, server address and Custom badge.
Add a custom OCR model#
Do this only if you want a different recognition engine, such as your own server. This existing Capture feature can use a local endpoint or a remote service; it is separate from the companion, which uses only Apple's on-device model.
- Open Settings›Capture›Advanced and find OCR Model.
- Press Add Custom Model….
- Fill in the fields (the table below).
- Press Test Connection to check the entry, then Save. Cancel discards the sheet.
- Click the new row to select it.
| Field | What it does |
|---|---|
| Name | Labels the custom provider in Goblin. |
| Server / API Base URL | Identifies the endpoint to contact. |
| Model Identifier | Names the model expected by that endpoint. |
| API Key (optional) | Supplies a credential when that service needs one. Saved keys use Keychain. When editing, blank keeps the existing key. |
| Prompt (optional) | Overrides the text-recognition instruction sent to the provider. |
Warning: When you choose a remote custom provider, the images you capture are sent to the configured server for recognition. Test Connection also contacts that server.
Each saved custom provider's menu has Edit, Test Connection and Remove. Removal asks for confirmation and deletes its saved Keychain key. Removing the selected custom model restores Built-in OCR as the selection. Provider errors are shown; a configured custom endpoint is not a guarantee of supported model behavior.
Notifications and links#
| Setting | What it does | Default |
|---|---|---|
| OCR Notifications | Shows a system notification containing recognized text after OCR. | On |
| Detect Links | Offers to open recognized web links. This is the same switch as Offer links in captured text on Capture Text. | On |
With OCR notifications enabled, the page shows a permission hint only when macOS would block them. Press Allow to ask for notification permission, or Open Settings if it was denied. Recognition still works and copies text when notifications are denied. Link opening behavior and Open links automatically are described on Capture Text.