 Goblin
Dragging an app to the Trash leaves pieces of it behind, and Goblin has more pieces than most: a login item, perhaps a network extension, the goblin command, entries in your AI apps. Uninstall Goblin… removes them all in the right order, then permanently deletes Goblin. Use it rather than dragging Goblin to the Trash yourself.
Uninstall Goblin#
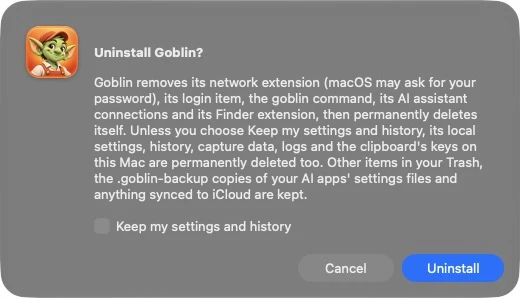
To remove Goblin:
- Choose Uninstall Goblin… from the Goblin menu in the menu bar. Or open Settings›General and click Uninstall… on the first card.
- Goblin asks first. To keep your settings and history for a later reinstall, tick Keep my settings and history.
- Click Uninstall. Click Cancel to stop.
- If a macOS prompt asks for an administrator password (to remove the network extension or protected files), enter it.
- Goblin removes its pieces in the order below, deletes itself and quits.
Warning: This permanently deletes Goblin and, unless you tick Keep my settings and history, its data. It can't be undone, so export anything you want to keep first.
| Option | What it does | Default |
|---|---|---|
| Keep my settings and history | Leaves your settings, your saved history and Goblin's other data in place, so a later reinstall picks up where you left off. | Off |
What it does, in order#
- Removes the firewall's network extension and filter, if they're installed. Goblin asks macOS to remove it automatically; approve the administrator prompt if one appears. If macOS schedules removal for the next restart, Goblin finishes the rest of the cleanup and tells you to restart. If removal fails or isn't approved, Goblin keeps the app and your data in place and offers Try Automatic Removal and Open Network Extensions. The optional Remove manually instructions are collapsed until you need them.
- Removes its encrypted DNS settings, if you used Encrypted DNS.
- Removes its login item and unregisters its System Tasks helper, so they no longer start in the background.
- Removes its connections: the Goblin entry in Claude, Claude Code, Cursor and Codex, the
goblincommand in~/.local/bin, the sign-ins for cloud storage accounts you connected (from your keychain), and Goblin's Dock icon. - Removes its data, unless you ticked Keep my settings and history. Goblin clears its settings and permanently deletes these folders in your Library:
Application Support/Goblin(your history, firewall rules, clipboard history and pinboards, and other data)Application Support/GoblinCapture(capture history and editing sessions)Logs/Goblin(output of dev servers Goblin restarted)Caches/com.higherbarapps.GoblinPreferences/com.higherbarapps.Goblin.plist- its web storage, saved window state, and the Finder extension's folders
It also removes this Mac's clipboard history and pinboard keys and Clipbar sign-ins with that data. Keep my settings and history retains those files and keys.
- Removes its Spotlight entries, even when you keep history, then permanently deletes Goblin and removes its Finder extension and other registrations with macOS. Removing protected files may ask for an administrator password.
- Quits.
Goblin does not empty your Trash or delete other apps’ files.
If the last step fails, Goblin says Finish removing Goblin and explains why. Goblin keeps the app available for another try when a local data file cannot be removed. The recovery screen includes Try Automatic Removal, Open Library Folder, and collapsed Remove manually instructions.
What it leaves behind#
A few things aren't removed. Clear them up by hand if you want nothing left:
New: Coming in the next update. Uninstall removes local logs and clipboard keys with the data they protect, and clears Goblin's Spotlight entries even when you keep history.
| What | Where | How to remove it |
|---|---|---|
| Backups of your AI apps' settings files | Next to each file Goblin edited, ending in .goblin-backup: ~/Library/Application Support/Claude/claude_desktop_config.json.goblin-backup, ~/.cursor/mcp.json.goblin-backup, ~/.codex/config.toml.goblin-backup | Delete them once you're sure the originals are fine. |
| Privacy permissions | System Settings › Privacy & Security (Full Disk Access, Location Services, Accessibility, Screen Recording and others) | Select Goblin and remove it, or switch it off. |
| What Goblin synced to iCloud | Your iCloud account, if you turned on iCloud Sync: synced clips, pinboards and settings, and pinboards you shared | Uninstalling and turning sync off leave it intact. Before uninstalling, use Delete iCloud Data… in Settings › iCloud Sync to remove Goblin's cloud data. Reset iCloud Data… replaces the synced data with this Mac's copy instead. To take pinboards you shared off other people's Macs, choose Stop Sharing… for each before you uninstall; see Leaving or ending. |
If macOS keeps the network extension#
Use Try Automatic Removal first. If macOS still refuses the request:
- Click Open Network Extensions. Goblin opens the most specific macOS settings page available. If the list doesn't open, choose System Settings › General › Login Items & Extensions › Network Extensions.
- Beside Goblin Network Monitor, click the three dots (•••) and choose Delete Extension. Approve any macOS prompt. Leave other apps' extensions alone.
- Return to Goblin and click Try Automatic Removal. Goblin verifies the removal and handles the remaining cleanup.
- If Goblin or macOS asks for a restart, restart from the Apple menu after cleanup finishes. An extension marked waiting to uninstall on reboot has been scheduled for removal; it isn't a failed uninstall.
If Goblin has already been deleted, you can still remove its extension from the same macOS settings page.
Removing Goblin by hand#
If you've already deleted Goblin, or Uninstall Goblin… can't run, do the same steps yourself. If Goblin is still on your Mac, start it and do steps 1 and 2 first:
- Turn the firewall off and remove its extension. In Settings›Firewall, turn the firewall off and choose Turn Off and Remove the Extension. Removing it may ask for an administrator and finish after a restart. Do this before deleting the app, because a network extension stays registered with macOS otherwise.
- Turn off Goblin's helper in Settings›General›System Tasks, if you allowed it.
- Quit Goblin and drag it from Applications to the Trash.
- Remove its login item and background items in System Settings › General › Login Items & Extensions.
- Delete its files:
~/Library/Application Support/Goblin, which holds your clipboard history and pinboards in itsClipboardfolder~/Library/Application Support/GoblinCapture(capture history and editing sessions)~/Library/Caches/com.higherbarapps.Goblin~/Library/Preferences/com.higherbarapps.Goblin.plist~/Library/Logs/Goblin~/.local/bin/goblin, the command
- Remove the Goblin entry from your AI apps, if you added one: the
goblinentry undermcpServersin Claude's and Cursor's settings files, the[mcp_servers.goblin]table in Codex'sconfig.toml, and for Claude Code runclaude mcp remove --scope user goblin. See AI assistants. - Remove cloud storage sign-ins, if you connected Dropbox, Google Drive, OneDrive or Box: in Keychain Access, delete the items named
com.higherbarapps.goblin.cloud. If you used the clipboard's encryption or locked pinboards, also deletecom.higherbarapps.Goblin.clipboard.history-keyandcom.higherbarapps.Goblin.clipboard.pinboard-keys. - Remove its privacy permissions in System Settings › Privacy & Security.
~/Library is hidden in Finder: choose Go›Go to Folder… and type the path.