 Goblin
The Disk tab is where Goblin finds space and tidies up: one big scan with Smart Care, a map of everything on a disk, large and duplicate files, caches, the Trash, apps and what they leave behind, startup items, tune-ups and privacy. Read this page when you want to know how a scan works, why Goblin asks for Full Disk Access, or what happens between ticking a file and losing it. Nothing in the Disk tab removes anything until you have seen a list of exactly what will go and confirmed it.
To get started, click Disk in the main window's tab bar, pick a section in the sidebar and press Scan.
New: Coming in the next update. The first time you open the Disk tab, a short introduction shows three things that work beyond the buttons: Smart Care checking cleanup, apps, startup items and maintenance in one scan; the Applications list, where ticking an app brings everything that is surely its own for you to review; and Storage Explorer, where you click a ring to go into it and can drop a folder on it to scan. How Disk Works at the bottom of the sidebar opens it again.
The sidebar#
The sections sit in a sidebar on the left, in four groups. Each shows a short subtitle under its name.
| Group | Section | What it's for |
|---|---|---|
| Overview | Smart Care | One scan that checks memory, cleanup, the Trash, startup items, updates and maintenance together. See Smart Care. |
| Overview | Activity | Live disk use: free space, reading and writing. See below. |
| Storage | Storage Explorer | A ring map of a disk, folder or cloud account. See Storage Explorer. |
| Storage | Files | Large and old files. See Large & old files. |
| Storage | Duplicates | Identical files and similar photos. See Duplicates. |
| Storage | Cleanup | Caches, logs and other junk. See Cleanup. |
| Storage | Trash | Every Trash bin on every drive. See Trash. |
| Apps | Applications | Uninstall apps with their related files. See Uninstalling apps. |
| Apps | Updates | Newer versions of your apps. See App updates. |
| Apps | Startup Items | What opens with your Mac. See Startup Items. |
| System | Maintenance | Tune-up tasks. See Maintenance. |
| System | Permissions | Which apps can use your camera, microphone, files and more. See Permissions. |
| System | Privacy | Browser history, cookies and other traces. See Privacy. |
Goblin opens the Disk tab on Activity each time it starts.
Hide or show the sidebar#
- Open the Disk tab.
- Click the sidebar button in the window's toolbar. Its tooltip reads Hide Sidebar when the sidebar is showing and Show Sidebar when it's hidden.
The Network tab shares the same setting, so hiding the sidebar in one hides it in the other. Storage Explorer shows its item details at the foot of the sidebar, so those details are out of sight while the sidebar is hidden.
See the introduction again#
Click How Disk Works at the bottom of the sidebar.
How scans work#
A scan only reads. It never moves, changes or deletes anything.
Run a scan#
- In the Disk tab, click the section you want in the sidebar.
- If the section hasn't scanned yet, press Scan at the top right. Some sections scan by themselves when you open them (listed below).
- Watch the progress card. When it's done, the results appear in the section.
To scan again later, press Scan again. Clicking the section that's already selected also re-runs its automatic scan, if it hasn't scanned yet.
When sections scan by themselves. Some sections scan the first time you open them, so there's something to look at:
- Applications, Files and Cleanup scan on first open. Files starts with your Downloads folder and files of 50 MB or more.
- Trash, Startup Items, Maintenance, Permissions, Privacy and Updates check when they need to.
- Smart Care, Duplicates and Storage Explorer never start a scan on their own. Duplicates reads the contents of your files, and Storage Explorer waits for you to pick a disk or folder, so both wait for you.
- Activity is live all the time.
One at a time. Goblin runs one Disk scan at a time. If you open a section while another scan or a removal is running, the section you opened last waits and starts when the other finishes. Storage Explorer is the exception: it can scan other disks and folders alongside a running scan (see Storage Explorer).
While a scan runs, a card shows what's being scanned, how many items have been checked, the item being read and, where Goblin can estimate it, a percentage and the time left. Scan turns into Cancel Scan.
Cancel a scan#
- Press Cancel Scan at the top right of the section.
- The results you had before stay on screen.
When a scan says Waiting for macOS#
If nothing new arrives for several seconds, the card changes to Waiting for macOS. macOS may be reading a slow disk, or it may be waiting for you to answer a file-access prompt for Goblin, which can hide behind other windows. Answer the prompt, or press Cancel Scan. The card offers three buttons:
- Files & Folders Settings opens the part of System Settings where macOS lists the folders Goblin may read.
- Full Disk Access Settings opens System Settings at Full Disk Access with Goblin's drag-in helper (see below).
- Show Goblin in Finder reveals Goblin's app, handy if you need to drag it into a list.
A read that macOS has stuck can't be interrupted. After you cancel, the card says Waiting for macOS to release the cancelled read. You can browse the previous results meanwhile. If the wait goes on with no prompt in sight, quit and reopen Goblin.
When some items couldn't be read completely, a Partial results · N items couldn't be fully scanned line appears. Open it to see up to 20 of them. Goblin doesn't offer partly read items for removal.
Full Disk Access#
macOS keeps some folders private until you allow Goblin in. To see inside them, Goblin needs Full Disk Access, and macOS can't ask for it with a prompt, so you switch it on yourself in System Settings. It lets Goblin see:
- your Trash, and the Trash on each drive;
- Safari, Chrome and Brave history and cookies;
- which apps can use your camera, microphone and screen;
- Mail attachments, iPhone backups and other apps' leftovers.
Without it, the sections still work but leave those places out. Trash can't tell how much it holds, Privacy and Permissions show less, Applications skips app containers (otherwise macOS would ask about each app's data), and Storage Explorer counts what it couldn't read as "permission gaps".
Goblin offers to set it up once, after the welcome window (or the next time you open Goblin's window after an update). If you press Scan without it, the Let Goblin see your whole Mac window appears, once per launch, and the scan goes ahead either way.
Turn on Full Disk Access#
- In the Let Goblin see your whole Mac window, click Open System Settings. If you don't see it, press Full Disk Access Settings on a Waiting for macOS card, or use the button on a Disk section that says it needs access.
- Goblin opens System Settings›Privacy & Security›Full Disk Access and puts a small helper panel next to it.
- Drag Goblin's icon from the helper into the list, or click + and choose Goblin.
- Turn Goblin's switch on. If macOS offers Quit & Reopen, choose it; Goblin comes straight back.
When it worked, the window changes to Goblin can see your whole Mac. Click Continue.
Note: Goblin never switches access on or off for you. To take it away, turn Goblin off in the same list.
Goblin notices the change by itself and closes the helper. It then re-runs the scans that had to leave protected folders out: Trash, Permissions, Privacy, Maintenance (if it had scanned before) and Cleanup (or Applications, if Cleanup has never scanned). For every permission Goblin asks for, see Permissions.
The More menu#
Applications, Files, Cleanup and Storage Explorer have a More button (⋯) in their header. Two items are the same everywhere:
- Ignored Items… opens the lists of folders and files Goblin leaves out of its scans. See Ignore lists.
- Removal History… lists the last 200 things Goblin removed: the name, where it was, when, and how big. Items that went to the Trash have a Show in Trash button (greyed out once they're no longer there). Items deleted permanently, including each Trash Goblin emptied, are marked Deleted permanently. Anything moved to the Trash can be put back with Finder's Put Back; anything deleted permanently can't be restored.
The Applications version has a few more items for the uninstaller; see Uninstalling apps.
See what Goblin has removed#
- In Applications, Files, Cleanup or Storage Explorer, click More (the ⋯ button) in the header.
- Choose Removal History….
- Scroll the list. Press Done when you've finished.
Put back something Goblin moved to the Trash#
- Open Removal History… as above.
- Click Show in Trash next to the item. Finder opens with it selected. The button is greyed out once the item is no longer in the Trash.
- In Finder, choose File›Put Back.
Warning: Anything marked Deleted permanently can't be put back, and neither can anything from a Trash you emptied.
Reviewing a removal#
Every section that removes files (Smart Care, Storage Explorer, Files, Duplicates, Cleanup, Applications, Leftovers and Startup Items) hands what you chose to the same review sheet. Its title says where the items came from, such as Review Storage Explorer items or Move duplicate files to Trash.
Review and remove items#
- In the section, tick the items you want gone.
- Press the button at the bottom of the section. It's Review Removal in most sections, Review Cleanup in Cleanup. A line beside it says how many items are selected and how much space they use.
- In the review sheet, look through the list. Click Review folder contents on a folder to see what's inside.
- Press Move to Trash. If the sheet shows a red warning, tick its checkbox first (see below).
- When it worked, the Goblin zaps the items, the sheet closes, and a status card in the section says what moved.
Press Cancel or Esc at any point to leave without changing anything.
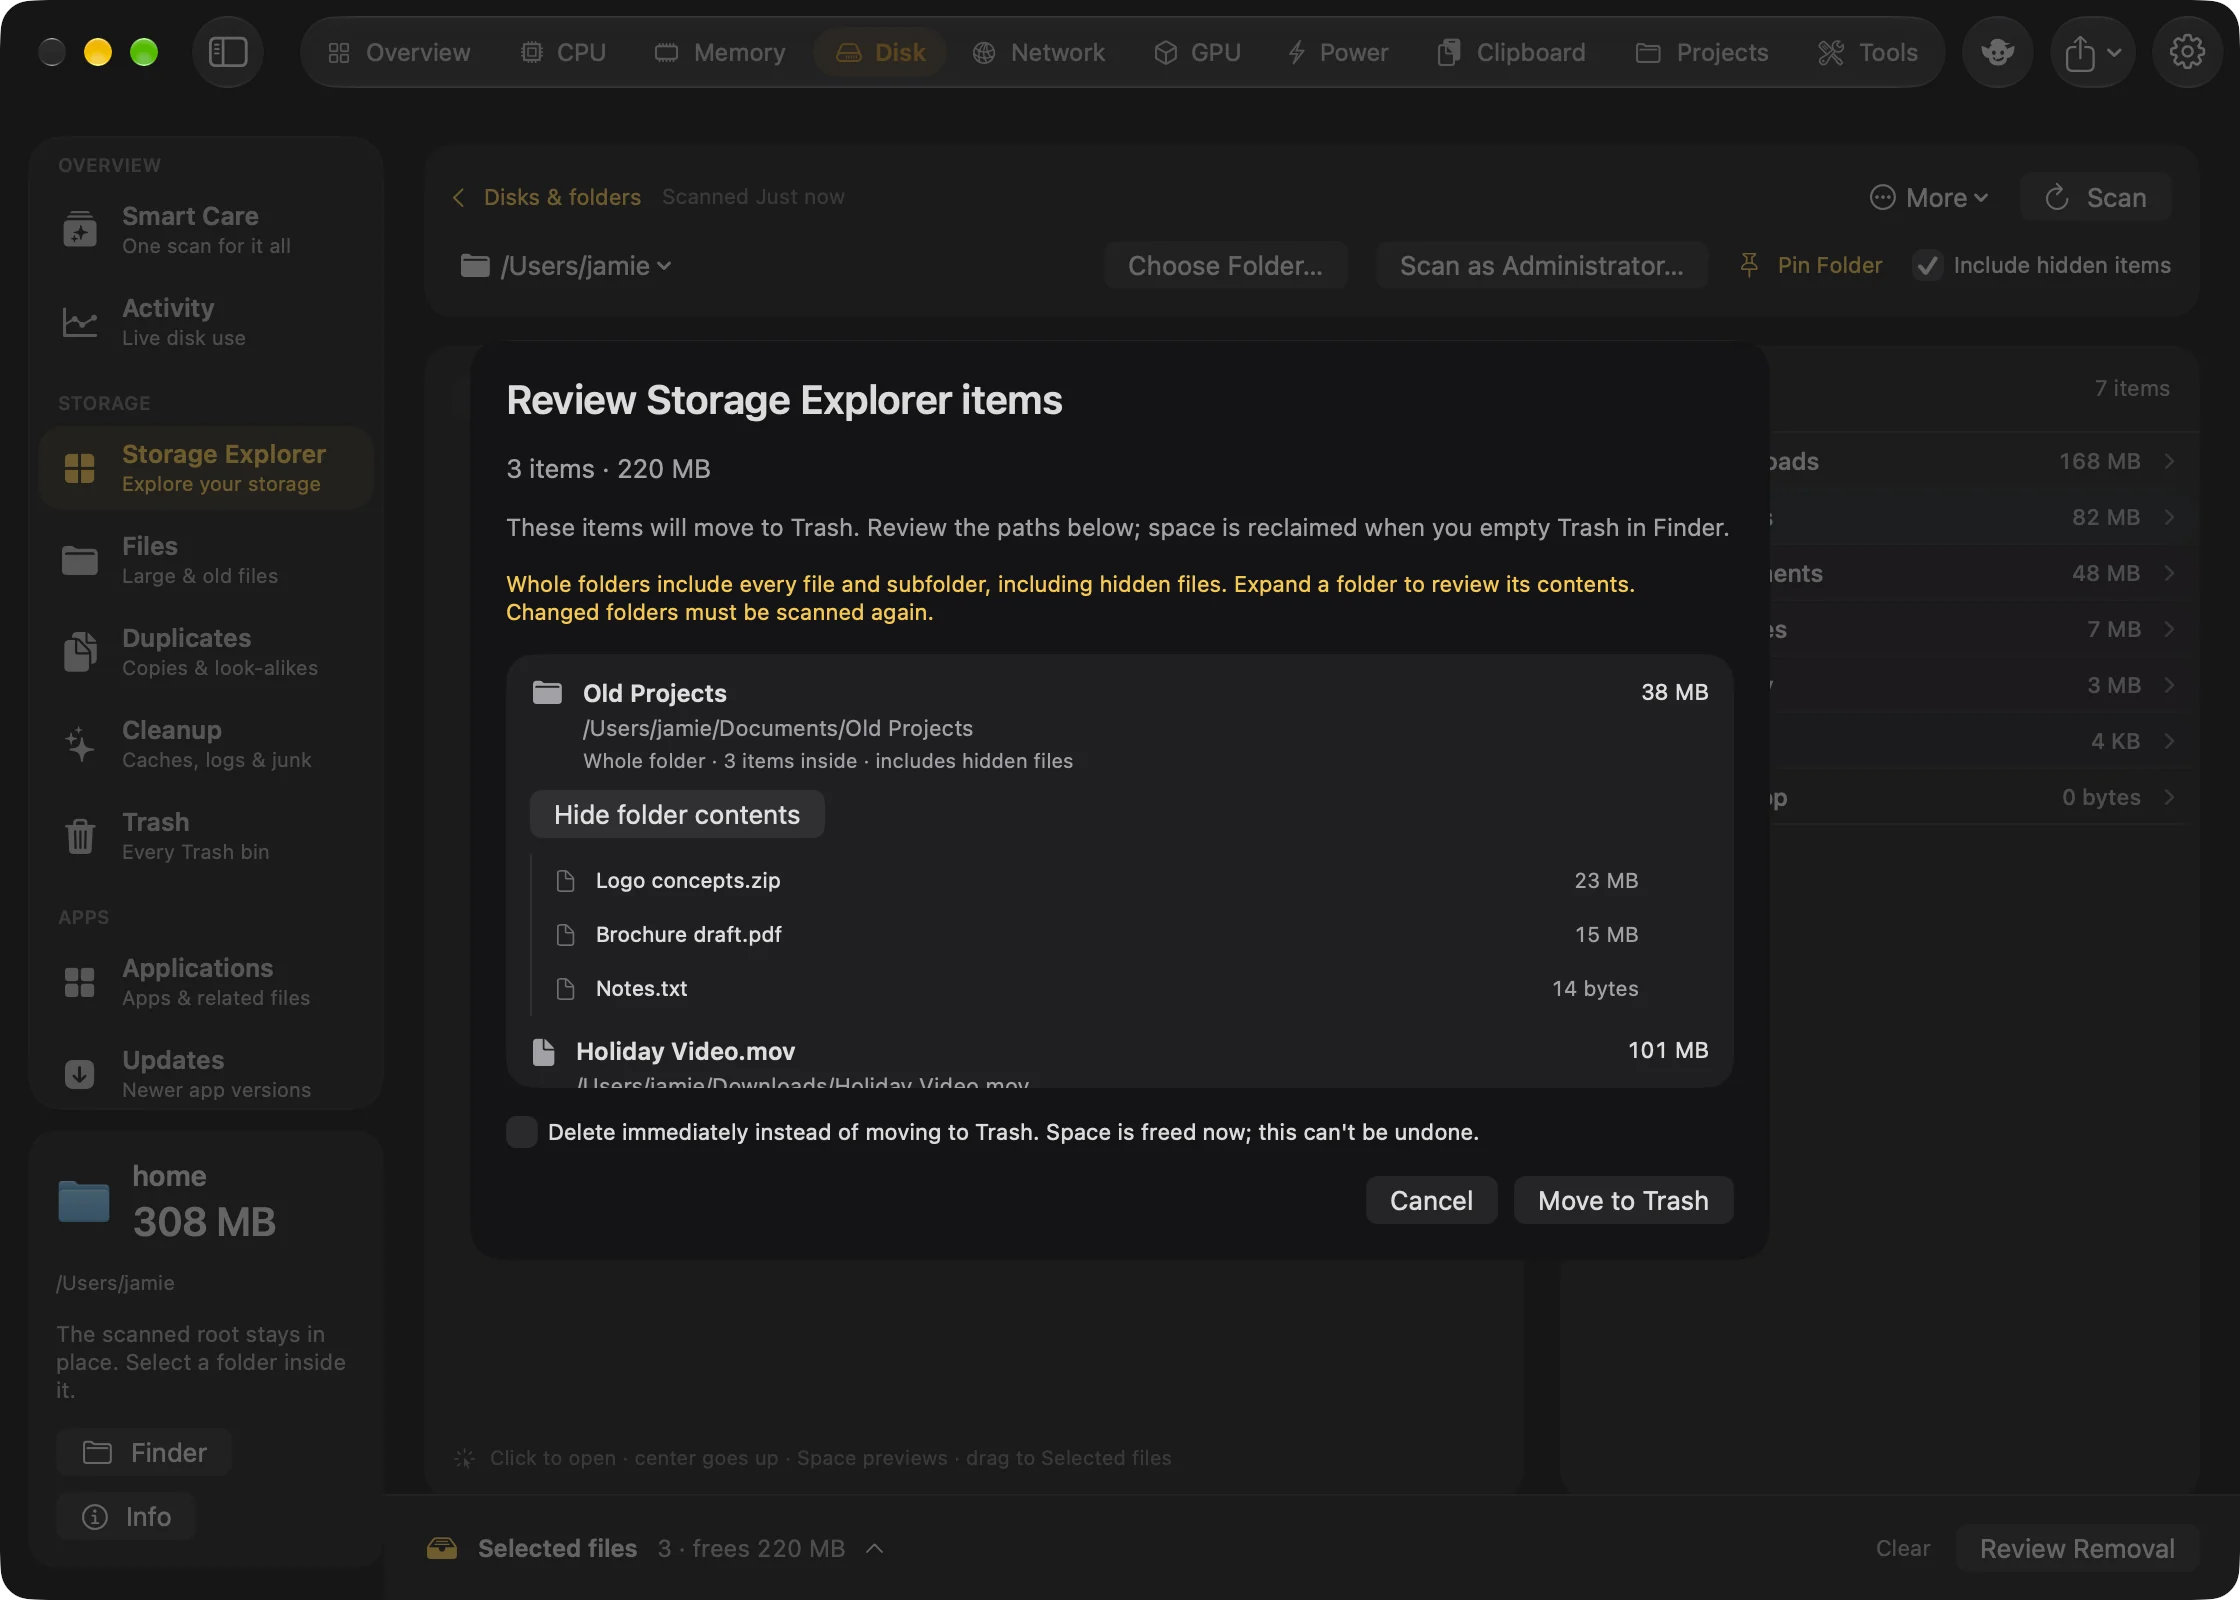
The sheet shows:
- how many items and how much space they use;
- what will happen to them: "These items will move to Trash" for files on your Mac, or that they'll move to the service's trash for a cloud account;
- each item's name, full path and size. A whole folder says how many items are inside and that hidden files are included; click Review folder contents to look through it;
- marks on items that can't go to the Trash:
- System file · needs your password · deleted permanently for items owned by the system;
- Already in the Trash · deleted permanently for items that are in a Trash already, since moving them would go nowhere;
- for app uninstalls, notes about apps you need to close first, background services Goblin stops, Dock icons it removes, and system extensions (see Uninstalling apps).
New in 1.1: Items already in a Trash, including apps you dragged there, can be reviewed and are marked Already in the Trash · deleted permanently.
Move to Trash or delete now#
By default, items move to your Trash. They still use space until the Trash is emptied, and until then you can put them back from Finder.
To delete for good instead:
- In the review sheet, tick Delete immediately instead of moving to Trash. Space is freed now; this can't be undone.
- The button changes to Delete Permanently. Press it.
Warning: Deleting immediately skips the Trash, so there is nothing to put back.
The checkbox is not offered for cloud account reviews. For an app uninstall, this checkbox starts on: only the app and selected related files are deleted after confirmation, and other items in your Trash are kept. Untick it to keep those items recoverable in Trash. Ordinary file and leftover-only reviews start with it off. Even deleted files can still be held on disk by a local Time Machine snapshot until macOS thins it.
Press Cancel or Esc to leave without changing anything.
Synced items: the red warning#
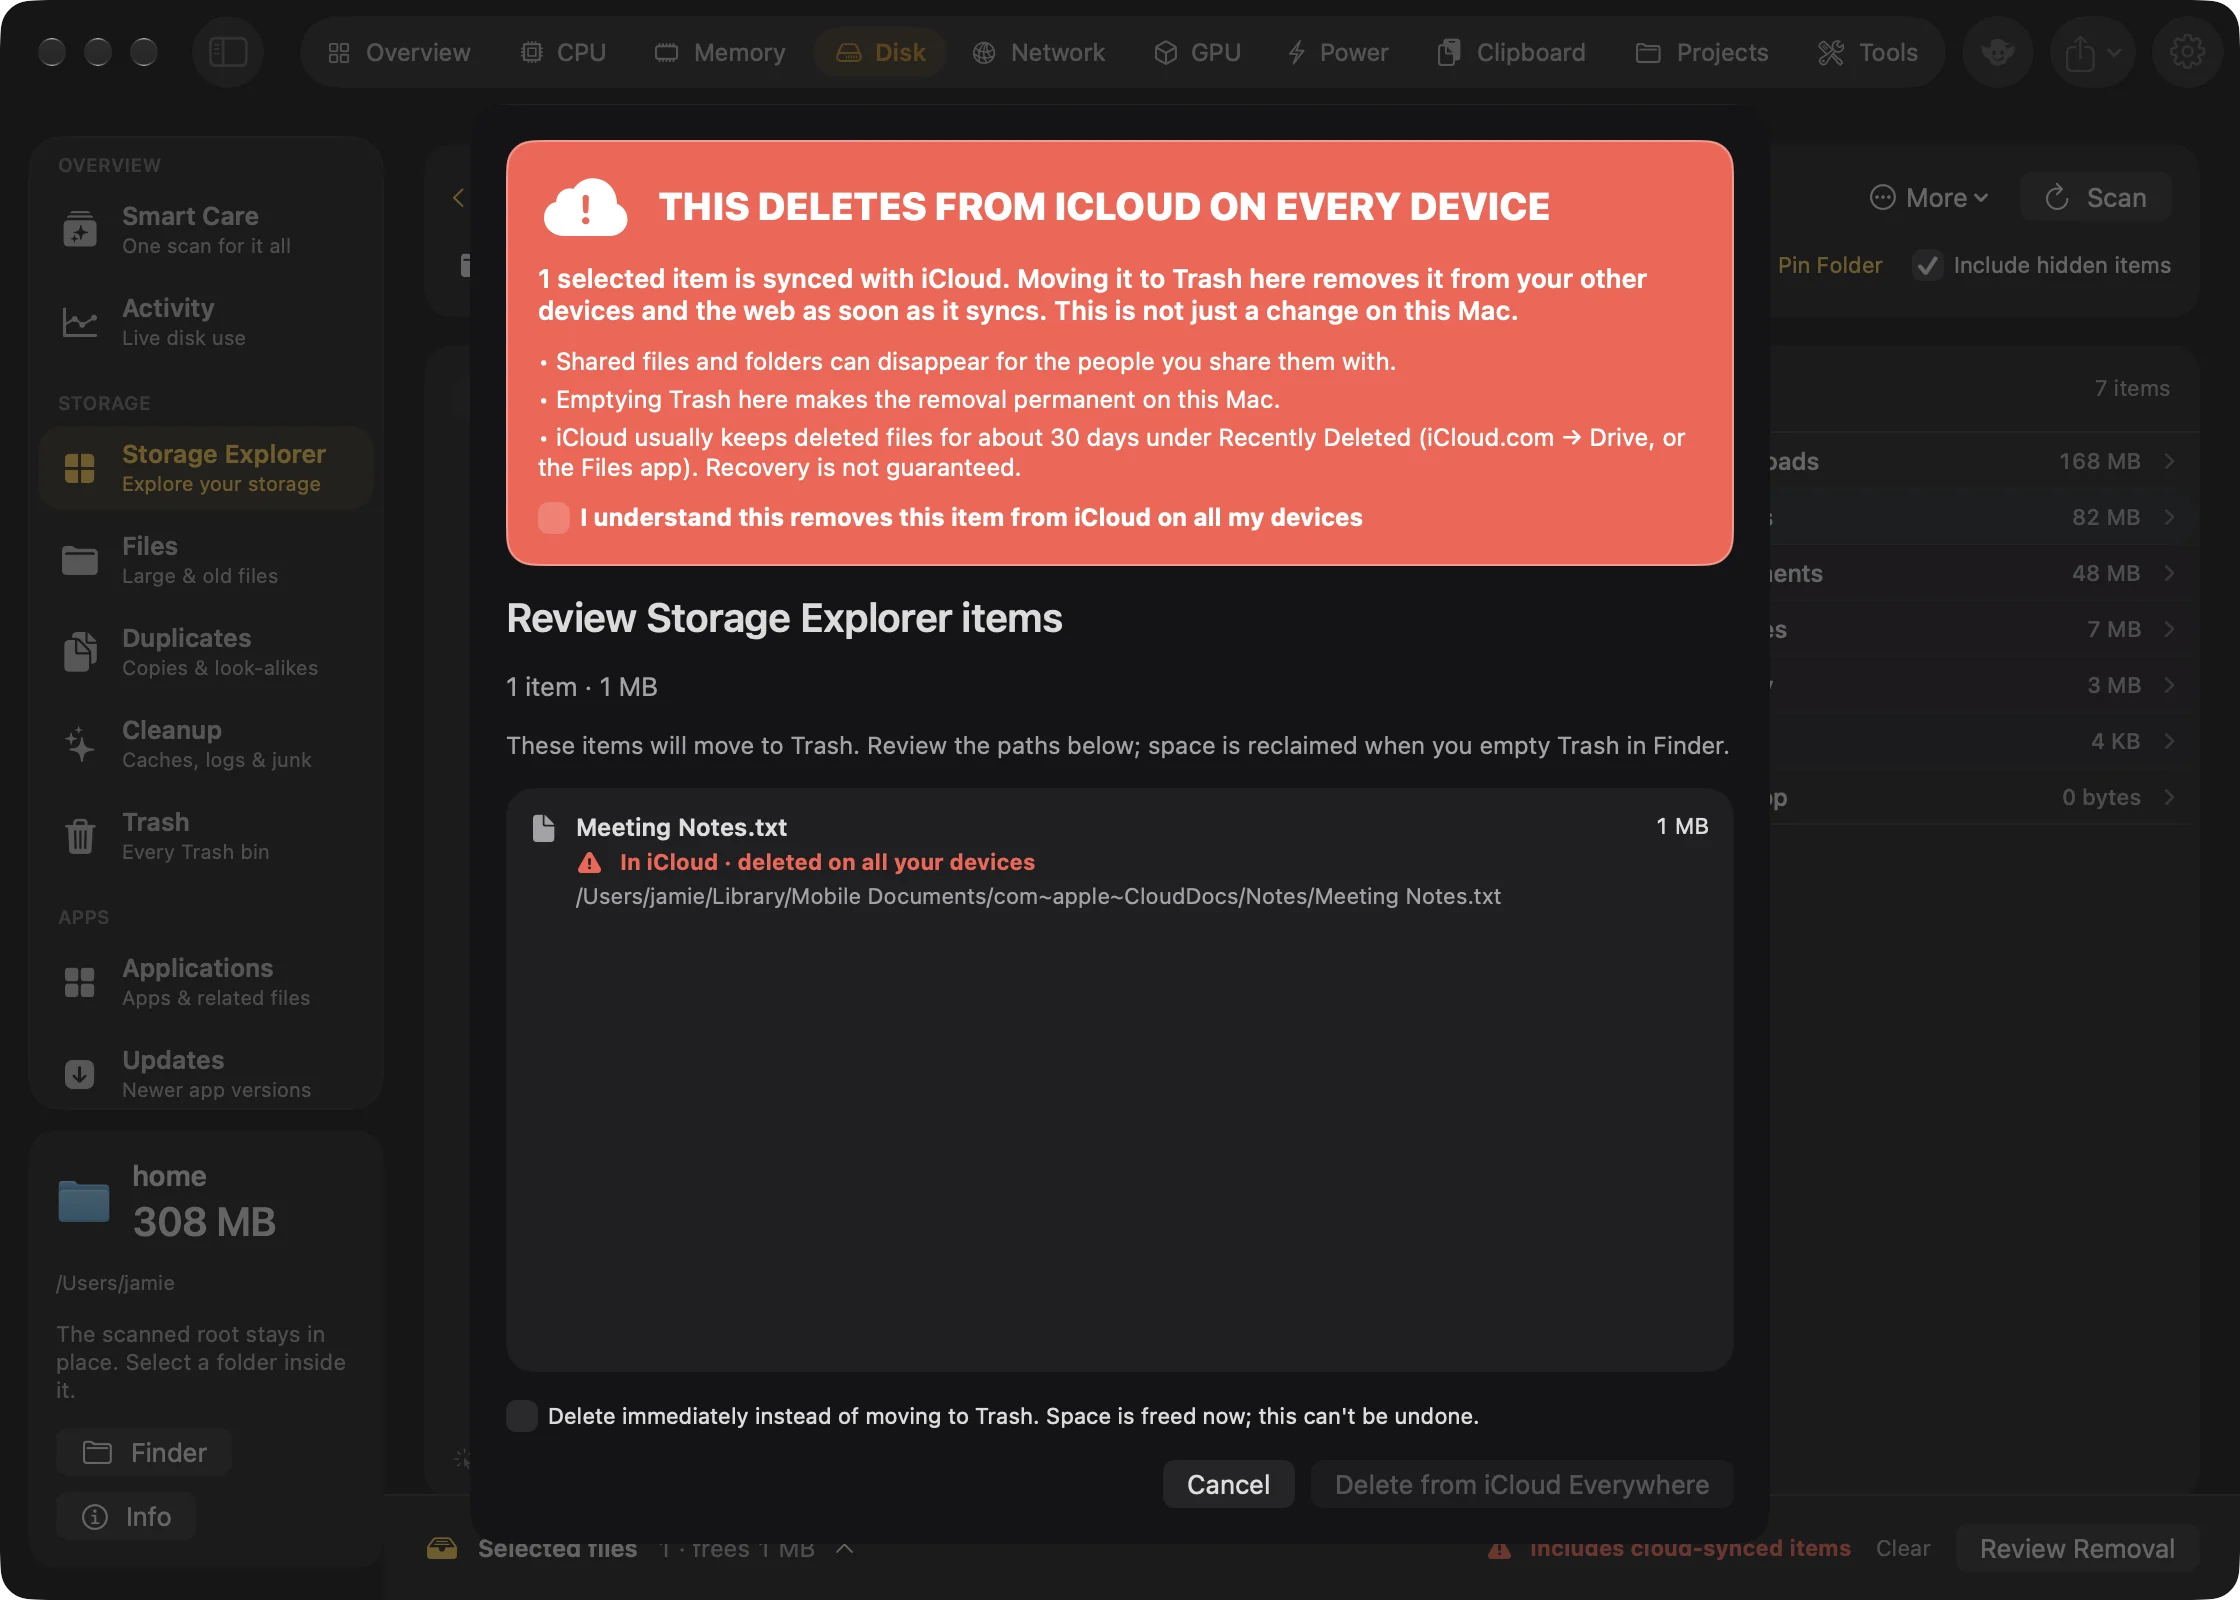
If any item syncs with iCloud Drive, Dropbox, Google Drive, OneDrive, Box, Nextcloud, ownCloud, pCloud or Syncthing, or comes from a cloud account scan, a red warning tops the sheet: THIS DELETES FROM the service ON EVERY DEVICE. Removing a synced file here removes it from your other devices and from the web as soon as it syncs, and shared files can disappear for the people you share them with. iCloud usually keeps deleted files for about 30 days under Recently Deleted; other services keep them only as long as their own trash or version history allows. Recovery isn't guaranteed.
The button stays greyed out until you tick I understand this removes these items from … on all my devices. It then reads Delete from <service> Everywhere (or Delete Everywhere for several services), with Now added when you've chosen to delete immediately. Synced items are also marked in red in the list.
Passwords#
Files you own move without a password. Files owned by the system can't go to the Trash: Goblin stops any background services they belong to, then deletes them for good as an administrator. All of them go in one batch, so you're asked for your password once, and Goblin checks afterwards that they're really gone.
New in 1.1: If you allow Goblin's system helper under System Tasks in Settings › General, administrator steps like this run without asking for your password.
The safety checks#
Goblin checks again when you press the button, because things can change between a scan and a removal. First it checks the whole list; if anything fails, nothing at all is moved. Then it checks each item once more right before moving it.
- Nothing is quit for you. If an app you're uninstalling, or a helper inside it, is still running, the button stays disabled (the sheet re-checks every 1.5 seconds) and offers a Quit button (Quit <app name>, or Quit Them for several). Quitting is a normal quit, so apps with unsaved work ask you first. When you're cleaning an app's files but keeping the app, the sheet instead leaves the open apps' files in place and also offers Quit, Clean & Reopen.
- The item is exactly as scanned. Same file, same dates, and for a folder the same full list of contents. If anything changed, Goblin stops with "changed after scanning. Scan again before removing it." The one exception is the related files of an app being uninstalled, which the app's own services may still be writing to: they only need to be the same kind of item.
- It was read completely and isn't blocked by a rule.
- It's where it should be. It must sit inside the location it was found in, not be that location itself, not be inside
/System, and not be reached through a symbolic link. - Storage Explorer's location rules apply again. Disks, home folders, standard folders like Documents, system and Library folders, and key and credential folders can't be removed, even if they were selected somehow. See What can't be selected.
- Folders contain only ordinary files, folders and links, nothing special.
- App files aren't shared. If another installed copy of an app has the same identifier, its support files stay.
- Ignored items stay. A folder that contains something on your ignore lists isn't removed.
- Protected apps stay. Apple's apps, the copy of Goblin that's running, and helper apps tucked inside other apps can't be uninstalled.
If one item fails, Goblin moves the rest and lists what it left and why. When an app's related file can't be moved, Goblin keeps the app too, so you're not left with half an app. If nothing at all was removed, the sheet stays open and says why.
After a removal#
The section updates in place, without a rescan, and a status card says what happened, for example "12 items moved to Trash. Space is reclaimed when Trash is emptied." Everything removed is added to Removal History and to the Cleaned with Goblin total on Smart Care. The Goblin zaps what went with a short animation (skipped when Reduce Motion is on).
New in 1.1: The zap, finished scans and finished cleanups play a sound. Turn Sound effects off in Settings › General for silence.
When one removal frees 5 GB or more, a banner at the bottom of the Disk tab says how much went, offers Open Trash when the space comes back only once you empty the Trash, and a Share button. It closes after 20 seconds, or when you click its close button.
Turn off the big-removal banner#
- Open Settings›Alerts.
- Turn off Celebrate removing more than 5 GB.
The same card has Notify when a disk scan finishes in the background.
Note: The close button's tooltip says to turn these off in "Settings → Disk". There is no Disk pane; the switch is in Settings › Alerts.
Activity#
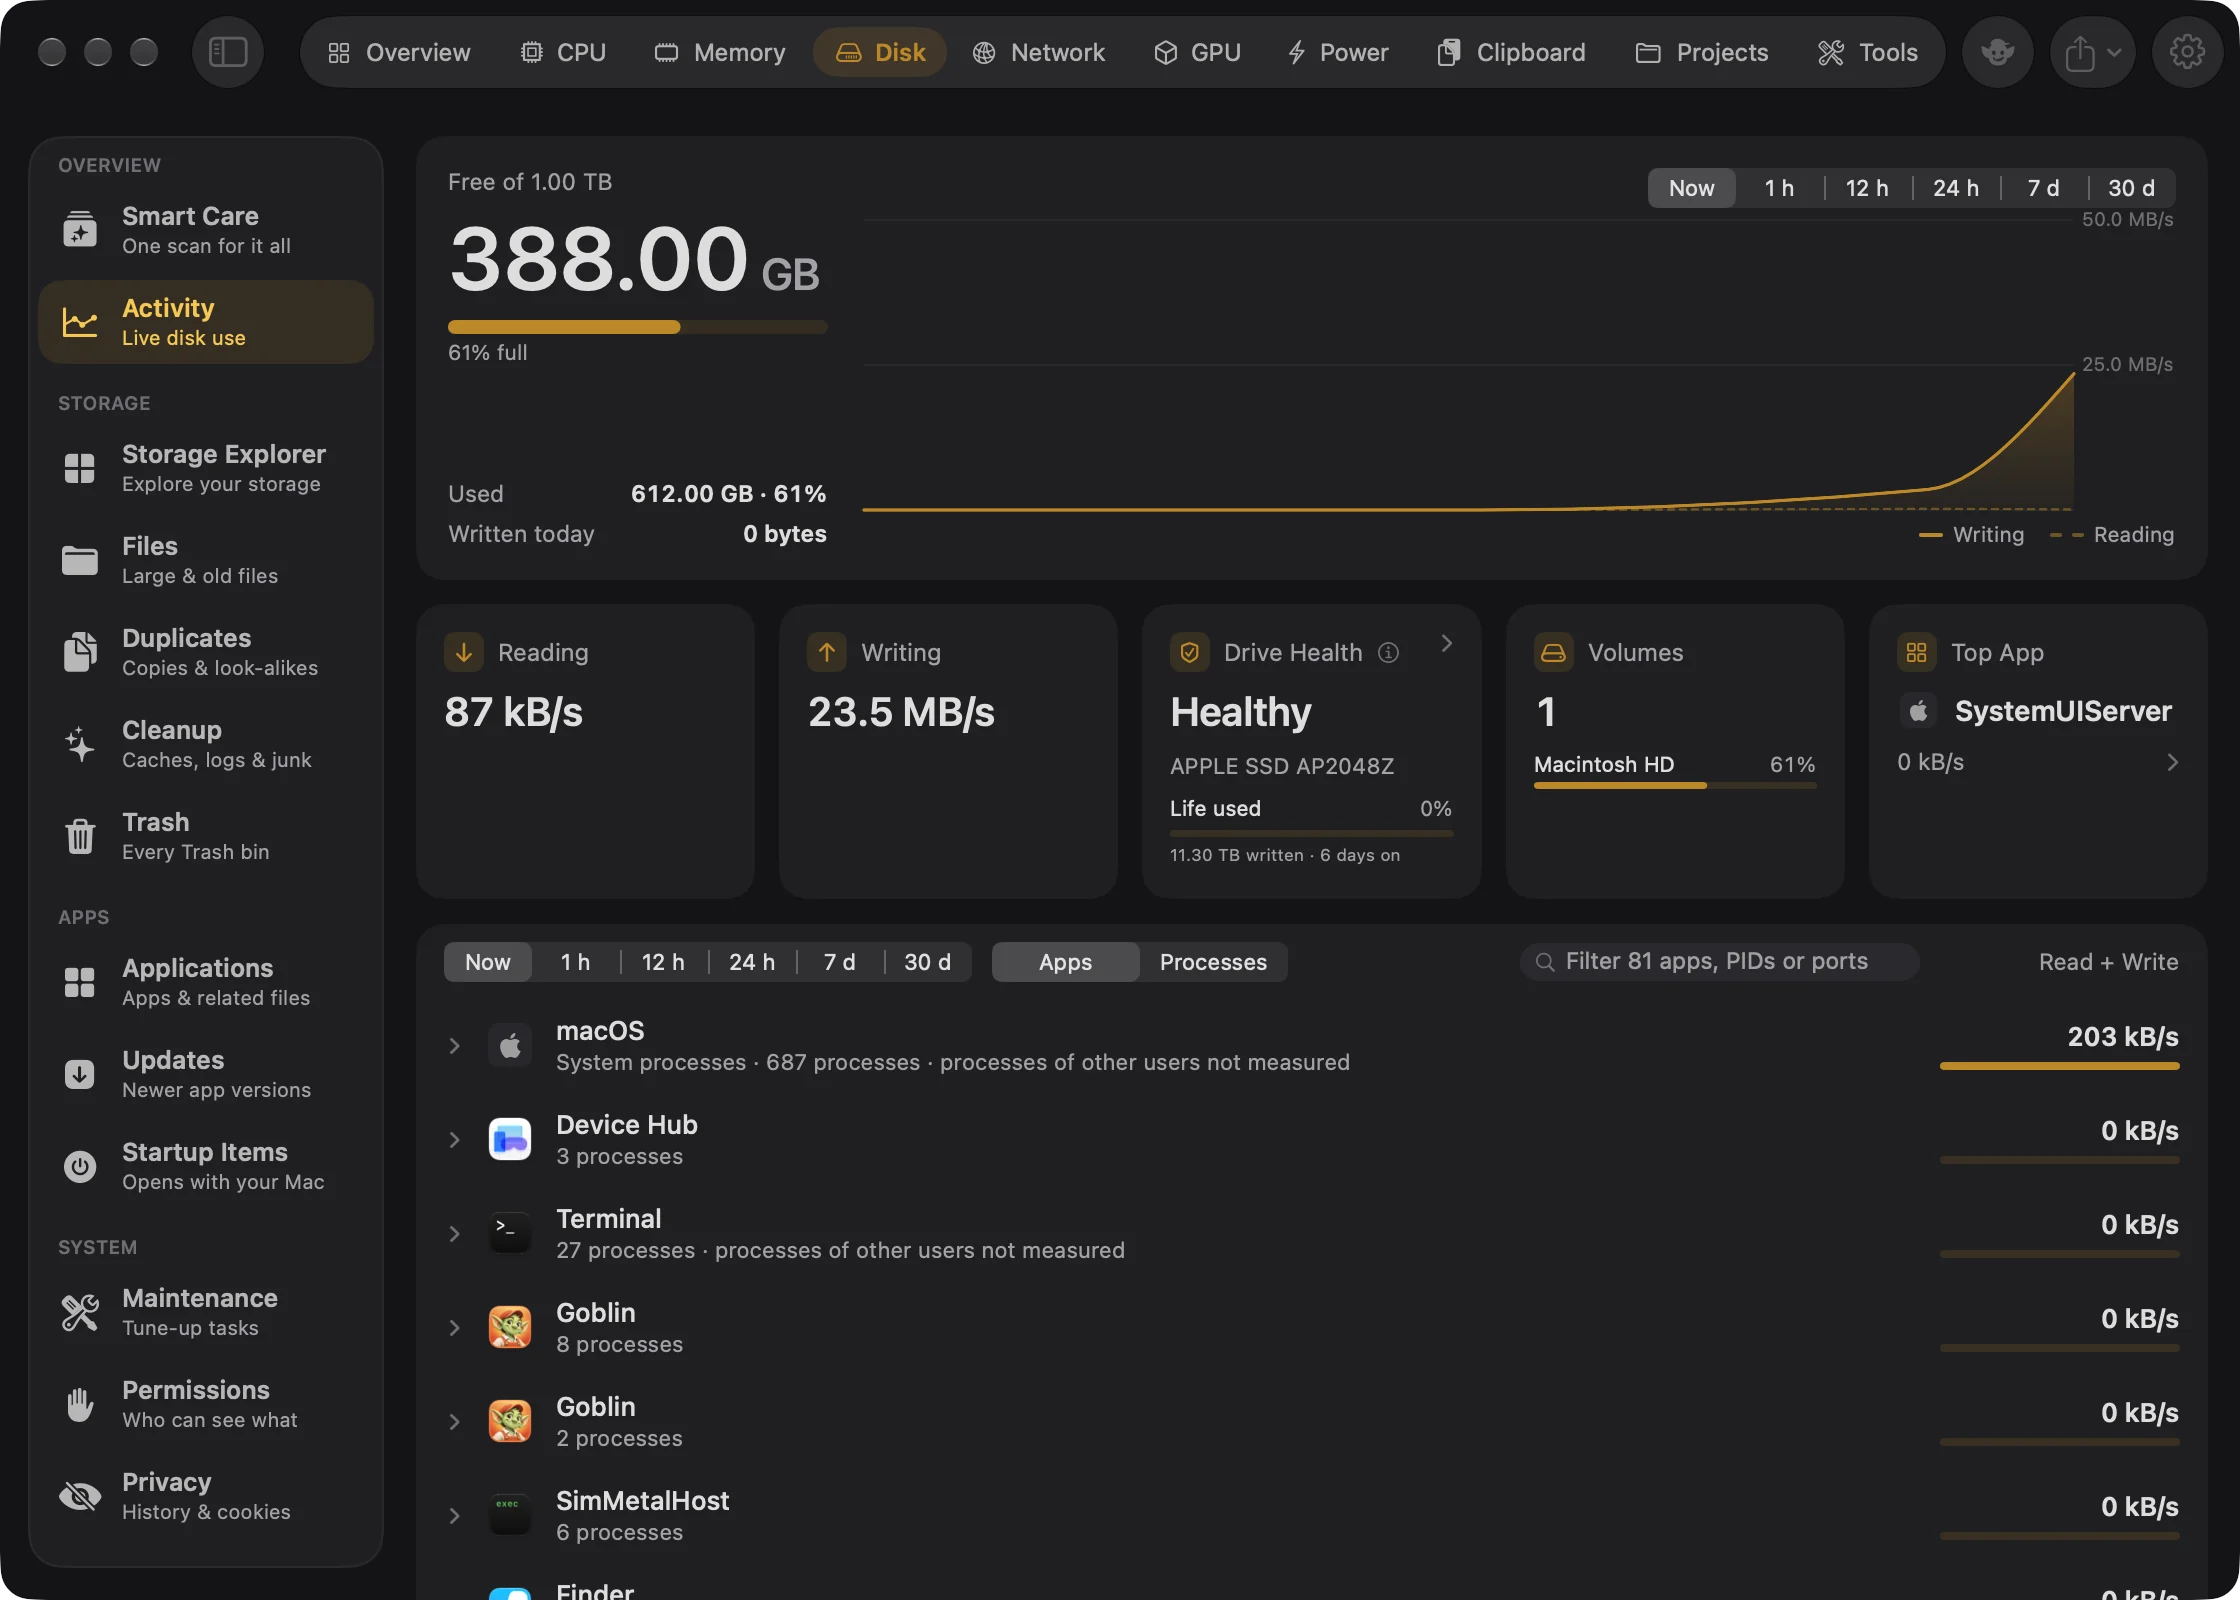
Activity shows how the startup disk is doing right now: free space out of the total with a gauge of how full it is (red above 95%), space used, data written today, a live chart of reading and writing, current read and write rates, your volumes, and the apps reading and writing the most. Where drives report their health, a Drive Health card opens the details; see Drive Health.