 Goblin
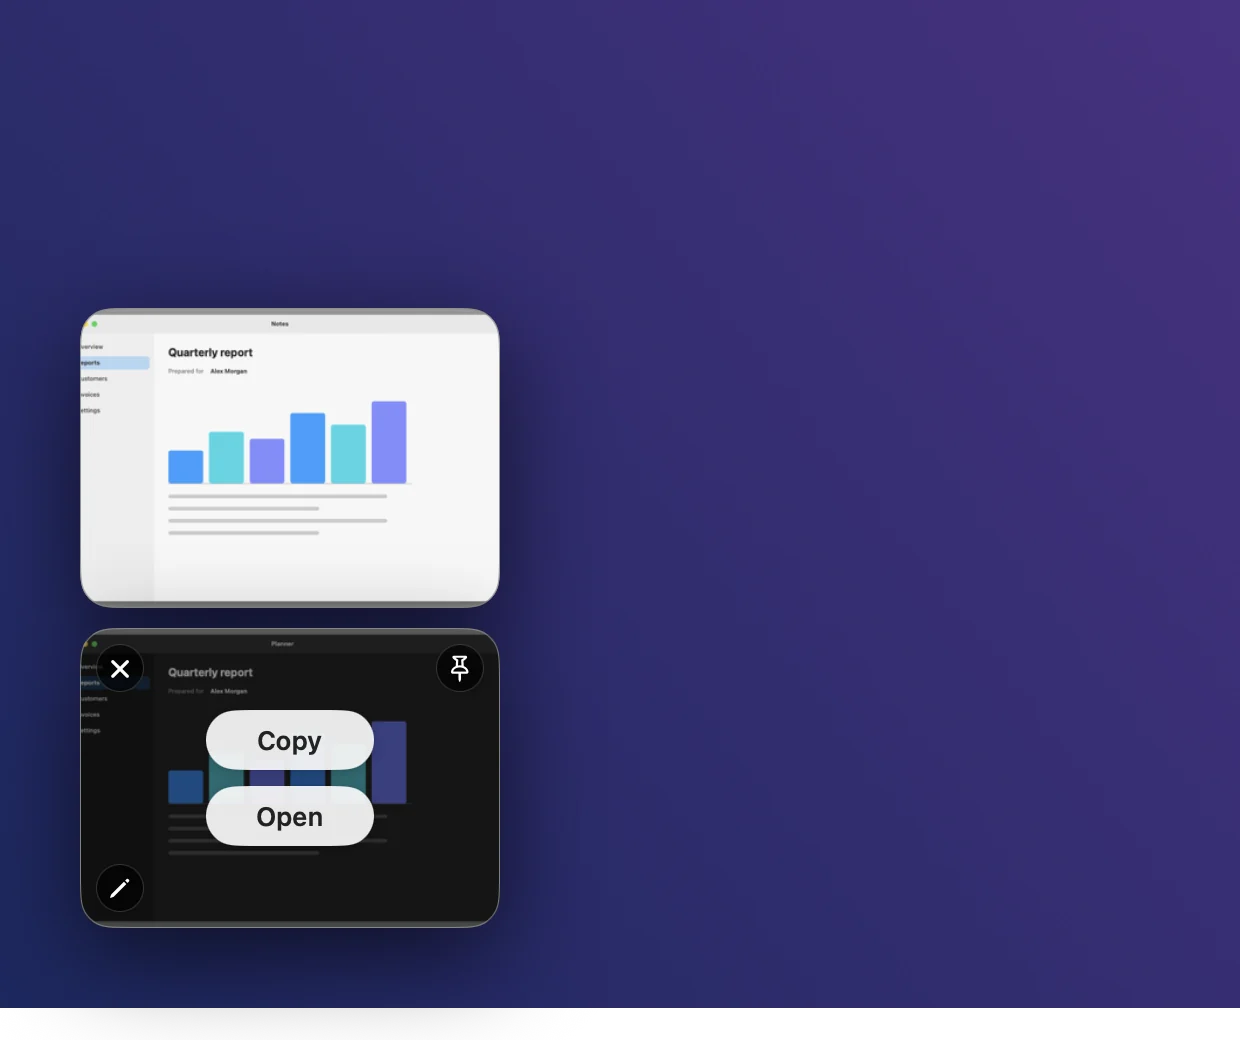
Right after a capture, a small card with the picture slides in at the edge of the screen. Goblin calls this Quick Access. It is the fastest way to do the next thing with a capture: copy it, save it, mark it up, upload it, or throw it away. Cards stack, so a run of captures stays in reach until you deal with each one.
Recordings and GIFs get a card too, with a play preview.
Use a capture card#
- Take a screenshot or recording. A card slides in at the bottom of the screen edge (the right edge unless you changed it).
- Point at the card. Its buttons appear.
- Press the button you want. The table below lists them.
You can also drag the card into another app, such as Mail, Messages or Finder, or double-click it to open it in the editor. Swipe a card sideways with two fingers on a trackpad to close it. Swipe down on the stack to slide every card out of the way for a moment.
Hover a card and press a key to run a button without the mouse: ⌘C copies, ⌘S saves, ⌘E edits, ⌘U uploads, ⌘P pins, ⌘⌫ deletes and ⌘W closes. These keys work only while the pointer is over a card. Press Space while pointing at a card to preview it in Quick Look. You can change the other keys or turn them off at Settings›Capture›Quick Access›More.
These are the buttons and where they sit by default:
| Button | Where | What it does |
|---|---|---|
| Copy | Top centre | Copies the capture to the clipboard. |
| Save / Open | Bottom centre | Saves the file, or opens it when it is already saved. Hold ⌥ while you press to choose the folder (or to skip the question, if you set it to ask). |
| Close | Top left | Closes the card without exporting it, sliding it off the screen edge. History can keep a recoverable copy; files you already saved stay saved. |
| Pin to Screen | Top right | Keeps the screenshot above your other windows as a floating reference. |
| Edit | Bottom left | Opens the picture in the annotation editor. On a recording this reads Edit Video and opens the video editor. |
| Upload to Cloud | Bottom right | Uploads the file and copies a link (Cloud upload). Only on the card once a cloud service is set up. |
| Delete | Right-click menu | Removes the capture and its history entry, even when copied to the clipboard. Saved files go to Trash. |
Pin a screenshot to the screen#
- Point at the card and press the pin button in the top-right corner, or right-click the card and choose Pin to Screen.
- The picture floats above your other windows. Drag it where you want it, which is handy while you write about it or compare two screenshots.
- To change it, use the pinned picture's own buttons: zoom it or Fit it to its window, or Lock and hide on mouse over, which hides it while the pointer is over it. Unlock pinned window undoes that. A recording can't be pinned.
Pin Last Screenshot in the menu bar's right-click menu does the same for the newest screenshot (The Screenshots pinboard).
Delete a capture#
- Right-click the card.
- Choose Delete.
Goblin removes the capture and its history entry, and moves any saved file to the Trash. A small stage appears where the card was, Goblin slashes it with his sword and the picture crumbles to dust. With Reduce Motion on in macOS, nothing is shown.
Change where the cards appear and how long they stay#
- Open Settings›Capture›Quick Access.
- To move the cards, set Screen Edge to Left or Right. To resize them, set Overlay Size to Small, Medium or Large.
- To keep cards from disappearing, turn Auto-close off. To change the time, leave it on and drag Close after (3 to 30 seconds).
- Close the Settings window. New cards use the new settings.
| Setting | What it does | Default |
|---|---|---|
| Screen Edge | Left or Right, at the bottom of the screen. | Right |
| Overlay Size | The size of the card: Small, Medium or Large. | Medium |
| Floating Overlay | Shows the card after a capture. | On |
| Move to Active Screen | The cards follow your pointer to whichever display it is on. | On |
| Auto-close and Close after | Closes a card after 3 to 30 seconds. Off keeps it open until you close it. | On, 30 seconds |
| Close After Dragging | Closes the card once you drop it into another app. Hold ⌥ while dragging to do the opposite. | On |
| Close After Uploading | Closes the card once its upload finishes. Hold ⌥ to do the opposite. | Off |
| Save button behavior | Save to 'Export location' or Ask for destination. Hold ⌥ to use the other one for a single save. | Save to 'Export location' |
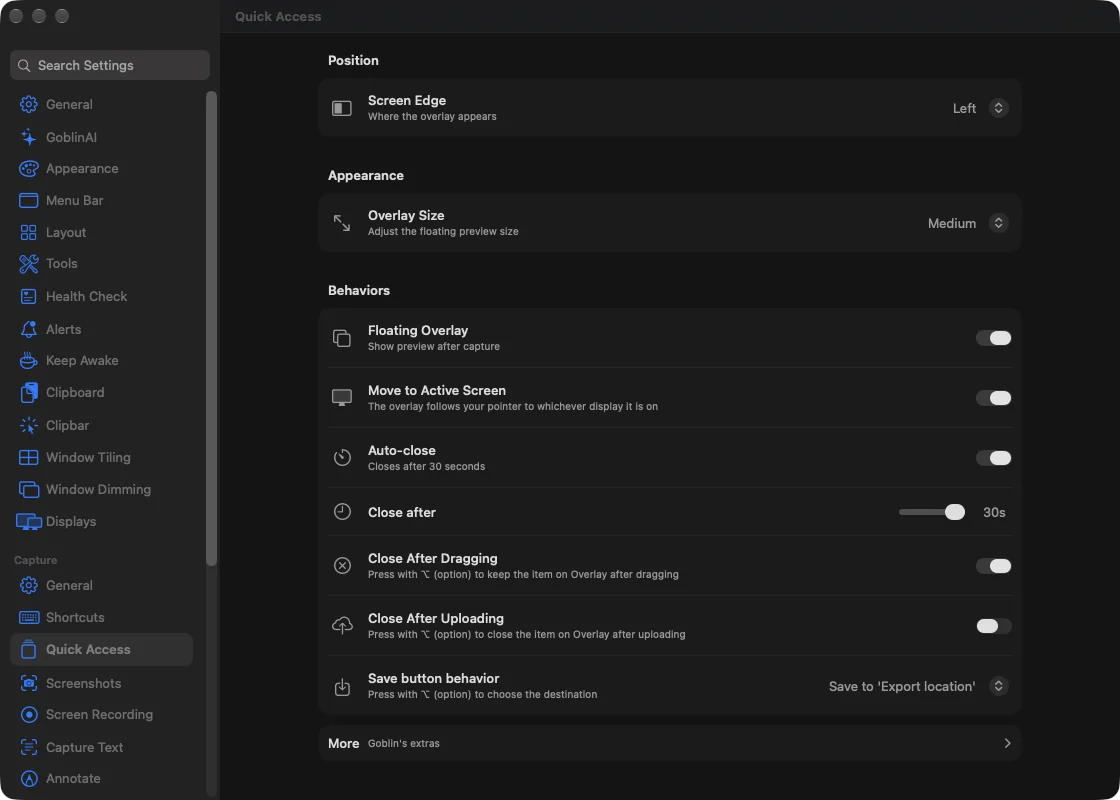
New: Coming in the next update. Cards now close by themselves after 30 seconds. Before, auto-close was off and the delay was 10 seconds. If you had already changed either setting, Goblin keeps your choice.
The page has a collapsed More row at the bottom, which shows these extras:
| Setting | What it does | Default |
|---|---|---|
| Quick Actions | Which action sits where on the card, and the order in the right-click menu. See below. | As in the table above |
| Auto-hide Opened Items | Hides a card while its editor window is open. | On |
| Animation Style | Slide or Scale & Fade. | Slide |
| Sound Effects | A sound when a card appears and when an action finishes. | On |
| Pause on Hover | Stops the countdown while the pointer is over the card. | On |
| Drag & Drop | Lets you drag captures to other apps. | On |
| Double-click to Annotate | Double-click a card to open it in the editor. | On |
| Two-finger Swipe | Swipe a card sideways to close it. Swipe Sensitivity and Trackpad Swipe Direction (Natural (follow finger) or Inverted (follow scroll)) tune it. | On |
| Swipe Actions | What a swipe left and a swipe right runs. Drag an action onto the circular target. Default is Dismiss. | Dismiss |
| Card action shortcuts | The keys listed above, one switch for all and one per action. | On |
Change which buttons a card has#
- Open Settings›Capture›Quick Access and click More at the bottom.
- In Quick Actions, drag an action from the list onto a spot on the preview card (Center top, Center bottom, or one of the four corners). An action not on the card shows Not on card.
- To change the right-click menu's order, drag the rows of the list.
- To undo your changes, press Reset Actions.
Turn the card off#
If you would rather not see a card at all, turn Floating Overlay off at Settings›Capture›Quick Access, or untick Show Quick Access Overlay in the After Capture grid on Settings›Capture›General. Neither one enables saving. Screenshots stay temporary unless you click Save or tick Save in After Capture; history can still retain them.
Look and sounds#
- Capture sounds (Settings›Capture›General›Sounds) plays a shutter when a screenshot is taken, a sound when a recording starts and stops, and the Quick Access sounds. It also follows Sound effects in General settings.
- On macOS 26, Liquid Glass controls (Settings›Capture›General›More›Look and Feel) sets whether buttons and bars in the editors use Apple's Liquid Glass. Turn it off for flat controls.
Capture sounds are on by default.