 Goblin
These tools are for the moments when one copy and one paste isn't enough: moving several things from one place to another in order, pasting a card without leaving the keyboard, joining clips into one, keeping a clip in view while you work, and capturing a color or a screenshot straight into your history. Everything here needs the Clipboard turned on in Settings›Clipboard (see Clipboard basics).
Copy Queue#
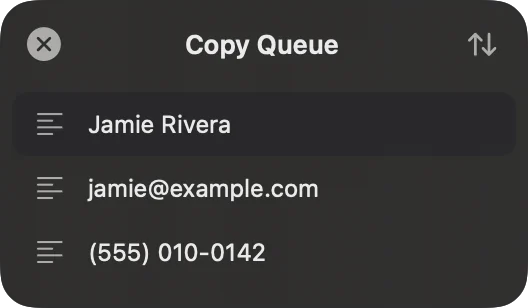
The Copy Queue collects what you copy, in order, and hands it back one paste at a time. Copy a name, an email address and a phone number from one window, then paste them into three fields of a form with ⌘V ⌘V ⌘V.
Start a Copy Queue#
- Press ⇧⌘C (Activate Copy Queue). A small Copy Queue panel appears, reading "Empty".
- Copy what you need, one thing at a time, in the order you want to paste it. Each copy joins the list.
If something is selected in the app in front when you press ⇧⌘C, Goblin copies it for you a moment later, so it becomes the first item (this needs Accessibility). You can also start the queue from the menu bar panel: click the Start Copy Queue icon in the footer of the Clipboard tab (it's tinted while the queue is on). Starting there doesn't copy anything.
The queue always starts empty.
Paste from the queue#
- Click where the first item should go, in any app.
- Press ⌘V. The top item pastes.
- Click the next field and press ⌘V again. Each paste takes the item off the list and the next one is ready.
Or press ⌥⇧⌘V (Paste Next from Queue) to paste the next item without pressing ⌘V, or click an item in the panel to paste it now.
End the Copy Queue#
Click ⓧ in the panel's top left (its tooltip reads End Copy Queue), press ⇧⌘C again, or click the footer icon in the menu bar panel. Turning the Clipboard off or quitting Goblin ends it too. Ending the queue only clears the list: the clips stay in your history.
How it works#
While the queue is open, every copy that Goblin saves to your history joins the end of the list, once. Copies Goblin doesn't save (while the clipboard is paused, from apps you've set to Don't save, and so on) don't join, and nor do clips in a locked pinboard.
The item that will paste next always sits on the clipboard. Each time you paste it with ⌘V, in any app, Goblin takes it off the list a moment later and puts the following item on the clipboard, ready for your next ⌘V.
Note: Because the next item always sits on the clipboard, copying a second item puts the first one straight back on the clipboard. While the queue is open, the clipboard holds whatever is first in the queue, not your latest copy.
If you copy something in the instant between pressing ⌘V and the queue moving on, the queue stays where it is, so nothing is skipped.
The panel#
The Copy Queue panel is a small window that floats over every Space and full-screen app and never takes the focus, so ⌘V keeps going to your app. It opens where you last dragged it, or near the top left of the screen.
- It reads "Empty" until you copy something. Then each item is a row, with the next one to paste at the top, highlighted. Secret clips show as dots.
- The ↑↓ button (Reverse order) flips the order. The queue pastes oldest first by default; flipped, it pastes newest first. The flip lasts until Goblin quits.
- Click a row to paste that item now. It leaves the queue. A template asks for its blanks first (see Snippets).
- Right-click a row and choose Remove, or swipe left on it with two fingers, to take it out without pasting.
Pasting from the strip, the menu bar panel or Goblin's window while the queue is open also takes those clips out of the queue, and the next item goes back on the clipboard half a second later.
Without Accessibility#
Goblin notices your ⌘V through the same keyboard tap as text expansion, which needs Accessibility (or Input Monitoring). For the Copy Queue it only looks for ⌘V. Without either permission, the queue still collects copies and keeps the next one on the clipboard, but it can't tell when you've pasted. The panel then shows "Allow Accessibility so ⌘V moves down the list"; click it to set that up (see Let Goblin paste for you). Until you do, click a row to use each item.
Quick Paste#
Paste with Quick Paste#
- Open the strip, or Goblin's menu bar panel on its Clipboard tab.
- Hold ⌘. Number badges 1 to 9 show on the first nine cards.
- Press a number key, for example ⌘3 for the third card.
Add the Plain Text key to paste without formatting: ⇧⌘3 pastes the third card as plain text.
Quick Paste counts the cards in the order they're shown, after any search, so you can search, then paste the second match with ⌘2 without touching the mouse. It works even while you're typing in the search field.
- In the strip, number badges appear on the first nine cards while you hold the Quick Paste key, and only that key.
- In the menu bar panel's Clipboard tab, the first nine rows always show ⌘1 to ⌘9 (with your chosen key).
- In Goblin's window, ⌘1 to ⌘9 switch tabs instead, so Quick Paste isn't available there.
- Use the number keys along the top of the keyboard; the keypad doesn't count.
- A template opens its fill-in panel. Clips in a locked pinboard are skipped.
| Setting | What it does | Default |
|---|---|---|
| Quick Paste | The key you hold with 1 to 9: ⌘ Command, ⌃ Control or ⌥ Option. | ⌘ Command |
| Plain Text mode | The key that pastes without formatting, with Quick Paste or with Return: ⌘ Command, ⇧ Shift, ⌃ Control or ⌥ Option. | ⇧ Shift |
Both are in the Shortcuts section of Settings›Clipboard. If you pick the same key for both, Goblin can't tell them apart and says so in red.
Combine into One Clip#
- Select two or more cards in the strip or on the Clipboard page: ⌘-click, ⇧-click or ⌘A.
- Press ⌘J, or right-click and choose Combine into One Clip (on the Clipboard page, click Combine in the bar under the cards).
- For text, choose how to join the pieces in the small Join with menu.
The new clip goes to the top of your history and is selected. The originals stay as they were.
- Text, links and colors are joined into one plain text clip. The Join with menu offers New Line, Blank Line, Space, Comma or Tab. The one you used last is ticked, and what you pick becomes the default. Line breaks at the end of each piece are dropped before joining.
- Files become one clip holding all the files, without asking. The same file twice is kept once.
- Images don't make a clip: the menu item reads Combine Images… and opens Goblin's image combiner, where you line the pictures up side by side or one above another and save the result. See Annotating screenshots.
- A mix, such as text and images, can't be combined; Goblin beeps.
The pieces go in the order the cards are shown in the list, not the order you clicked them. In history that's newest first, so the clip you copied last comes first. Secret clips, clips in a locked pinboard and clips in the Trash can't be combined.
The default for Join with is also the Combine text with setting in Settings›Clipboard, in the "Transform, Colors and Combine" section. It starts as New Line.
Floating clips#
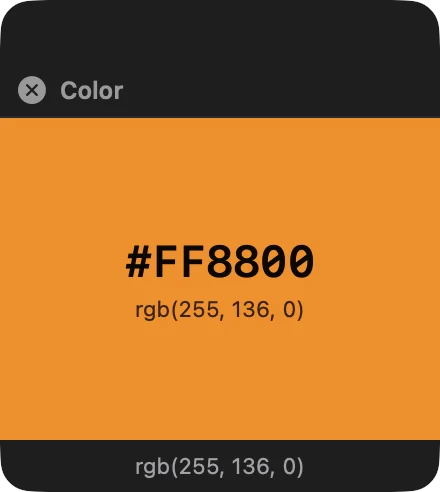
A floating clip is a small window that stays above all your other windows, so you can keep a reference in view: a color while you design, an image while you draw, a snippet of code while you type it somewhere else.
Float a clip#
- Select the clip.
- Press ⌘D, or right-click and choose Open in Floating Window. (On the Clipboard page, click Float in the inspector.)
The Float Last Clip shortcut floats the newest clip in your history; it's off until you set it. Any clip can float except secret clips, clips in a locked pinboard and clips in the Trash.
- Text shows as text you can select. Code and JSON use a monospaced font, with JSON neatly indented. Images sit on a checkerboard, scaled to fit. Colors show a swatch and their value; click the value to step through the color formats. Anything else gets the standard preview.
- Resize the window from its edges and move it by dragging its background. It appears on every Space and over full-screen apps, and doesn't take the focus from the app you're using.
- ⌥-click it to make it click-through: it fades, gets a dashed border, and clicks pass to the window underneath. ⌥-click over it again to get it back.
- Close it with its ⓧ, or with Esc or ⌘W while it has the focus.
You can float several clips at once; each new one opens a little below and to the right of the last. Floating a clip that's already floating brings its window to the front. A floating clip closes by itself if you delete the clip, move it to the Trash or into a locked pinboard. Floating clips don't come back after Goblin restarts.
Capture shortcuts#
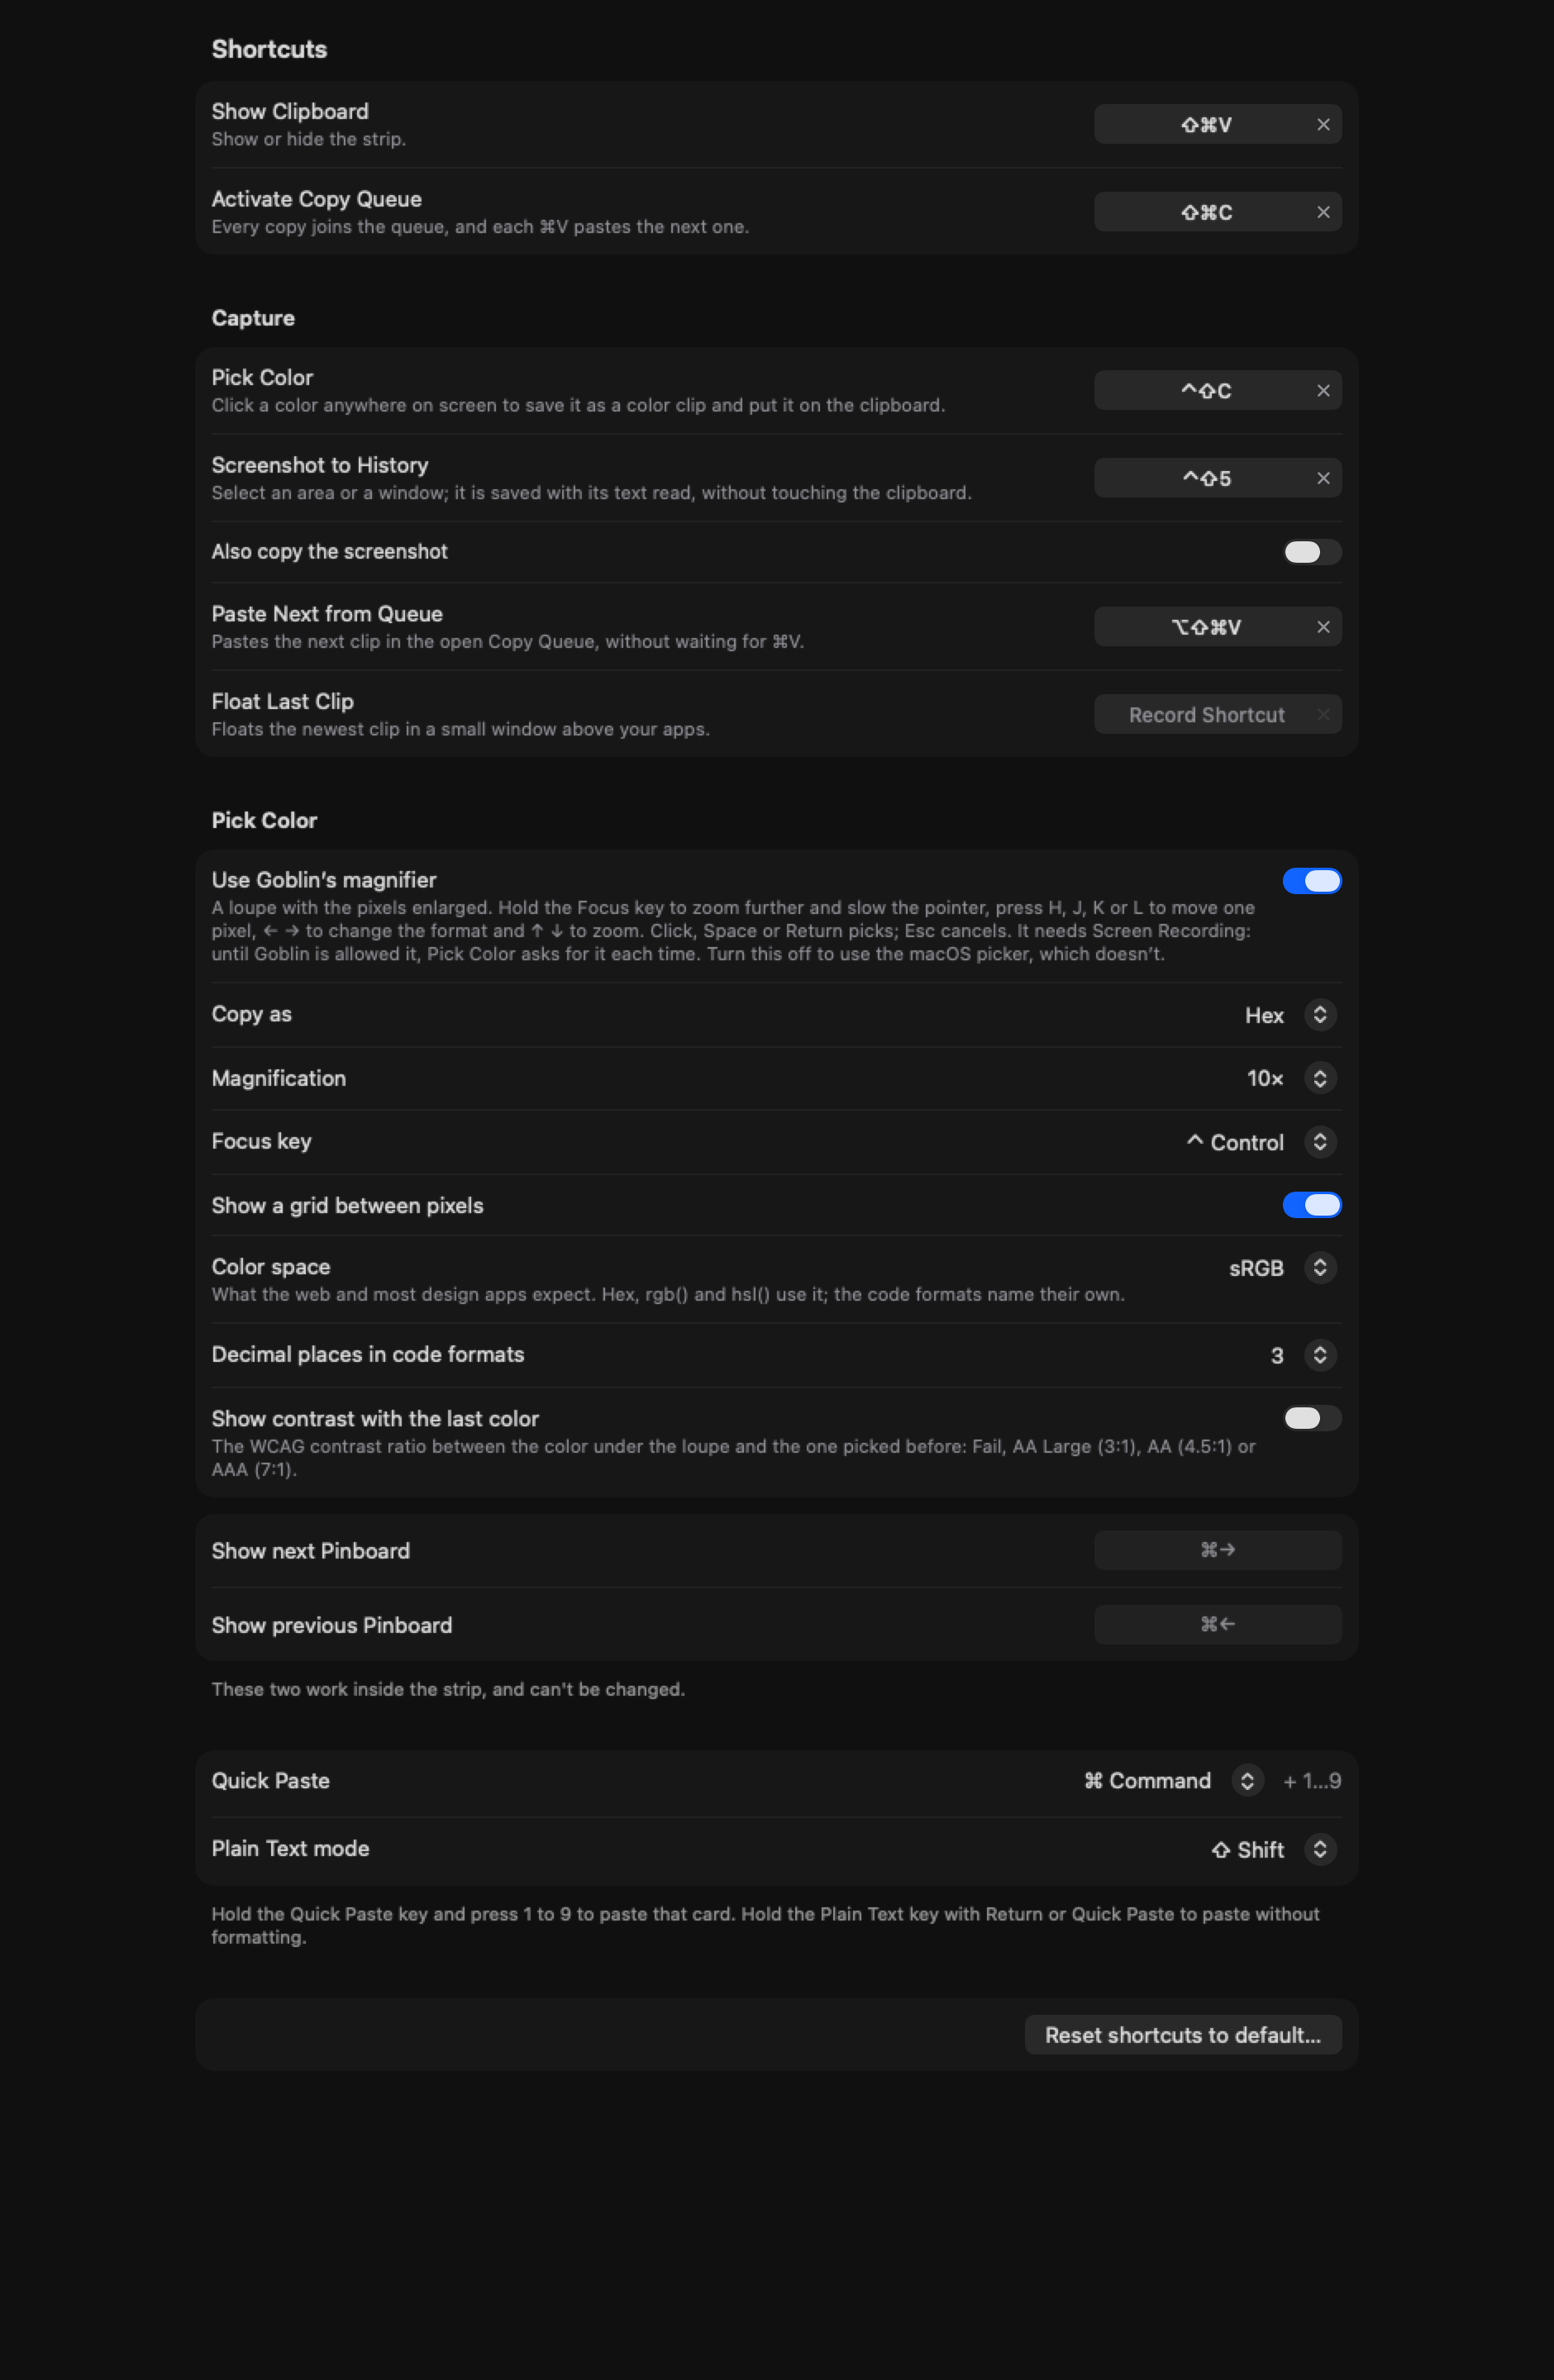
Four global shortcuts sit in the Capture section of Settings›Clipboard, below the Shortcuts section. They work from any app while the Clipboard is on.
| Shortcut | Default | What it does |
|---|---|---|
| Pick Color | ⌃⇧C | Opens Goblin's color magnifier. Click anywhere on screen to save that color as a color clip; Esc cancels. |
| Screenshot to History | ⌃⇧5 | Drag to select an area, or press Space and click a window. The screenshot is saved as an image clip, and its text is read on your Mac like any other image clip's. No file is left behind and the clipboard isn't touched. Esc cancels. |
| Paste Next from Queue | ⌥⇧⌘V | Pastes the next item in the open Copy Queue into the app in front. |
| Float Last Clip | Off | Floats the newest clip in your history in a floating window. |
A picked color is saved as a color clip and put on the clipboard, ready to paste. Screenshot to History has a switch for that:
| Setting | What it does | Default |
|---|---|---|
| Also copy the screenshot | Puts the screenshot on the clipboard as well as saving it. | Off |
New: Coming in the next update. Capture shortcuts honor Pause and presentation mode.
Pick Color and Screenshot to History honor Pause and presentation mode. Pick Color still copies the chosen color, but does not save it to clipboard or tool history. Screenshot to History stops and explains why.
Take a screenshot into the history#
- Press ⌃⇧5.
- Drag to select an area, or press Space and click a window. Esc cancels.
- Open the strip with ⇧⌘V. The screenshot is the newest card.
Change a shortcut#
- Open Settings›Clipboard and find the shortcut in the Shortcuts or Capture section.
- Click it so it reads "Type shortcut…".
- Press the new combination. It has to include ⌘, ⌃ or ⌥.
Esc cancels, ⌫ clears it, and the × button turns the shortcut off, so it reads Record Shortcut. "In use by another app" means macOS wouldn't let Goblin have that combination. If two of Goblin's clipboard actions share a combination, their notes turn red, because only one of them can work.
Reset shortcuts to default… at the end of the Shortcuts section puts back Show Clipboard (⇧⌘V), Activate Copy Queue (⇧⌘C), Quick Paste and Plain Text mode, and these four capture shortcuts, which turns Float Last Clip off again.
Picking a color or taking a screenshot plays the clipboard's Paste sound. The sounds are chosen in Clipboard settings.
The color magnifier#
Pick a color from the screen#
- Press ⌃⇧C. A round loupe follows the pointer, with the pixels under it enlarged and the middle one boxed. Under the loupe is the color, written the way it will be saved.
- Move to the pixel you want. Use H J K L to nudge it one pixel at a time.
- Click, or press Space or Return. The color is saved as a color clip and put on the clipboard.
Esc or a right-click closes the loupe without picking.
You can also open it with Pick Color in Goblin's right-click menu (next to Measure Screen), from the Pick Color tool in the Tools tab (Tools), or with a shortcut of your own in Settings›Menu Bar. The same shortcut is listed under Tools in Settings›Capture›Shortcuts. With the Clipboard off, the shortcut works while the capture shortcuts are on, and the color is copied instead of being saved as a clip.
| Key | What it does |
|---|---|
| Click, Space or Return | Picks the pixel in the middle. |
| Esc or right-click | Closes the loupe without picking. |
| H J K L | Moves one pixel left, down, up or right. |
| ← → | Changes the format: hex, rgb(), hsl(), SwiftUI, NSColor, UIColor, CGColor or Display P3. The loupe remembers it. |
| ↑ ↓ or scrolling | Zooms in or out. |
| Hold ⌃ | Focus Mode: zooms in twice as far and moves the loupe at a quarter of the pointer's speed, for the pixel that's hard to hit. |
The Pick Color section, under the capture shortcuts and again in Settings›Capture›General, sets the loupe up:
| Setting | What it does | Default |
|---|---|---|
| Use Goblin's magnifier | Off, Pick Color opens the macOS color sampler instead. | On |
| Copy as | The format a picked color is written in. | Hex |
| Magnification | How big each pixel is in the loupe. | 10× |
| Focus key | The key to hold for Focus Mode. | ⌃ Control |
| Show a grid between pixels | Thin lines between the enlarged pixels. | On |
| Color space | The space hex, rgb() and hsl() are written in: sRGB, Display P3, or the display's own values. The code formats name their own space. | sRGB |
| Decimal places in code formats | How many decimals the 0–1 numbers get. | 3 |
| Show contrast with the last color | Shows the WCAG contrast ratio between the color under the loupe and the one you picked before: Fail, AA Large (3:1), AA (4.5:1) or AAA (7:1). | Off |
The loupe needs Screen Recording, like screenshots do. Until Goblin is allowed it, Pick Color asks for it each time you use it: the first time with macOS's own alert, after that by opening System Settings with Goblin's small bar beside it (the same way as Accessibility). If macOS asks you to Quit & Reopen Goblin once you switch it on, choose it. To use the macOS color sampler instead, which needs no permission, turn off Use Goblin's magnifier.
Goblin AI and Siri#
Goblin AI and Siri can run several of them for you, always from a full item ID (a long code that Find Clipboard Items returns), never from a position or a name. They check the exact clip again before they do anything, and they never paste into another app on their own: pasting waits for you to confirm in Goblin.
- Copy Queue: Start Clipboard Queue, Stop Clipboard Queue, Clipboard Queue Status, Add Clipboard Queue Item, Remove Clipboard Queue Item, and Set Clipboard Queue Reversed to flip the order while a queue is open.
- Combine and float: Combine Clipboard Items (a separator, then the item IDs in the order you want), Float Clipboard Item, Preview Clipboard Item, and Copy Clipboard Item As Plain Text.
- Pasting into a named app: List Clipboard Paste Apps, then Review Plain Text Clipboard Paste or Review Queued Clipboard Paste with the item, the app's bundle ID and its process ID. Clipboard, To active app under Paste Items, and Accessibility must already be on.
The full list is in Siri phrases.