 Goblin
Settings›Clipbar controls the small action bar over text you select in another app. It can copy, collect, search, convert or transform the selection. A separate paste bar gives you recent clips where you can type. Use this page to turn Clipbar on, change how and where it appears, and decide which buttons it has. The actions, the keyboard and result window and Convert have their own pages.
Turn on Clipbar#
- Open Settings›Clipbar. (Press ⌘,, then click Clipbar.)
- Click the Clipbar switch at the top.
- If a yellow line says Clipbar needs Accessibility to read your selection., click Allow Accessibility… and follow the steps that open. Come back to Goblin when you're done.
- Select some text in any app. The bar appears over it.
To turn it off, click the Clipbar switch again. While it is off, Clipbar does not watch the mouse or read selections, and the settings below do nothing. You can also turn it on from the Welcome window.
Clipbar reads text when you select it. Choose Collect or Copy to save it; showing the bar alone does not save that selection. Actions such as searching, shortening a link or looking up an IP address send selected text to their chosen destination.
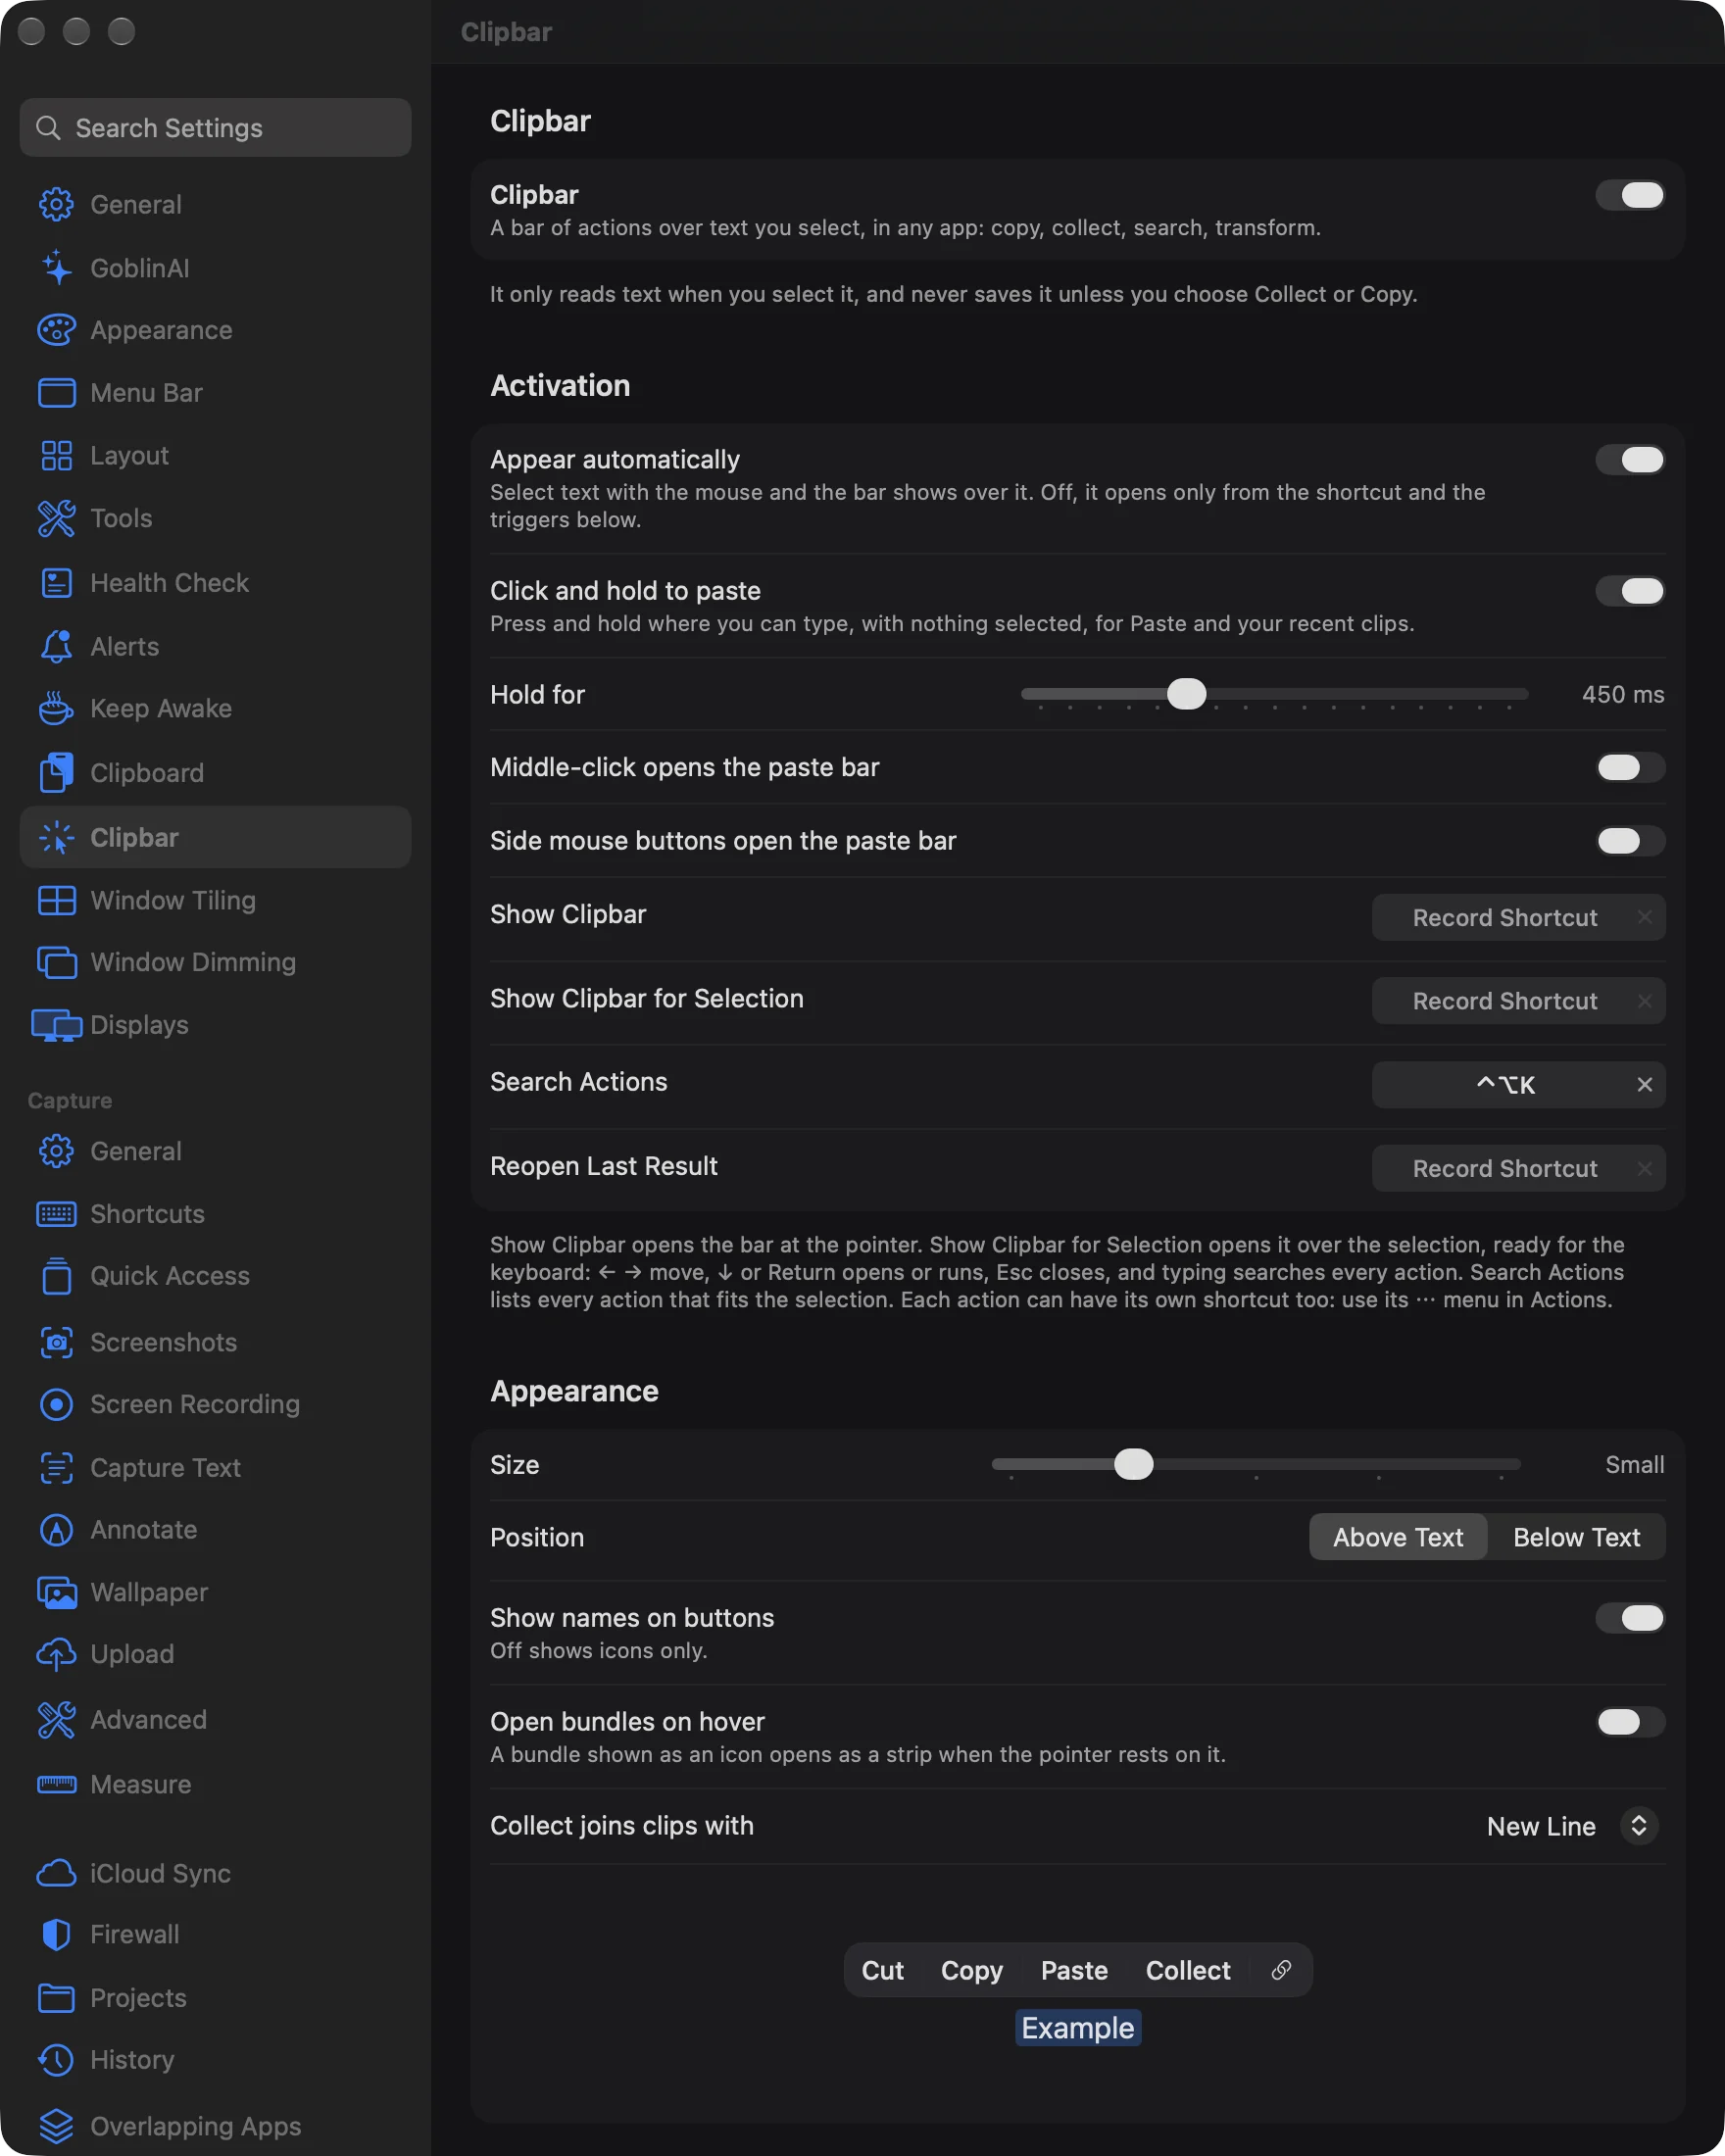
Activation#
This section decides how the bar opens.
Change a Clipbar shortcut#
- Open Settings›Clipbar and find Activation.
- Click the box beside the shortcut you want to change, such as Search Actions. It shows the current keys, or Record Shortcut if it has none.
- The box says Type shortcut…. Press the new keys. Include ⌘, ⌃ or ⌥.
- The box now shows your keys.
To turn a shortcut off, click the × beside the box. To leave without changing it, press Esc while the box says Type shortcut….
If another Clipbar shortcut already holds the combination, a red line says which, and the box keeps listening so you can press different keys. If a Capture shortcut holds it, the row names that one; change it in Settings›Capture or choose another here. If macOS refuses the combination because another app holds it, the box says In use by another app.
Stop the bar appearing by itself#
- Open Settings›Clipbar and find Activation.
- Turn off Appear automatically.
The bar no longer shows when you select text with the mouse. You can still open it with Show Clipbar or Show Clipbar for Selection, once you've set one.
Open the paste bar with a mouse button#
- Open Settings›Clipbar and find Activation.
- Turn on Middle-click opens the paste bar, Side mouse buttons open the paste bar, or both.
- Click in a text field in any app, then press that button. The paste bar opens with your recent clips.
By default you open the paste bar by holding the mouse button down in a text field. Change how long with Hold for (200–1,000 ms), or turn Click and hold to paste off.
The Activation settings#
| Setting | What it does | Default |
|---|---|---|
| Appear automatically | Shows the bar after mouse text selection. Off leaves the shortcuts and paste triggers available. | On |
| Click and hold to paste | Opens the paste bar when you hold in a text field with nothing selected. | On |
| Hold for | Sets how long to hold before the paste bar appears, 200–1,000 ms. Shown while Click and hold to paste is on. | 450 ms |
| Middle-click opens the paste bar | Adds a middle mouse button trigger. | Off |
| Side mouse buttons open the paste bar | Adds side mouse button triggers. | Off |
| Show Clipbar | Global shortcut that shows the bar at the pointer. | Off |
| Show Clipbar for Selection | Global shortcut that shows the bar over the selection, ready for the keyboard. | Off |
| Search Actions | Global shortcut that opens a large search over every action that fits the selection. | On, ⌃⌥K |
| Reopen Last Result | Global shortcut that brings back the result window you closed, with its edited text. | Off |
A shortcut needs ⌘, ⌃ or ⌥ in it to work from any app; ⇧ alone is not enough. Search Actions is on from the start, so if another app uses ⌃⌥K, Settings › General shows a shortcut clash banner for it.
Show Clipbar for Selection, Search Actions and Reopen Last Result need something to act on. If the front app has no readable selection, Goblin beeps (or, for Reopen Last Result, has no result to bring back). Every action can also have its own shortcut; see Actions. How to use the bar from the keyboard is on Clipbar keyboard, search and results.
Appearance and collection#
Change the bar's size or position#
- Open Settings›Clipbar and find Appearance.
- Drag the Size slider to Smallest, Small, Medium, Large or Largest.
- Under Position, choose Above Text or Below Text.
- Turn Show names on buttons off if you want icons only.
The preview at the bottom of the section shows the bar over the word Example as you change things.
| Setting | What it does | Default |
|---|---|---|
| Size | Smallest, Small, Medium, Large or Largest. | Small |
| Position | Above Text or Below Text for a single-line selection. Multi-line selections follow the drag direction. | Above Text |
| Show names on buttons | Shows action labels; off shows icons. | On |
| Open bundles on hover | A bundle (folder) shown as an icon opens as a strip of buttons when the pointer rests on it for 0.3 seconds. Lists such as Transform, and bundles shown as words, still need a click. | Off |
| Collect joins clips with | The separator used when collecting text. Capture Text's Add to last text also uses it. | New line |
Clean Paste#
Clean Paste is a bar action that pastes what is on your clipboard as plain text, tidied. This section chooses which clean-up steps it runs. The text is always pasted as plain text, and your clipboard is put back afterward without a new entry in Clipboard history.
Choose what Clean Paste cleans up#
- Open Settings›Clipbar and find Clean Paste.
- Turn each step on or off.
- If Clean Paste isn't on your bar yet, add it: see Add an action to the bar.
| Step | What it does | Default |
|---|---|---|
| Fix line endings | Turns Windows and old Mac line endings into ordinary line breaks. Off keeps Windows line endings if the text had them. | On |
| Remove invisible characters | Removes zero-width spaces, byte order marks, direction marks and soft hyphens. Joiners inside emoji stay. | On |
| Turn non-breaking spaces into spaces | Replaces the no-break space and the other fixed-width spaces with a plain space. | On |
| Collapse runs of spaces | Turns several spaces or tabs inside a line into one. A line's indentation stays. | On |
| Join hard-wrapped lines | Joins lines inside a paragraph, like text copied from a PDF or an email. Blank lines, list items and indented lines keep their breaks. | On |
| Rejoin words split by a hyphen at a line end | Puts "exam-" and "ple" back together as "example". | On |
| Remove link tracking | Cleans tracking out of links in the text, like the Strip Link Tracking transform. | On |
| Straighten curly quotes | Turns curly quotes and apostrophes into straight ones. | Off |
| Trim the ends | Removes spaces and blank lines at the start and end. | On |
Results#
| Setting | What it does | Default |
|---|---|---|
| Close the result when you click outside it | Off keeps the result window up until you close it. | On |
Each action chooses what happens to its result in Actions›⋯›When It Finishes; see Clipbar keyboard, search and results.
Rules#
The Apps, Websites and Processes lists stop the bar appearing in those places. They apply to every way of opening the bar, including the shortcuts.
Stop Clipbar in one app or website#
To skip an app:
- Open Settings›Clipbar and find Rules.
- Under Apps, click +.
- Choose the app in the file chooser and click Exclude.
To skip a website:
- Under Websites, click +.
- Type the address, such as
example.com, and click Exclude. Its subpages are included.
To skip a process (for apps that share a bundle or have none):
- Under Processes, click +.
- Type the name Activity Monitor shows, such as
Code Helper, and click Exclude.
To allow one again, click its row in the list, then click −.
- Apps. Passwords, Keychain Access, 1Password and Bitwarden are excluded to start with. An app that is no longer installed stays listed as Not installed.
- Websites. Goblin reads the page address through Accessibility. When an app doesn't give one and you have a website rule, Goblin asks Safari or a Chromium-based browser (Chrome, Brave, Edge, Vivaldi, Opera, Arc) for the front tab's address, waiting up to 0.7 seconds. Goblin asks only when a website rule exists, because the first time can raise that browser's Automation prompt.
- Processes. The match ignores case and a trailing
.app, and a*matches any run of characters (Code Helper*). Goblin compares the rule with both the program's name and the app's name before it reads anything.
Convert#
Convert turns an amount, a measurement or a time into other values. This section sets its currencies and CSS sizes, and lists the websites whose $, kr or ¥ you corrected. Every control is on Clipbar Convert.
Actions#
The action list is the bar's button order. Search it, enable or disable an item, drag to reorder, or drag an action onto a folder. Pinned actions stay visible; others fold into ⋯ when space runs out. Beside a row, a small label shows its own shortcut when it has one.
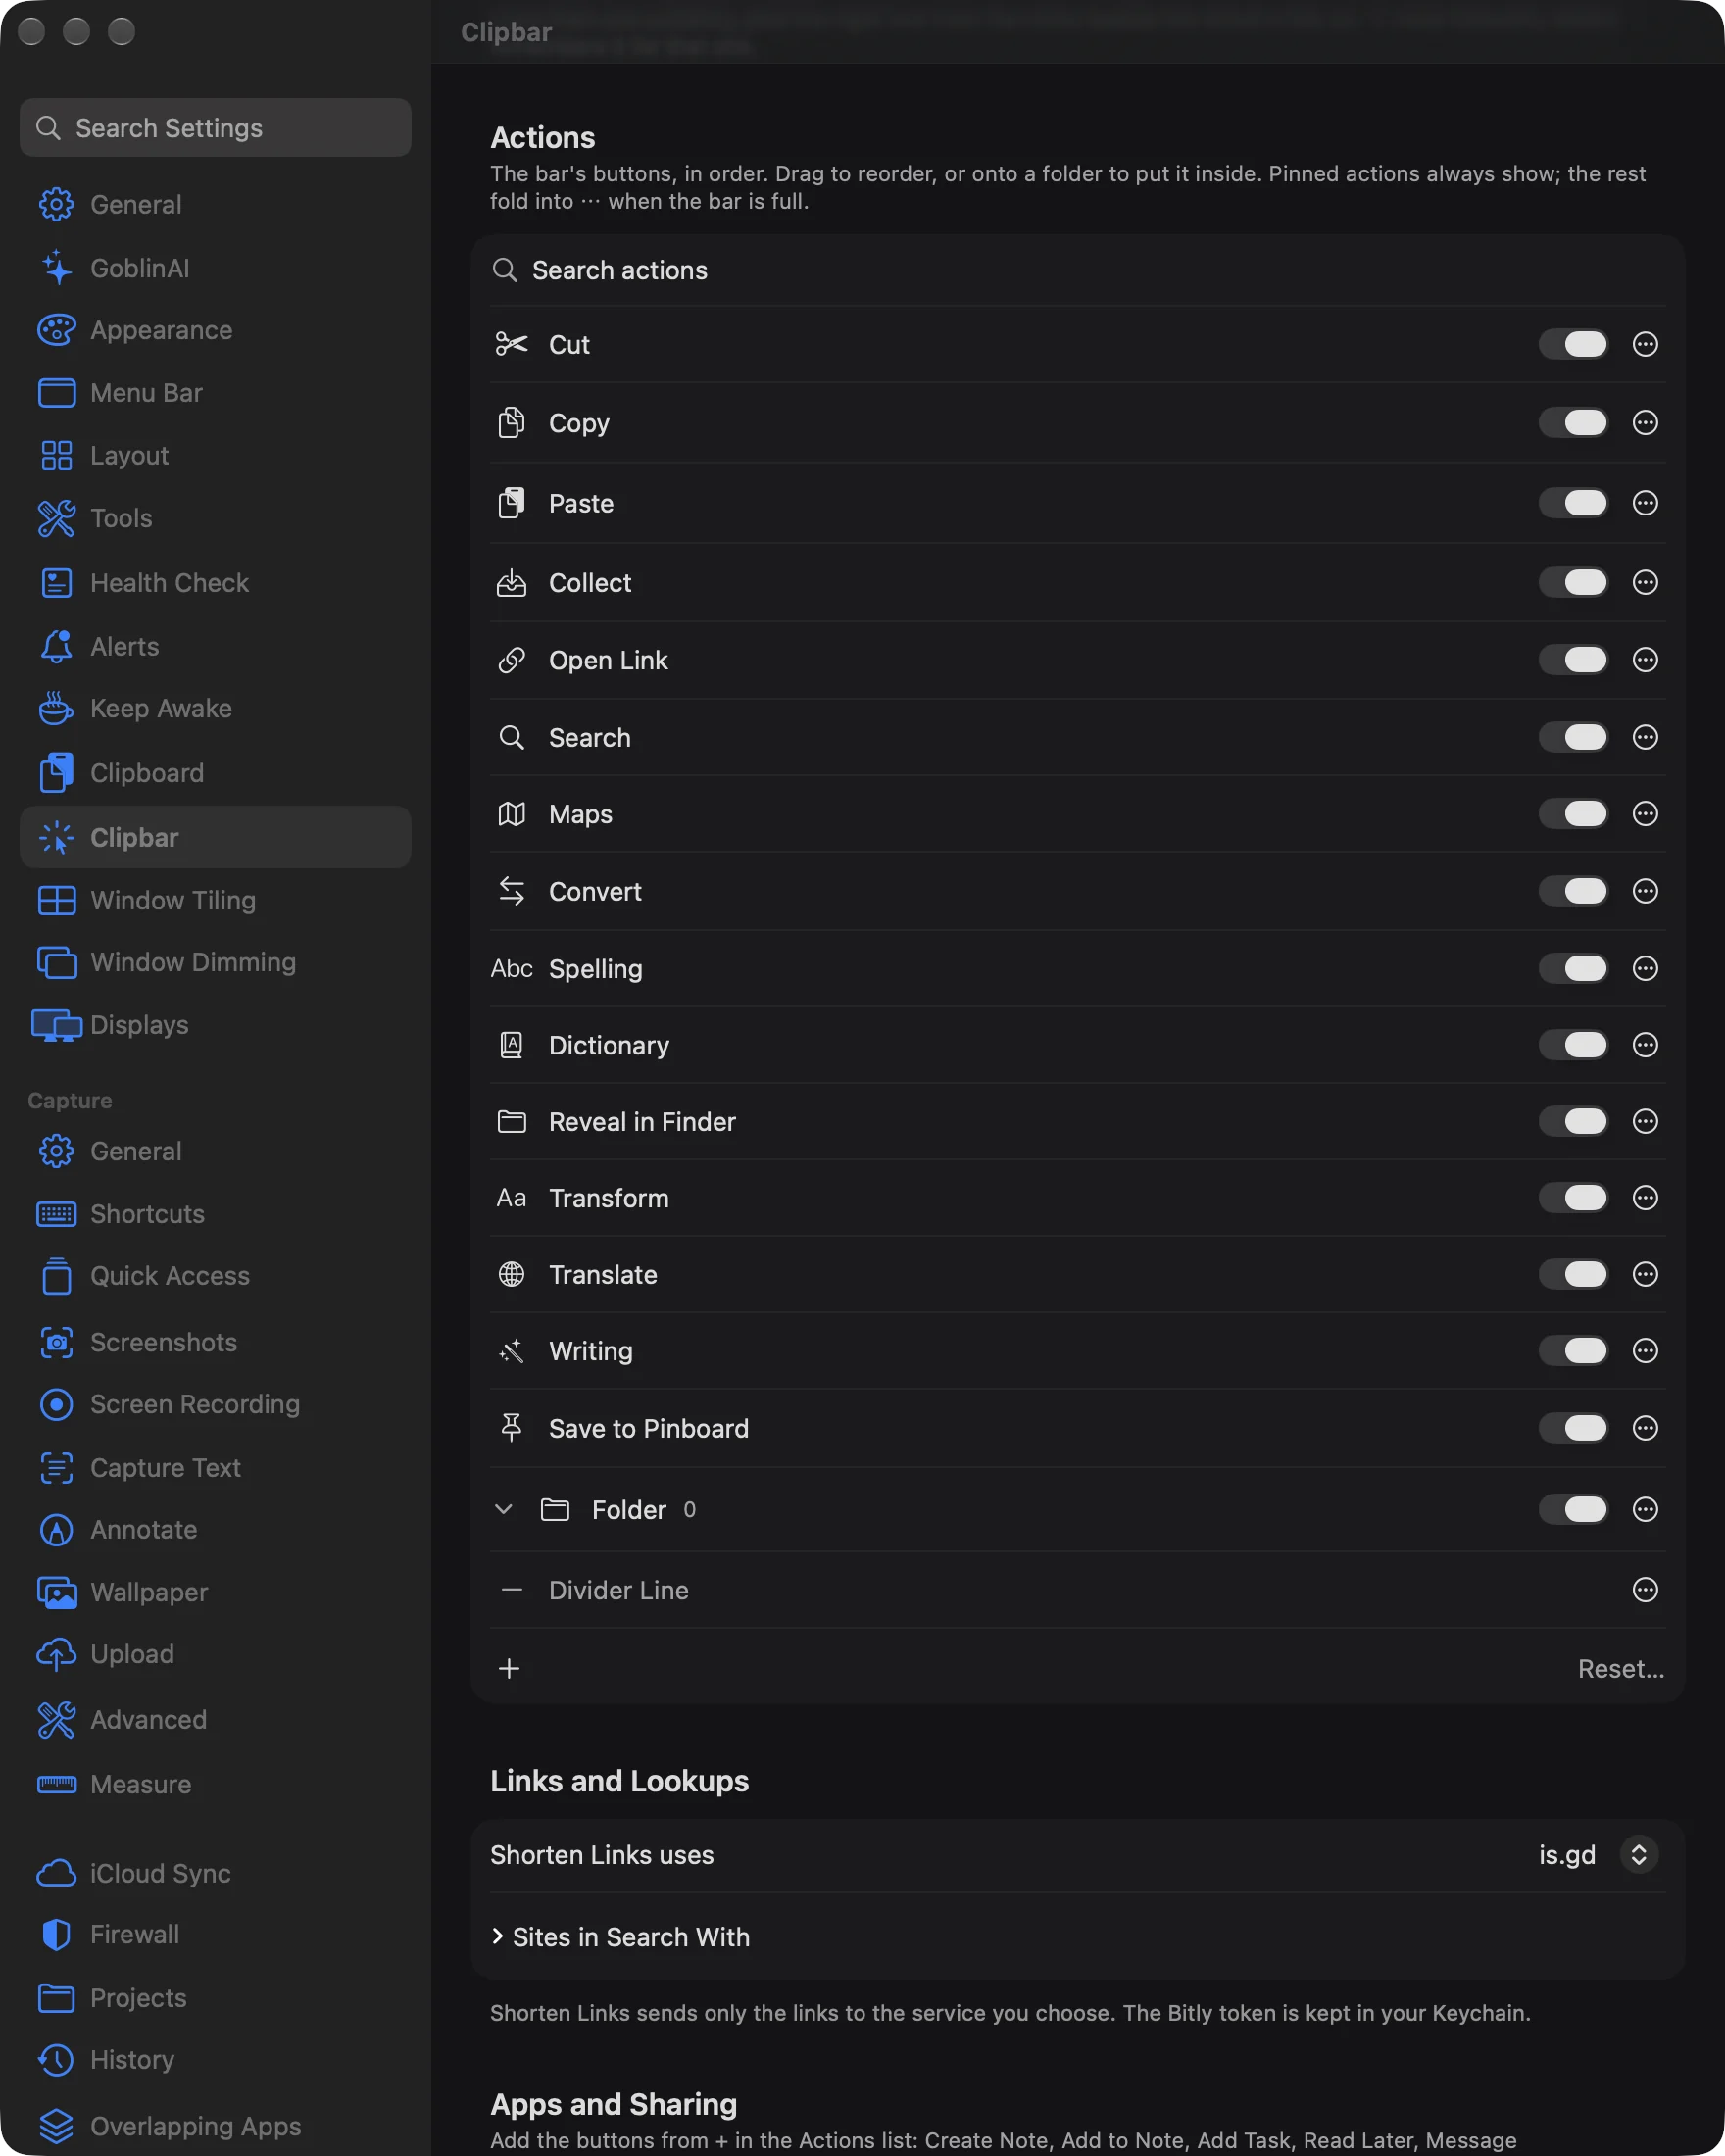
Add an action to the bar#
- Open Settings›Clipbar and scroll to Actions.
- Click + below the list.
- Choose Add Built-in Action, then the action. (This submenu lists only built-ins that aren't in the list yet.) Or choose Folder, Divider Line, Gap or Custom Action….
- The new row appears at the end of the list, and on the bar.
See Clipbar actions for every built-in. To add an action from a ready-made collection, see Add a ready-made action.
Three built-in file actions, Extract, Open Archive and Compress, show only when the selected text holds a path to a file that exists, and they are off in the standard bar; see Archives.
Reorder, hide or group actions#
- In Actions, drag a row up or down to move it. Or open its ⋯ menu and choose Move Up or Move Down.
- To hide an action without deleting it, click its switch off. Hidden actions are greyed out.
- To group actions, click + and choose Folder, then drag actions onto the folder row. To take one out, open its ⋯ menu and choose Move Out of Folder.
- To keep an action always visible, open its ⋯ menu and turn on Pin to Bar. Others fold into ⋯ when the bar is full.
To find a row in a long list, type in Search actions at the top of the list.
Rename an action or change its icon#
- Open the row's ⋯ menu and choose Rename…. Type a name and click Rename. Leave it empty to go back to the original name.
- For the icon, choose Icon›Choose Symbol…, search or type an SF Symbol name, and click a symbol. Icon›Reset to Default Icon puts it back.
Reset the bar to its default actions#
- In Actions, click Reset… at the bottom right.
- Click Reset to confirm.
Names, icons, folders and order go back to the defaults. Custom actions and extensions stay installed; add them back with + if you want them in the bar.
The ⋯ menu#
The item menu offers Rename…, Icon (Choose Symbol…, Reset to Default Icon), Duplicate, Delete, Pin to Bar, Show As (Automatic, Icon or Text), When It Finishes (Show Result, Replace Selection or Copy), Add Shortcut… (Change Shortcut… once it has one), Move Up, Move Down and, inside a folder, Move Out of Folder. Custom actions also have Edit…. Extension actions have an Extension submenu with Info, View Source and Remove…. A divider row has Style instead. A ⚙ beside a row opens a custom action for editing, or an extension action's options.
- Folders (bundles) hold other actions. A folder shows as one button that opens a strip of its buttons.
- Dividers separate groups. A Divider Line is a stronger, full-height line with room around it. A Gap is blank space. The row's Style menu switches between them. Dividers count against the bar's width and fall into ⋯ only when the buttons beside them do. At either end of the bar, or two in a row, they are not drawn.
- When It Finishes decides what happens to the text an action returns. A folder's setting applies to everything in it that returns text, so a folder of text transforms set to Replace Selection gives one-click transforms. Replace needs a selection you can type over, and an action that rewrites text; otherwise Goblin shows the result instead. Dictionary and Word Count never replace, and neither do the reports among the text transforms (Validate JSON, Unicode Inspector, the extract and sum ones).
- Add Shortcut… records a global shortcut that runs that one action on the current selection without opening the bar first. The bar shows a spinner, then a tick or the result. Up to 60 action shortcuts can be active; if two use the same keys, the first keeps them.
Make a custom action#
- In Actions, click + and choose Custom Action….
- Next to Type, choose AI Prompt, Link, Terminal Command, AppleScript or JavaScript.
- Type a Name, or leave it to get a default.
- Fill in the box under it: the prompt, link or script.
- For actions that return text, choose Result: Preview first, Replace the selection, Copy or Show.
- Click Save. If something is missing, a red line says what.
To change it later, click the ⚙ beside its row, or open its ⋯ menu and choose Edit….
What each type needs:
- AI Prompt runs on this Mac and needs Apple Intelligence on macOS 26 or later. You can save one now; it runs once it's available.
- Link opens a link with
***where the selection belongs, such ashttps://example.com/search?q=***. - Terminal Command runs in your shell. The selection is in
$POPCLIP_TEXTand what the command prints is the result. - AppleScript substitutes
{popclip text}with the selection. What the script returns is the result. - JavaScript receives
textand returns the transformed text.
Warning: Review what a custom action does before running it. Terminal commands and scripts run as you.
Links and lookups#
Choose the Search With sites#
- Open Settings›Clipbar and find Links and Lookups.
- Click Sites in Search With to open the list.
- Turn each site on or off. The ones on appear under Search With.
Choose the link shortener#
- In Links and Lookups, next to Shorten Links uses, choose is.gd, v.gd or Bitly.
- For Bitly, paste your token into Bitly access token. It is kept in your Keychain.
| Setting | What it does | Default |
|---|---|---|
| Shorten Links uses | The service the Shorten Links action sends links to: is.gd, v.gd or Bitly. | is.gd |
| Bitly access token | Appears when Bitly is chosen. Kept in your Keychain. | Empty |
| Sites in Search With | A list with one switch per site. | Eight sites on |
The eight sites on to start with are Wikipedia, YouTube, Amazon, IMDb, Google Images, Google Maps, Stack Overflow and Reddit. The full directory has 29 sites, including shops (eBay, Etsy), film and book sites (Rotten Tomatoes, Letterboxd, Goodreads), developer references (GitHub Code Search, DevDocs, MDN Web Docs), maps (OpenStreetMap), dictionaries (Urban Dictionary, Thesaurus.com), social sites (X, LinkedIn), web archives (Archive.today, the Wayback Machine), PubMed, AI assistants (Perplexity, ChatGPT, Claude), and translators (Google Translate, DeepL). Shorten Links sends only the links, not the rest of your selection, to the service you choose.
Apps and sharing#
This section chooses where the notes, tasks and read-later actions go. Add the buttons themselves from the + menu in the Actions list: Create Note, Add to Note, Add Task, Read Later, Message Contact and Share….
Choose where notes and read-later go#
- Open Settings›Clipbar and find Apps and Sharing.
- Next to Notes app, choose where Create Note and Add to Note go.
- If a field appears below it (Note to add to, Obsidian vault or Craft Space ID), fill it in.
- Next to Read later, choose where Read Later saves links.
Only apps on this Mac are listed.
| Setting | What it does | Default |
|---|---|---|
| Notes app | Where Create Note and Add to Note go: Apple Notes, Bear, Obsidian, UpNote, Drafts or Craft. | Apple Notes |
| Note to add to | Appears for Apple Notes, Bear and Obsidian. Names the note Add to Note adds to. Apple Notes uses the note selected in Notes first. | Empty |
| Obsidian vault | Appears for Obsidian. Empty uses the vault used last. | Empty |
| Craft Space ID | Appears for Craft, which needs it to make a note. | Empty |
| Read later | Where Read Later saves a link: Safari Reading List, Raindrop.io or GoodLinks. | Safari Reading List |
| Message Contact sends to | A phone number or email address. Message Contact opens a new message to it with the text typed in. You press Return to send. | Empty |
| Voice | The voice Speak uses, grouped by language with your own first. Preview plays a sample. | Automatic for the text's language |
| Shortcuts | Apple Shortcuts that get their own bar buttons. | None |
Put an Apple Shortcut on the bar#
- In Apps and Sharing, under Shortcuts, click Add Shortcut….
- Choose a shortcut from the list of the ones on your Mac.
- Set Receives (The selected text or Nothing), Time limit (10, 30, 60, 120 or 300 seconds) and Output (Show it in the bar or Replace the selection).
The button is named after the shortcut. To take it off the bar, click the minus button beside it.
Extensions#
Extensions add actions to the bar. Clipbar works with extensions in the standard selection-bar format: a folder or a packed file whose Config file (Config.yaml, Config.plist, Config.json or a Config script) describes its actions, or a text snippet.
Add an extension#
- Open Settings›Clipbar and find Extensions.
- Click Add Extension… and choose the extension folder, packed file or text snippet. Click Add.
- A window shows what the extension is and what it can do: its trust level, and, for scripts, a View Source button. Read it.
- Click Add. Its actions go to the end of the bar.
Click Browse extensions to open a web page of extensions for this format.
Look at or remove an extension#
- In Extensions, find it in the list. Each shows its action count.
- Click its ⋯ menu and choose Info, View Source or Remove….
- For Remove…, click Remove Extension to confirm. Its actions leave the bar and its files are deleted from this Mac.
| Setting | What it does | Default |
|---|---|---|
| Allow shell and AppleScript extensions | Allows installation after a warning and source review. These commands run as you. | On |
When Goblin finds another selection-bar app on your Mac, an import row appears at the bottom of Extensions, with a button to bring its extensions across. Goblin asks whether to Import Extensions and Button Order or Import Extensions Only. It reads the other app's data without changing it, and running the import again doesn't duplicate anything. With the button order, the bar starts with the other app's buttons in their order and Goblin's own buttons follow. Excluded apps, excluded sites, the shortcut and the bar position come across with the extensions. If the other app is still running, both bars appear until you quit it.
More actions#
More Actions is a starter catalog of more than 100 ready-made extensions, bundled inside Goblin. Nothing is downloaded, and nothing signs you in anywhere.
Add a ready-made action#
- Open Settings›Clipbar and scroll to More Actions.
- Click Browse….
- Search by name, description or category, or click a category chip.
- Click Add beside an action. Its button goes to the end of the bar.
- Click Done.
To take one off the bar, click Remove beside it in the same window.
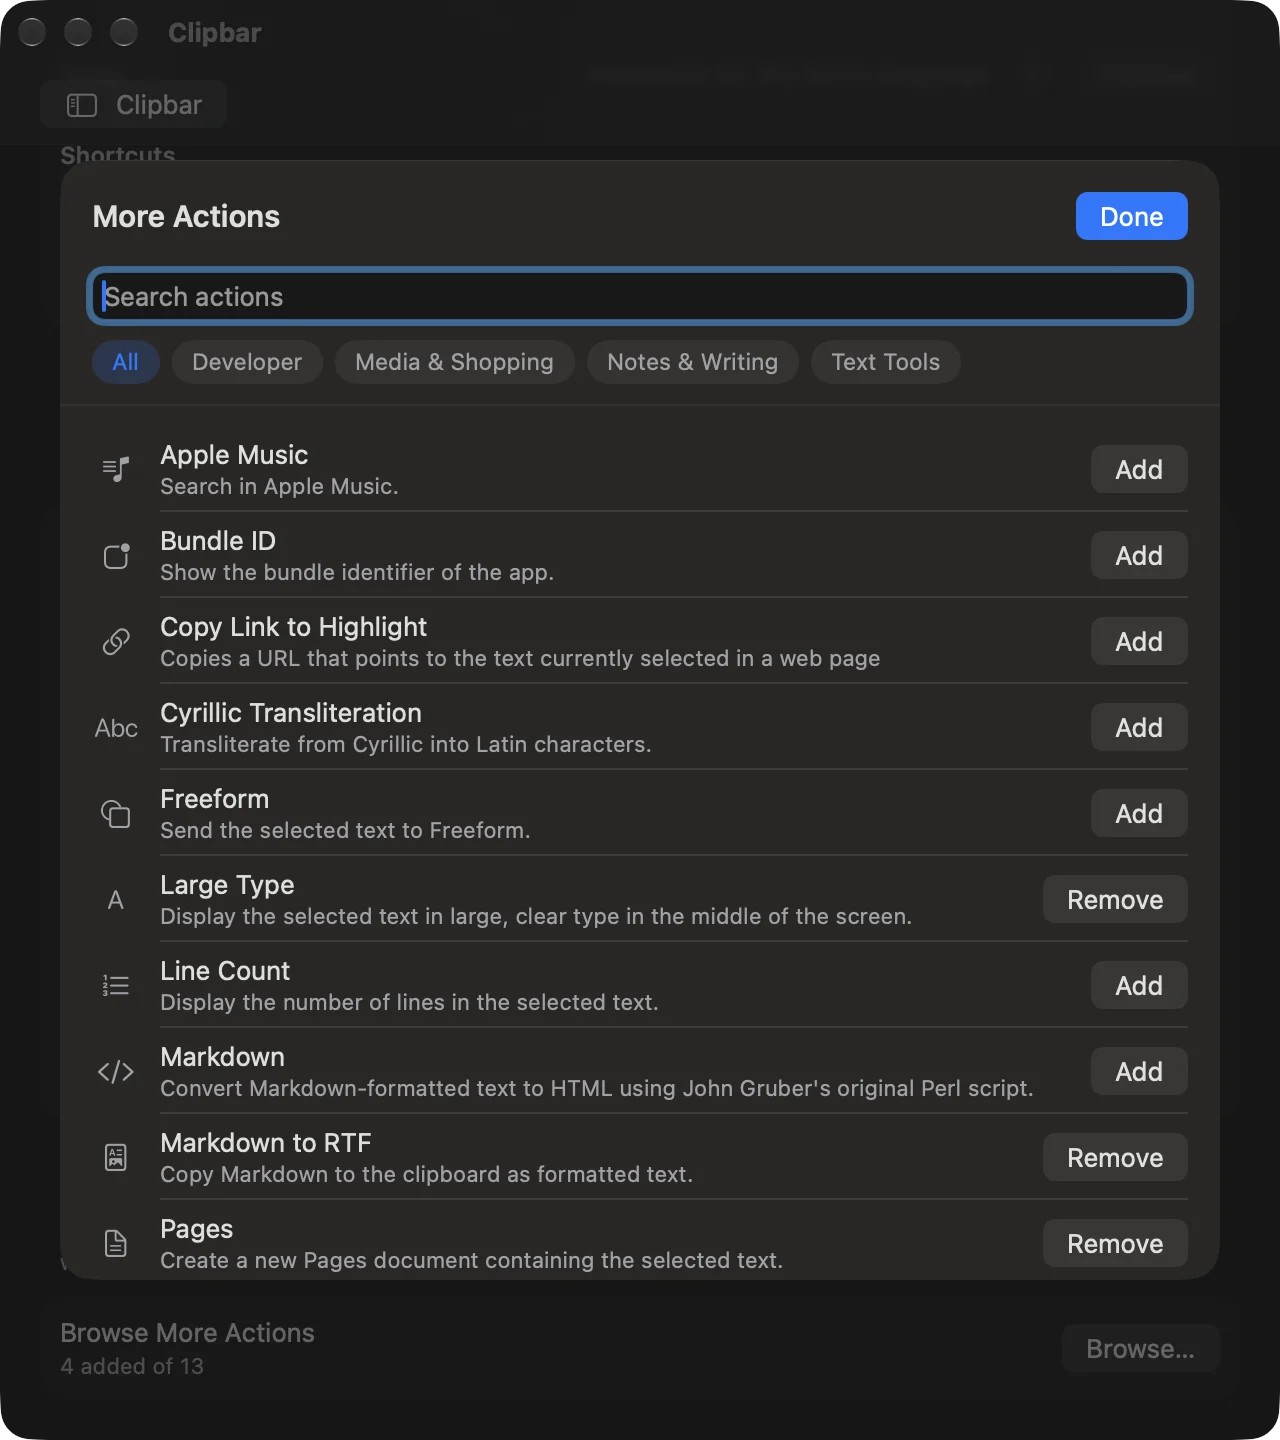
- The card shows how many you've added, such as "12 added of 107".
- The category chips are Notes & Writing, Media & Shopping, Utilities, Translate, Tasks & Calendar, Text Tools, Search & Lookup, Other Search Engines, Developer and Contacts & Calls.
- An extension that runs a shell or AppleScript command shows a warning the first time you add it: it explains what the extension can do and asks you to add it only if you use the app it works with.
- Added extensions appear in Extensions with the others.
The catalog is open-source work; its authors and license are listed in Settings›Help & Feedback›Acknowledgements…. See Acknowledgements.
Shortcuts and Siri actions#
Shortcuts and Siri can list Clipbar's layout and open Goblin's own editors on a draft of it. The actions that start with Review open Goblin's window with the change in front of you, and nothing is saved until you apply it there. Preparing or editing a draft never runs a custom action, and secrets stay in the Keychain. The actions are:
List Clipbar Action Layout, which lists layout IDs, action IDs, folders and each row's enabled, pinned and show-as state. It leaves out action bodies, option values and secrets.Review Clipbar Action Layout,Review Reset Clipbar Layout,Review Add Clipbar Custom Action,Review Edit Clipbar Custom Action,Review Clipbar Action Options,Review Clipbar Extension Sign In And Secrets,Review Remove Clipbar ExtensionandReview Install Clipbar Extension, which open the matching editor.- The bulk import actions for other selection-bar apps, which work the same way and recheck the source data first.
Read Clipbar Native Review ResultandCancel Clipbar Native Review, which report on or close the review.
Closing a review doesn't undo files, settings or Keychain changes already made, and removing an extension can't be undone. Every phrase is listed on Siri Phrases.
Syncing and Goblin AI#
Clipbar's settings travel with iCloud sync: the shortcuts go with Shortcuts, and the rest with Clipboard. Goblin AI can change some of them by voice or text.