 Goblin
A Keep Awake session always stops the Mac from sleeping. These options decide what else it does: whether the screen stays on, whether the Mac stays awake with the lid shut, whether Goblin nudges the pointer so you don't look away, and whether external drives are kept spinning. You set the defaults in Settings›Keep Awake›New Sessions, and a few on the Keep Awake card. A session keeps the options it started with, so a change applies to the next session.
To get to the card, click Goblin's menu bar item and open the Power tab, or open the Power tab in Goblin's window and click Keep Awake (⌘7).
Screen#
Keep the screen on or let it sleep#
- On the Keep Awake card, with no session running, click Screen on. It's lit while the screen will stay on.
- Click it again to let the screen sleep while the Mac stays awake. The line under Off then reads "Screen may sleep".
- Start your session as usual.
Or open Settings›Keep Awake, and under New Sessions switch Keep the screen on on or off. A session already running keeps the choice it started with.
| Setting | What it does | Default |
|---|---|---|
| Keep the screen on | The display stays awake as well as the Mac. Turn it off and the screen sleeps as usual ("Screen may sleep") while the Mac keeps working. | On |
| Let the screen saver start | While the screen is kept on, your screen saver still starts after the delay set in macOS. | Off |
| Lock the screen when the Mac is idle | During a session, locks the screen once you've been away from the keyboard and mouse this long. 1 to 240 minutes. | Off (10 min when switched on) |
| Let the screen sleep while it is locked | While the screen is locked, the display may sleep; it's kept on again when you unlock. | Off |
The first two are in the New Sessions section of Keep Awake settings, and Screen on is also a button on the card. The last two are in the Screen section.
Lock the screen while away#
- Open Settings›Keep Awake and scroll to the Screen section.
- Switch on Lock the screen when the Mac is idle. It starts at 10 minutes.
- Change the time with the stepper beside it (1 to 240 minutes).
- If you also want the display to turn off while locked, switch on Let the screen sleep while it is locked.
From then on, any session locks the screen once you've been away from the keyboard and mouse for that long.
Let the screen saver start only works while the screen is kept on, so it's greyed out otherwise. It uses the delay you chose in macOS's own screen saver settings, and starts the screen saver once each time you go idle. If macOS is set never to start the screen saver, nothing happens.
The lock and the screen saver are useful together with a long session: the Mac keeps working, but your screen isn't left open on your desk. If both are due at the same moment, the lock wins. Goblin checks every 5 seconds, so either can come a few seconds after the exact time.
Closed-lid mode#
Normally a MacBook goes to sleep when you shut the lid. Closed-lid mode keeps it awake with the lid closed, even on battery and with no screen attached. Use it to finish a download or a render while you carry the Mac between rooms.
Turn on closed-lid mode#
- Open the Keep Awake card (menu bar panel › Power tab, or the Power tab in Goblin's window › Keep Awake).
- With no session running, click Closed lid so it's lit. (Or, in Settings›Keep Awake›New Sessions, switch on Stay awake with the lid closed; or in the separate menu bar item, choose Quick Preferences›Closed-Display Mode.)
- Click Start and choose a length, or switch the card's switch on.
- If macOS asks, type an administrator password. The text reads "Goblin wants to keep your Mac awake with the lid closed." You can skip this prompt for good; see Stop being asked for a password.
- Shut the lid. The screen locks (unless you turned that off) and the Mac keeps running.
The card's line under the time reads "Closed lid" when the mode is on. Open the lid and sign in as usual; end the session with End when you're done.
What happens#
- When the session starts, Goblin needs administrator rights to turn sleep off. If you haven't approved Goblin's helper, macOS asks for an administrator password: "Goblin wants to keep your Mac awake with the lid closed." The Mac is already being kept awake while the prompt is open. With the helper approved, there is no prompt.
- Goblin turns sleep off for the whole Mac until the session ends.
- With Lock the screen when the lid closes on (the default), the screen locks when you shut the lid.
- When the session ends, or you quit Goblin, sleep is turned back on within about 5 seconds. There's no second password.
If you cancel the password prompt, the whole session ends and the card says "Closed lid mode couldn't turn on. It needs an administrator password."
Extending the session, or replacing it with another closed-lid session, doesn't ask again. Replacing it with a session that doesn't use closed-lid mode turns it off.
Only an administrator can change whether the Mac sleeps. Goblin hands the job to a small watcher that runs with that permission, either through the password prompt or through the helper. If Goblin crashes or is force-quit, the watcher notices within a few seconds and lets the Mac sleep again.
Stop being asked for a password#
New: Coming in the next update. With the helper approved, closed-lid sessions start without a password prompt.
Approve Goblin's helper once and closed-lid sessions start without a prompt. The helper only runs the tasks Goblin needs it for, and only for Goblin; see the System Tasks card in Settings›General.
- Open Settings›Keep Awake and scroll to the Closed Lid section.
- Find the Password row. It reads Asked each session.
- Click Stop Asking…. Goblin registers its helper.
- If the row now shows Open System Settings…, click it. macOS is waiting for your approval.
- In System Settings›General›Login Items & Extensions, switch on Goblin.
- Go back to Goblin. The row updates and reads Not needed.
Note: The helper is one approval for all of Goblin's administrator tasks, not only closed-lid mode. You can switch it off again in the same System Settings pane, and closed-lid sessions go back to asking for your password.
Safety#
A shut MacBook in a bag has nowhere to lose heat, and it can run its battery flat. Closed-lid sessions are stricter:
- They end when the battery reaches End when the battery falls to (20% by default, 5% to 90%), or your general battery floor if that's higher.
- They always end when macOS reports the Mac is critically hot, even if you've turned off End when the Mac gets too hot.
Warning: While closed-lid mode is on, the Mac doesn't sleep at all, even with the lid shut. Make sure air can reach it, and end the session when you no longer need it.
Closed Lid settings#
To change these, open Settings›Keep Awake and scroll to the Closed Lid section.
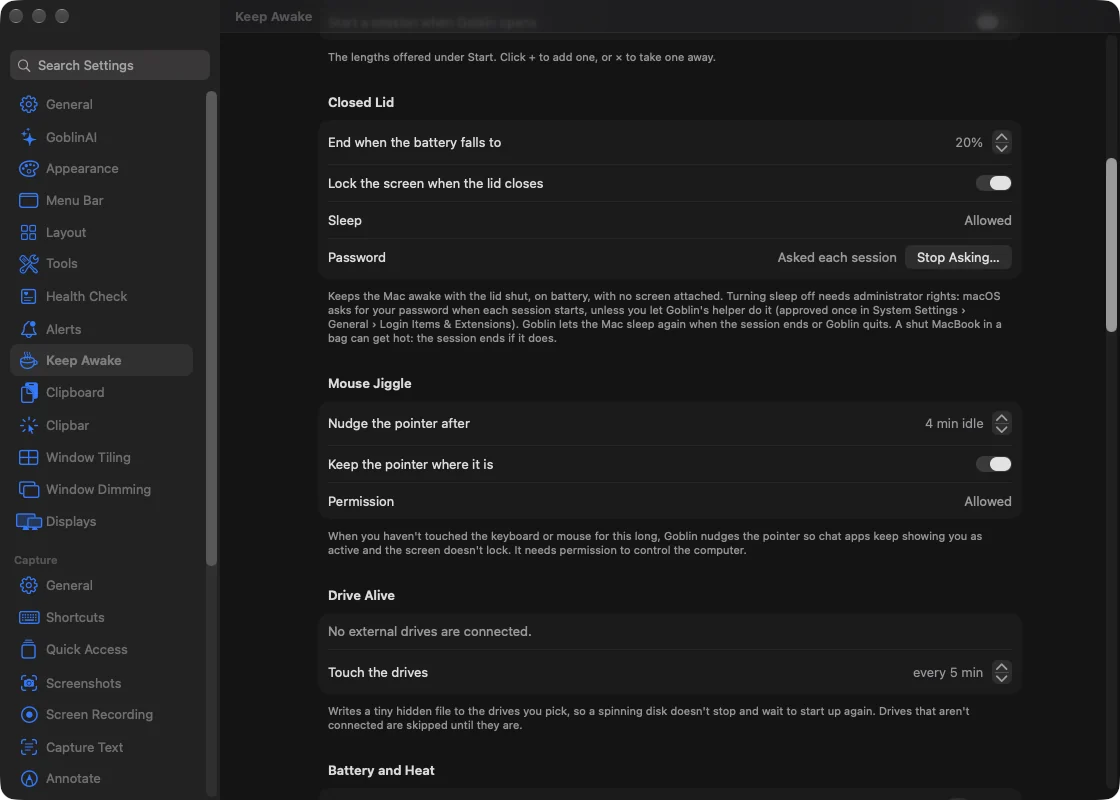
| Setting | What it does | Default |
|---|---|---|
| End when the battery falls to | On battery, ends a closed-lid session at this charge. 5% to 90%, in steps of 5. | 20% |
| Lock the screen when the lid closes | Locks the screen once when you shut the lid during a closed-lid session. | On |
| Sleep | Shows whether the Mac is allowed to sleep right now: Allowed or Turned off. | – |
| Password | Whether closed-lid sessions ask for your password: Asked each session or Not needed once the helper is approved. Stop Asking… or Open System Settings… sets that up. | Asked each session |
The Sleep row reports the Mac's real state, whoever changed it. If sleep is turned off and no closed-lid session is running, a Turn Off Now button appears: it turns the "no sleep" setting off, so the Mac can sleep again, after asking for your password (unless the helper is approved). If you cancel, you see "Cancelled. Sleep is still turned off."
Let the Mac sleep again#
If sleep was left turned off, for example after a crash, you can turn it back on yourself.
- Open Settings›Keep Awake and scroll to the Closed Lid section.
- Check the Sleep row. If it reads Turned off and no session is running, a Turn Off Now button appears.
- Click Turn Off Now. Enter your administrator password if macOS asks.
The row changes to Allowed. If you cancel the prompt you see "Cancelled. Sleep is still turned off."
If the Mac was left unable to sleep#
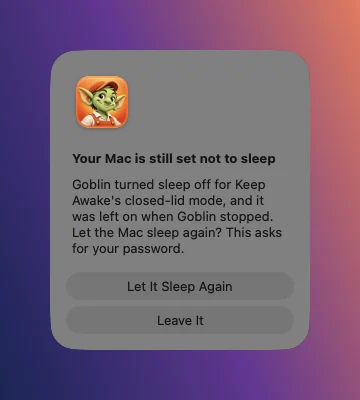
If Goblin turned sleep off and it's still off the next time Goblin opens, because Goblin stopped before it could turn sleep back on, Goblin waits a few seconds, checks again, and then asks: Your Mac is still set not to sleep. Choose Let It Sleep Again to turn sleep back on (macOS asks for your password unless the helper is approved), or Leave It. Goblin only does this for a change it made itself; if another app turned sleep off, Goblin leaves it alone.
Closed lid and triggers#
A trigger can use closed-lid mode, but without the helper the password prompt appears every time the trigger starts a session. The session keeps the Mac awake while the prompt waits, but closed-lid mode isn't on until you enter the password, so it suits triggers that fire while you're at the Mac. With the helper approved there is no prompt, and a trigger can start closed-lid mode on its own.
Mouse jiggle#
Chat apps such as Slack and Teams mark you as away after a few minutes without input, and macOS may lock the screen. Mouse jiggle prevents both during a session: when you haven't touched the keyboard or mouse for a while, Goblin nudges the pointer.
Turn on mouse jiggle#
- On the Keep Awake card, with no session running, click Jiggle so it's lit. (Or, in Settings›Keep Awake›New Sessions, switch on Move the pointer when idle; or choose Quick Preferences›Mouse Jiggle in the separate menu bar item.)
- Start a session. If the card says "Mouse jiggle needs permission to control the computer.", open Settings›Keep Awake, scroll to Mouse Jiggle, and click Allow….
- In Privacy & Security›Accessibility in System Settings, switch on Goblin. The Permission row reads Allowed.
While the session runs, Goblin nudges the pointer whenever you've been idle for the time below.
| Setting | What it does | Default |
|---|---|---|
| Nudge the pointer after | How long you must be idle before Goblin nudges the pointer. 1 to 30 minutes. | 4 min idle |
| Keep the pointer where it is | On: the nudge happens in place and you don't see the pointer move. Off: the pointer moves one point to the right and back. | On |
| Permission | Allowed or Needed. Allow… asks for the permission and opens Privacy & Security›Accessibility in System Settings. | – |
Goblin checks every 30 seconds, so a nudge comes up to half a minute after the Nudge the pointer after time. Each nudge also tells macOS someone is using the Mac, which restarts its own idle timers.
Mouse jiggle needs permission to control the computer. If it's missing when a session starts, Goblin asks for it and the card shows "Mouse jiggle needs permission to control the computer." The session still runs, but no nudges happen until you allow it. Changes to Nudge the pointer after and Keep the pointer where it is apply from the next session.
Tip: Don't combine mouse jiggle with an Idle for a while trigger. The nudges count as activity, so the trigger stops matching and ends its own session.
Drive Alive#
Many external hard disks spin down when they're not used for a while, and the next app that needs them has to wait for them to start up again. Drive Alive keeps the drives you choose spinning during a session.
Keep an external drive awake#
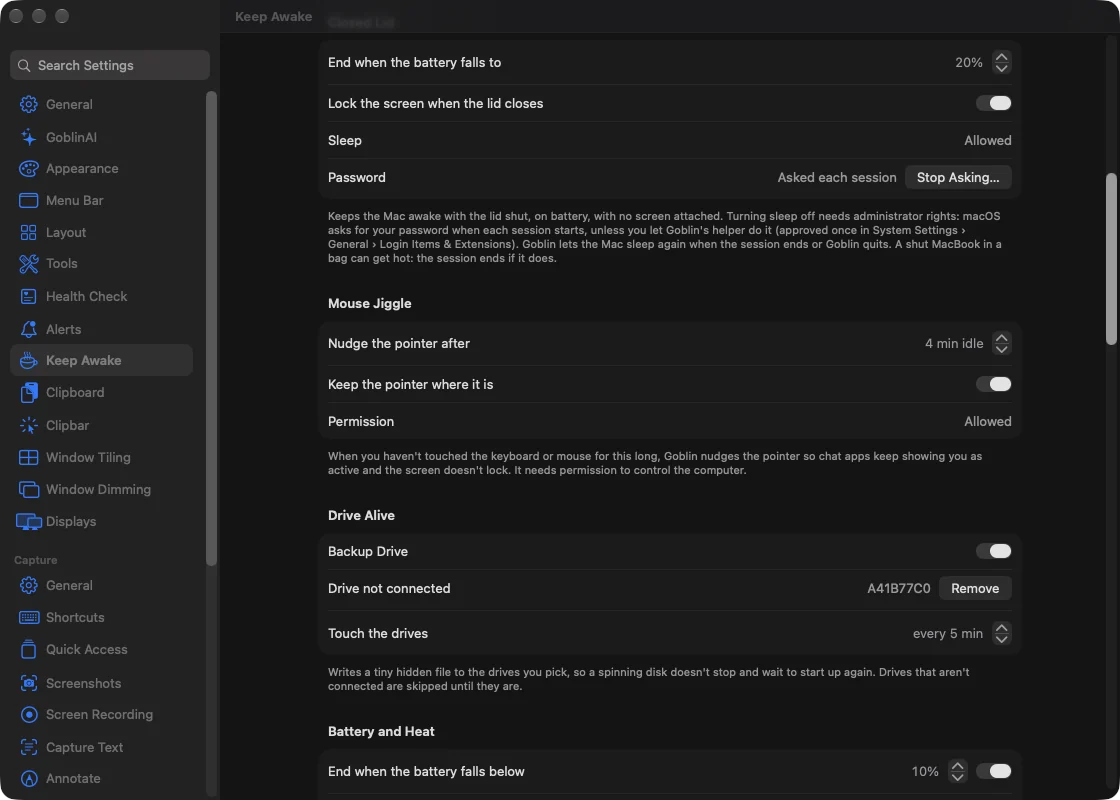
- Open Settings›Keep Awake and scroll to the Drive Alive section.
- Switch on each drive you want kept awake. Only external drives you can eject are listed; with none connected you see "No external drives are connected."
- Scroll up to New Sessions and switch on Keep chosen drives awake. (Or choose Quick Preferences›Drive Alive in the separate menu bar item.)
- Start a session. The card's line includes "Drive Alive".
During a session, Goblin touches each chosen drive straight away, then again at the interval set in Touch the drives (every 5 minutes by default, 1 to 60). On a drive it can write to, it writes a tiny hidden file called .goblin-drive-alive at the top of the drive, replacing the same file each time. On a read-only drive it reads a little from a file instead.
Drives that aren't connected are skipped until they are. A chosen drive that's disconnected stays in the list as Drive not connected, with the start of its ID, and a Remove button. Your startup disk is never touched. If Drive Alive is on but you haven't chosen any drives, it does nothing.
Drives are remembered by their ID, not their name, so renaming a drive doesn't lose it.