 Goblin
A profile is a set of rules that only applies in one situation: at the office, at home, on a train. Rules that belong to no profile apply everywhere; a profile's own rules join them while that profile is active. Only one profile is active at a time, or none.
Profiles can also switch on by themselves. Tell Goblin which profile goes with which network, and joining that Wi-Fi network (or plugging into that Ethernet, or connecting that VPN) activates it. Profiles are part of the firewall, so they live on the Rules screen and work only while the firewall is on.
Make a profile#
- Open the Network tab and click Rules.
- In the sidebar, click the + next to PROFILES. Or choose File›New Profile….
- Goblin creates "New Profile" and selects it. Click the name at the top of its page and type a new one.
- Optionally set the two operation-mode menus and the networks that switch it on (see the table below).
- Click Activate to switch it on now.
When it worked, the profile appears under PROFILES with its rule count, and an Active chip shows on its page. The active profile has a green check in the sidebar.
Creating a profile asks macOS for Location Services if Goblin doesn't have it yet. See Why Location Services.
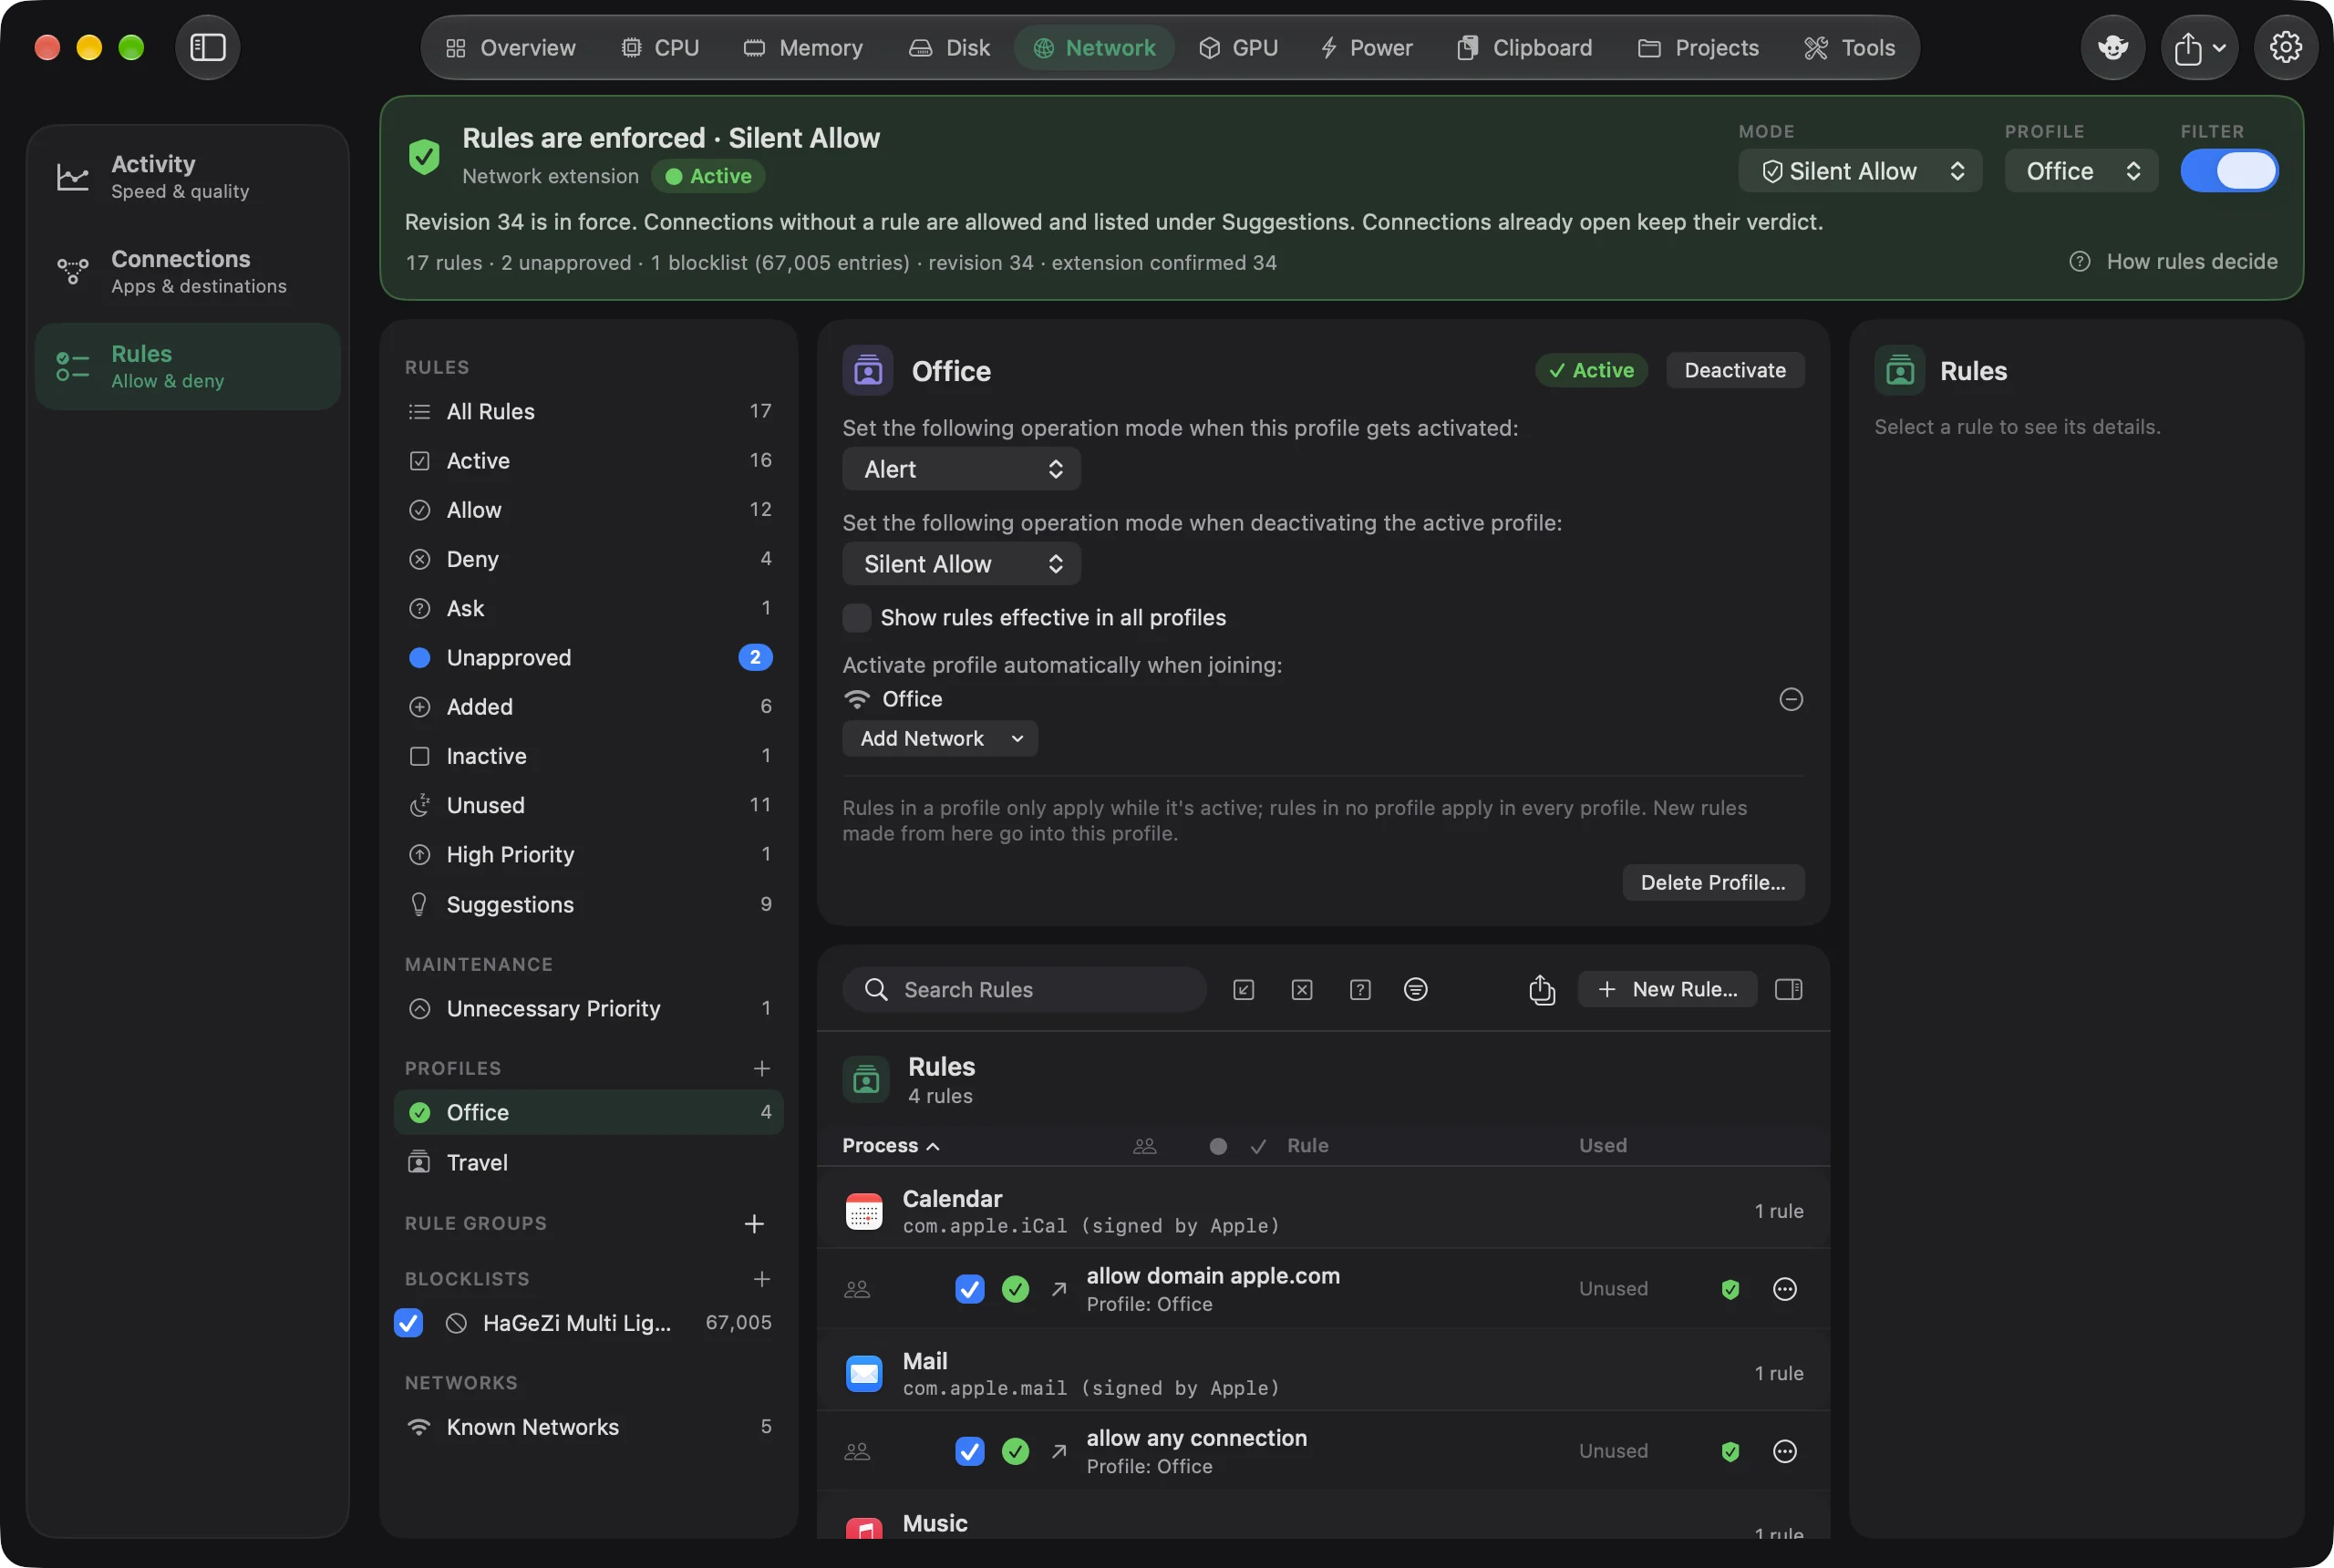
The top of a profile's page holds:
| Control | What it does | Default |
|---|---|---|
| Name | The profile's name. Click to edit. | New Profile |
| Activate / Deactivate | Switches this profile on, or off again. An Active chip shows when it's on. | |
| Set the following operation mode when this profile gets activated: | Changes the operation mode as the profile switches on: Don't Change, Alert, Silent Allow or Silent Deny. | Don't Change |
| Set the following operation mode when deactivating the active profile: | The same choices, applied when this profile switches off. | Don't Change |
| Show rules effective in all profiles | Also lists rules that belong to no profile, so you see everything that applies while this profile is active. Changes only what's listed. | |
| Activate profile automatically when joining: | The networks that switch this profile on. Add Network picks from your known networks; ⊖ removes one. | None |
The two mode menus let a profile tighten things up: a "Travel" profile could switch to Alert mode when it starts and back to Silent Allow when it ends.
With Allow Rule Editing off in Settings › Firewall › Security, every control here except Activate and Deactivate asks for Touch ID or your password first: the name, both mode menus, Show rules effective in all profiles and the networks. Activate and Deactivate follow Allow Profile Switching instead.
Putting rules in a profile#
- Select the profile under PROFILES in the sidebar.
- Click New Rule…. New rules you make while a profile is selected go into it.
To move rules that already exist, select them in the list, open the N Selected menu above the list and choose Move to Profile, then the profile. Or choose the profile in the rule editor's Profile menu.
A connection alert's options include a Profile menu too, preset by Settings›Firewall›Alert: the active profile, or every profile.
Switching profiles#
To switch the active profile by hand:
- Open the Network tab and click Rules.
- Open the PROFILE menu in the header and choose a profile, or None to switch off all of them.
When it worked, the chosen profile has a green check in the sidebar. No profile is active if you chose None.
You can switch the active profile from:
- The PROFILE menu in the Rules header, or Activate on a profile's page.
- The Profile menu in the menu bar panel's firewall card, and Profile › in the menu you get by right-clicking Goblin's menu bar item.
goblin network profile <name>orgoblin network profile nonein Terminal, if Terminal access is allowed.- Automatically, when the Mac joins a network (below).
With Allow Profile Switching off in Settings › Firewall › Security, a manual switch asks for Touch ID or your password first.
Deleting a profile#
- Select the profile under PROFILES in the sidebar.
- Click Delete Profile… at the bottom of its page.
- In the dialog "Delete <name>?", choose what to do with its rules:
- Delete Profile and N Rules removes both.
- Delete Profile, Keep Rules keeps the rules but makes them apply in every profile. They're turned off and marked unapproved, so they don't suddenly start applying everywhere; review them before turning them on.
Networks that used to activate the deleted profile go back to Ask.
Switching with the network#
Make a profile switch on by itself#
- Open the Network tab, click Rules, and select the profile.
- Join the network you want it for, so Goblin lists it. (Networks appear under Known Networks as the Mac joins them.)
- On the profile's page, under Activate profile automatically when joining:, open Add Network and pick the network.
- Check that Enable automatic profile switching is on in Settings›Firewall›Profiles.
Next time the Mac joins that network, the profile activates and a notification says so. To stop a network doing this, click the ⊖ beside it in the same list.
Or do it from the other side: open NETWORKS›Known Networks, find the network, and set its When joined menu to Activate "<profile>".
Stop automatic profile switching#
- Open Settings›Firewall and click Profiles.
- Switch off Enable automatic profile switching.
Profiles then change only when you change them.
Every time the network changes while the firewall is on, Goblin works out which network it is:
- Wi-Fi by its name, if Goblin may use Location Services; otherwise by its router's address. Such a network is listed with a name like "Wi-Fi via 192.168.1.1".
- Ethernet by its router's address.
- VPNs by their network interface, which can change between connections, so the same VPN can turn up more than once. OpenVPN counts as one network, or one per server if you turn on Distinguish OpenVPN remote servers.
The network is added to Known Networks. With Enable automatic profile switching on (the default), Goblin then does what that network is set to do when joined. A notification says "Profile "Office" activated" or "…deactivated", while Automatic Profile Switching is on in Settings › Firewall › Notifications.
A network Goblin hasn't seen before#
To answer the alert: pick what to do from the When joining menu, then click Choose. Click Decide Later to be asked again next time.
The first time the Mac joins a network, Goblin follows When joining an unknown network in Settings › Firewall › Profiles. The default is Ask, which shows this alert (only once you have at least one profile):
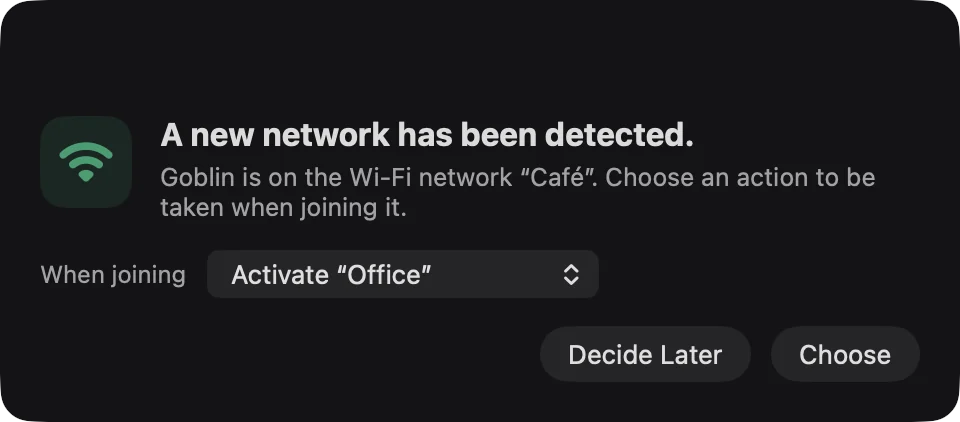
- When joining offers Activate "X" for each profile, New Profile… (with a name field), Deactivate Active Profile or Do Nothing.
- Choose (Return) saves the choice and applies it now.
- Decide Later (Esc) leaves the network set to Ask, so you're asked again next time.
If several networks are waiting, the alert says how many. When it can't read the Wi-Fi name, it says the network is identified by its router and offers Allow Location Access… or Open Privacy & Security.
Known Networks#
Rename or forget a known network#
- Open the Network tab, click Rules, and click Known Networks under NETWORKS.
- Right-click the network.
- Choose Rename…, type a name in the "Rename Network" box and click Rename. Choose Restore Original Name to undo it.
- Or choose Forget Network, or click the bin icon in the row. The network is removed from the list. If the Mac joins it again, Goblin treats it as a network it hasn't seen before.
NETWORKS›Known Networks in the Rules sidebar lists every network the Mac has joined while the firewall was on. At the top is a card with the automatic switching settings (the same as Settings › Firewall › Profiles, below) and the network you're on now.
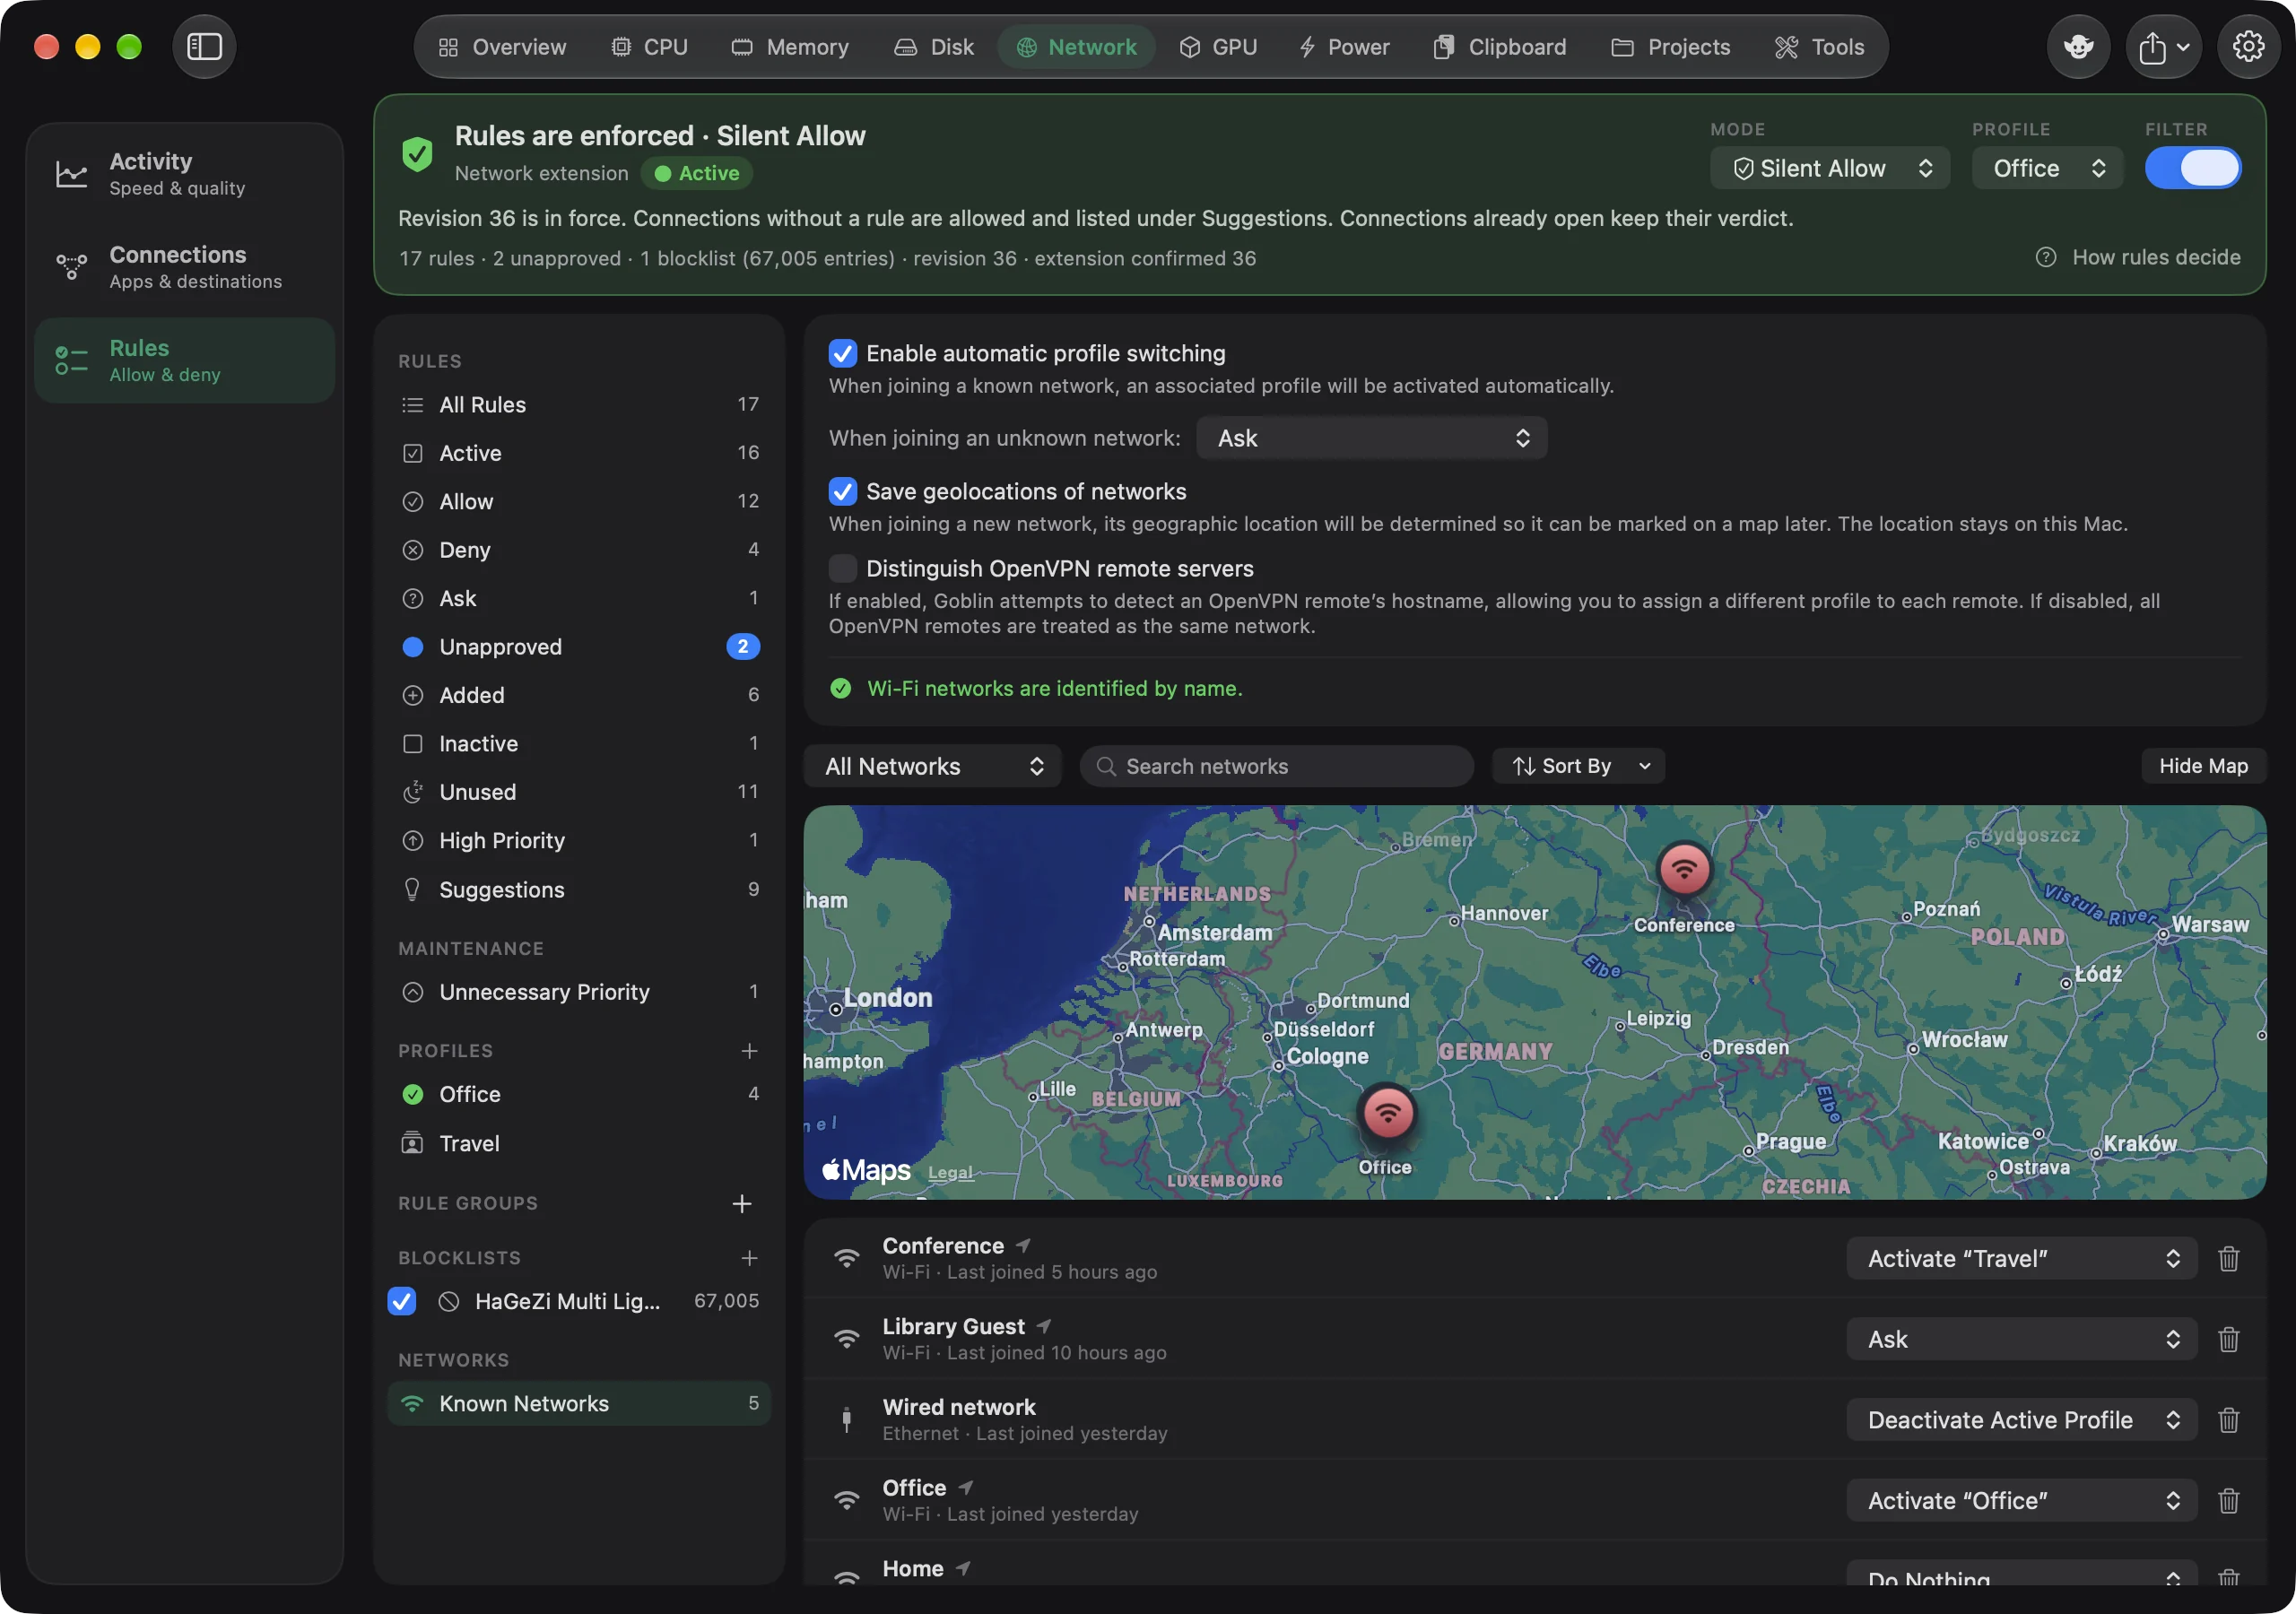
- Show narrows the list to Recently Joined (the last 14 days), All Networks (the default), Wi-Fi, Ethernet, VPN or Other.
- Sort By: Network Name, Location Availability, Last Joined (the default) or Action When Joined.
- Show Map / Hide Map shows the networks that have a saved location as markers on a map. Locations are only saved with Save geolocations of networks on.
Each row shows the network's kind, name, a pin if its location is saved, and when it was last joined. Its When joined menu sets what happens next time: Ask, Do Nothing, Deactivate Active Profile, or Activate "X". The bin icon forgets the network.
Right-click a network for Rename… (Goblin still recognises it by its original identity, and shows the original name beside yours), Restore Original Name, Show on Map, Delete Location Information and Forget Network. With Allow Rule Editing off, everything here except Show on Map, including the When joined menu, asks for Touch ID or your password first.
Settings › Firewall › Profiles#
| Setting | What it does | Default |
|---|---|---|
| Enable automatic profile switching | When the Mac joins a known network, its profile is activated. | On |
| When joining an unknown network: | Ask, Do Nothing, Deactivate Active Profile or Activate "X". Greyed out while switching is off. | Ask |
| Save geolocations of networks | Records where each new network is, so it can be marked on the Known Networks map. | Off |
| Distinguish OpenVPN remote servers | Tells OpenVPN servers apart, so each can have its own profile. Off: every OpenVPN server counts as one network. | Off |
Below them, a line says whether Wi-Fi networks can be identified by name, with a button to allow Location Services or open its settings.
Why Location Services#
macOS only tells an app the name of a Wi-Fi network if the app may use Location Services, because a network's name can reveal where you are. Without it, Goblin tells Wi-Fi networks apart by their router's address instead. That mostly works, but two networks whose routers share an address (many home routers use the same one) look like the same network, so one profile would follow both.
Goblin asks for Location Services only when something needs it:
- Turning on Enable automatic profile switching, or creating a profile while it's on.
- Turning on Save geolocations of networks.
- The map's My Location features in Connections.
It doesn't ask while the firewall is off. A saved network location is rounded to about 10 metres and stays on your Mac, like everything else here. If you said no and change your mind, allow Goblin in System Settings›Privacy & Security›Location Services. More on every permission Goblin asks for is in Permissions.