 Goblin
Settings›Window Tiling arranges other apps' windows. Snap a window to half the screen, a third, a corner or the whole display, with a shortcut, by dragging it to a screen edge, from the window's green button, or from Goblin's menu. Use it to line up two documents side by side or keep a reference window in a corner.
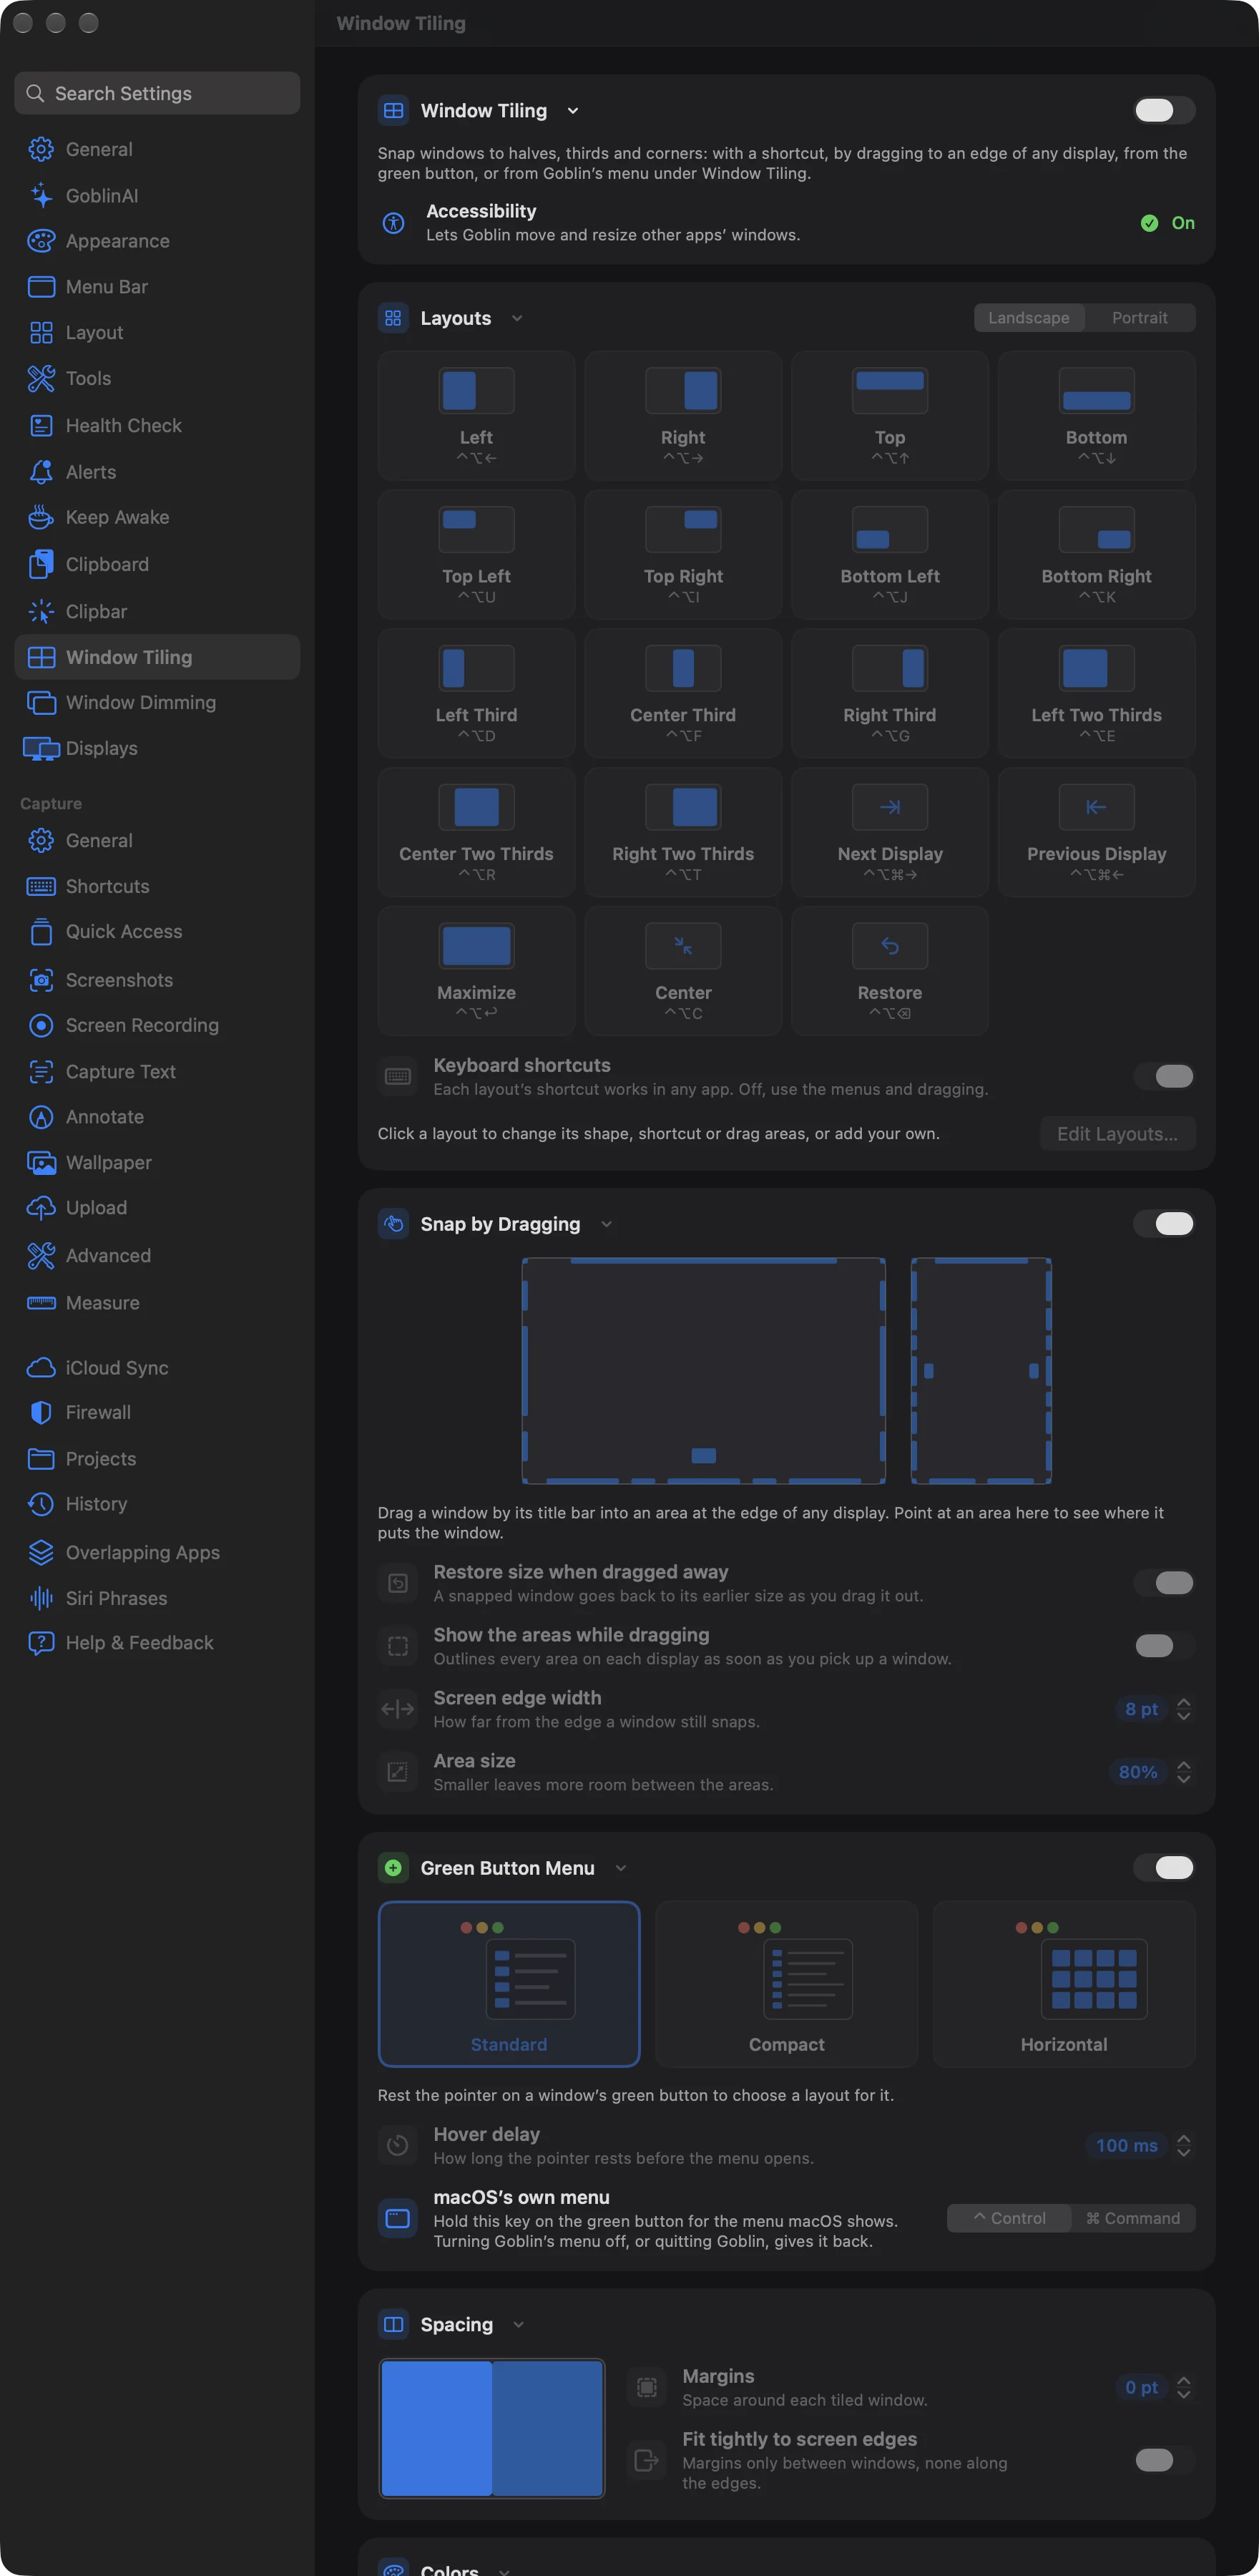
Turn on Window Tiling#
Window Tiling starts off, and the rest of the pane is greyed out until it's on.
- Open Settings›Window Tiling.
- Switch on Window Tiling. The first time, Goblin shows a short introduction with a Turn On button; click it.
- In the Accessibility row, click Allow… and approve Goblin in System Settings. Goblin needs it to move and resize other apps' windows. The row reads "Lets Goblin move and resize other apps' windows." once it's on.
To turn it off, switch Window Tiling off. Goblin's menu bar menu then drops its Windows›Window Tiling item.
Tile a window with a shortcut#
- Click the window you want to move so it's in front.
- Press a layout's shortcut, for example ⌃⌥← for the left half.
Shortcuts work in any app. The built-in ones use ⌃⌥ (Control and Option):
| Layout | Shortcut |
|---|---|
| Left, Right, Top, Bottom halves | ⌃⌥←, ⌃⌥→, ⌃⌥↑, ⌃⌥↓ |
| Top Left, Top Right, Bottom Left, Bottom Right corners | ⌃⌥U, ⌃⌥I, ⌃⌥J, ⌃⌥K |
| Left Third, Center Third, Right Third | ⌃⌥D, ⌃⌥F, ⌃⌥G |
| Left Two Thirds, Center Two Thirds, Right Two Thirds | ⌃⌥E, ⌃⌥R, ⌃⌥T |
| Next Display, Previous Display | ⌃⌥⌘→, ⌃⌥⌘← |
| Maximize, Center, Restore | ⌃⌥↩, ⌃⌥C, ⌃⌥⌫ |
On a portrait display the thirds read Top Third, Middle Third and Bottom Third. Restore puts a window back to the size it had before tiling.
The Layouts card shows every layout with its shortcut under it, or No shortcut, or Shortcut in use when another app has already taken the keys. Choose Landscape or Portrait at the top of the card to see the layouts for that display shape.
| Setting | What it does | Default |
|---|---|---|
| Keyboard shortcuts | Enables each layout's global shortcut. Off, you can still use the menus and dragging. | On |
You can also tile from the menu bar: right-click Goblin's menu bar item and choose Windows›Window Tiling, then a layout.
Snap a window by dragging#
- Drag a window by its title bar toward an edge or corner of any display.
- When an outline shows where the window will land, let go.
The two display pictures in the Snap by Dragging card show the areas for Landscape and Portrait displays; point at an area to see which layout it uses. Switch Snap by Dragging off to turn the feature off.
| Setting | What it does | Default |
|---|---|---|
| Snap by Dragging | Enables screen-edge activation areas. | On |
| Restore size when dragged away | Returns a snapped window to its earlier size as you drag it out. | On |
| Show the areas while dragging | Outlines every area on each display when you pick up a window. | Off |
| Screen edge width | How far from the edge a window still snaps, 1–40 pt. | 8 pt |
| Area size | Scales activation areas from 10% to 100%. Smaller leaves more room between them. | 80% |
Tile from the green button#
- Rest the pointer on a window's green button.
- After a short delay, a menu of layouts opens. Click one.
To get the menu macOS normally shows, hold ⌃ (or ⌘, depending on your choice below) while pointing at the green button.
| Setting | What it does | Default |
|---|---|---|
| Green Button Menu | Shows Goblin's layout menu when the pointer rests on a green button. | On |
| Menu style (Standard, Compact or Horizontal) | How the menu is laid out. | Standard |
| Hover delay | How long the pointer rests before the menu opens, 0–2,000 ms. | 100 ms |
| macOS's own menu | The key you hold on the green button for the menu macOS shows: Control or Command. | Control |
Turning Goblin's green button menu off, or quitting Goblin, gives you macOS's normal behavior back.
Add or change a layout#
Use the layout editor to change a built-in layout's shape, shortcut or drag areas, or to make your own.
- In the Layouts card, choose Landscape or Portrait.
- Click a layout to edit it, or click Edit Layouts… to see the full list.
- To make a new one, click New Layout (or New Divider to separate groups in the menus). Rename it in Layout name.
- Under Window Size and Position, drag across the grid to draw where the window goes, or set Column, Row, Width and Height.
- Under Keyboard Shortcut, switch the shortcut on and press the keys you want. If another layout already uses them, the editor says so.
- Under Drag Areas, switch drag areas on, then drag or click on the grid to add an area. Click the same area again to remove it.
- Under Show In, choose whether the layout appears in Goblin's menu, the Green button menu, or both.
- Click Done.
The buttons under the list delete the selected layout or move it up or down. A divider has only a name and the two Show In switches.
Add margins between windows#
- Open Settings›Window Tiling and find the Spacing card.
- Set Margins, 0–40 pt. The picture beside it shows two windows with that gap.
- To keep the space between windows but none along the screen edges, switch on Fit tightly to screen edges. It's greyed out while Margins is 0.
| Setting | What it does | Default |
|---|---|---|
| Margins | Adds space around each tiled window. | 0 pt |
| Fit tightly to screen edges | Keeps the space between windows but removes the outer edge margins. | Off |
Change the preview colors#
The Colors card has two rows: Snap preview (where the window will go when you let go) and Drag areas (shown while dragging, when that's on). For each, pick Automatic, Light, Dark, Inverse or Custom, and set the Outline from 0 to 8 pt. With Custom, a color picker appears beside the choices.
| Setting | Default |
|---|---|
| Snap preview | Automatic; 2 pt outline |
| Drag areas | Automatic; 1 pt outline |
Leave an app alone#
- In the Ignored Apps card, click Add App….
- Choose one or more apps and click Ignore.
- To stop ignoring one, click the x on its chip.
Goblin then leaves those apps' windows alone: no shortcuts, snapping or green button menu. You can also ignore the app in front from Goblin's menu under Windows›Window Tiling.
Restore the defaults#
- At the bottom of the pane, click Restore Defaults….
- Choose Restore Preferences (keeps your layouts), Restore Layouts (removes custom layouts and shortcut changes), or Restore Everything.
Each option leaves the Window Tiling switch as it was. iCloud Sync…, beside it, opens the iCloud Sync controls in a sheet.