 Goblin
's menu bar item is where capture lives when you don't use shortcuts. A right-click opens a menu with the capture tools, the dropdown has a row of tool buttons, and the item itself shows the self-timer and the recording time.
The right-click menu#
Right-click (or Control-click) Goblin's menu bar item. The capture tools are grouped in four submenus at the top, then come Goblin's own submenus (Keep Awake, Network, Windows), Settings…, What's New and Quit Goblin.
To take a screenshot from the menu:
- Right-click Goblin's menu bar item.
- Point at Capture.
- Choose Capture Area (or any other item).
| Submenu | Items |
|---|---|
| Capture | Capture Area, Capture Previous Area, Capture Fullscreen, Capture Window, Scrolling Capture, Import from iPhone, Self-Timer (3 seconds, 5 seconds, 10 seconds), Record Screen (while a recording runs: Stop Recording and Pause Recording or Resume Recording), Record GIF (off while a recording runs). See Taking screenshots and Recording. |
| Text & Codes | Capture Text, Read Text from File…, Read Text from Clipboard (dimmed unless the clipboard has an image or PDF), Read QR or Barcode. See Capture Text. |
| Image & PDF Tools | Annotate Last Screenshot (dimmed when there isn't one), Open from Clipboard (dimmed when there is no image), Open File…, Convert Images…, PDF Tools…, Pin Last Screenshot, Restore Last Capture (brings the latest capture's card back; dimmed when the file is gone), Open Capture History (the Screenshots pinboard) and Show Recently Uploaded (cloud uploads). |
| Screen Tools | Measure Screen and Restore Last Measurements (or Turn On Measure… until Measure is on), Pick Color, and Hide Desktop Icons (a check mark shows while they are hidden; see below). |
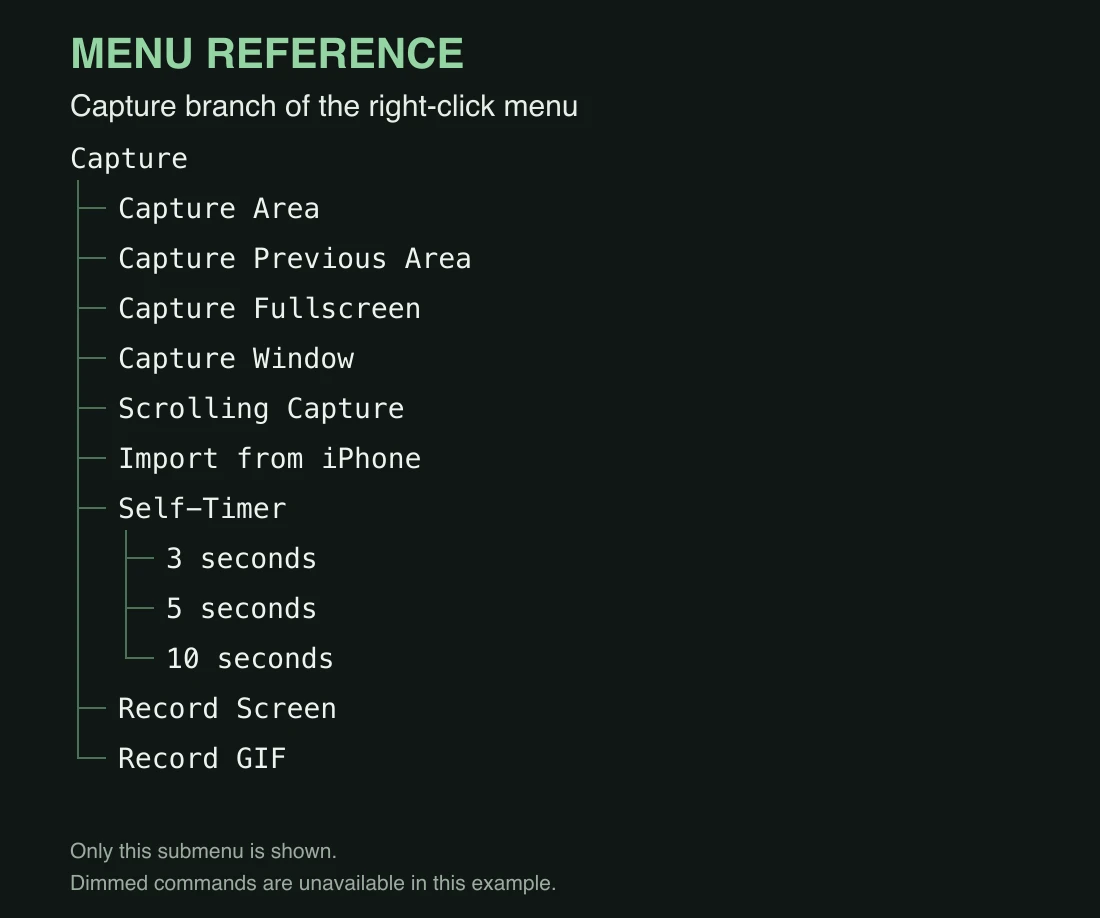
Items that have a keyboard shortcut show it. The shortcut can be a capture shortcut, or one of the extra shortcuts you made in the Shortcuts card of Settings›Menu Bar, whose list of actions includes every capture action.
The menu waits a moment before a capture starts, so the menu itself doesn't end up in the picture.
The dropdown tool buttons#
A row of buttons at the bottom of the menu bar dropdown starts a tool with one click. The row shows your first six pinned tools that work as buttons. A Mac with no saved list starts with the four capture buttons (Area, Screen, Window and Record), then Pick Color and Measure. Displays and Sound are sliders, so they never show in the row. See Tools settings.
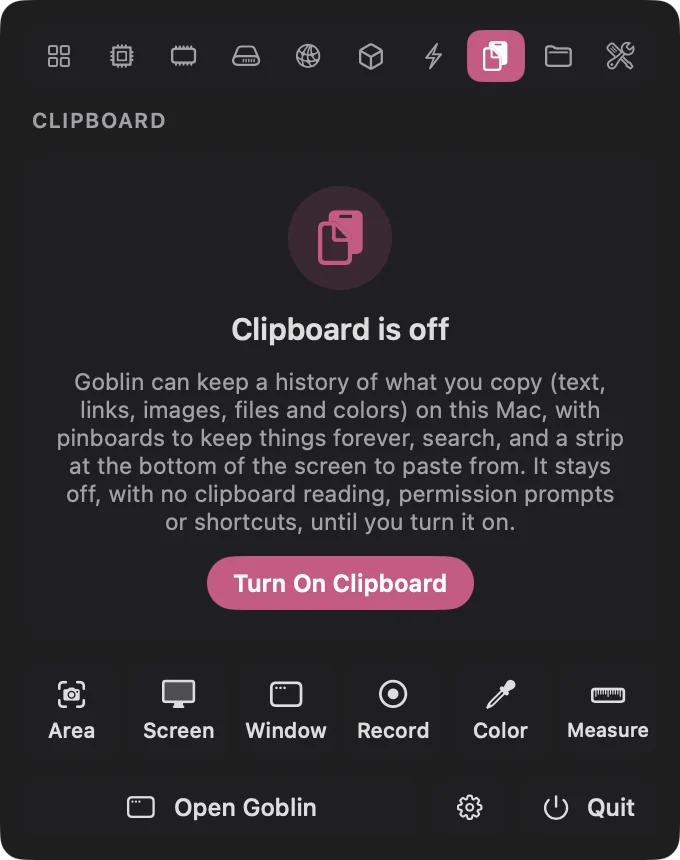
While a recording runs the row becomes the time recorded with Pause (or Resume) and Stop buttons.
Change the dropdown buttons#
- Open Settings›Capture›General and click More at the bottom.
- In the Menu Bar section, press Choose Pinned Tools…. This opens the pin editor in Settings›Tools.
- Add or reorder the tools, including the capture ones (Capture Area, Capture Fullscreen, Capture Window, Record Screen and the rest). The first six that work as buttons make the row.
The Tools tab and its pins are covered in The Tools tab and Tools settings.
What the menu bar item shows#
- Self-timer. An orange ring and the seconds left: 3, 2, 1. Click the item to cancel. See The self-timer.
- Recording. A red dot and the time recorded, grey while paused. A plain click on the item opens a small menu with Stop Recording, Pause Recording and Show Dropdown, instead of the dropdown. Option-click and the right-click menu keep doing what they did.
Add a separate capture icon#
Goblin can put a second icon in the menu bar just for capture.
- Open Settings›Capture›General.
- Switch on Capture menu bar icon (in the App section).
- Click the new icon. A menu opens with All-In-One, Capture Area, Capture Fullscreen, Capture Window, Scrolling Capture, Self-Timer, Capture Text (OCR), Record Screen, Hide Desktop Icons (or Show Desktop Icons), Read Text from File…, Open…, Open from Clipboard, Pin to the Screen…, Capture History…, Settings… and Quit Goblin. Self-Timer here counts the length set in Settings›Capture›Screenshots.
While a recording runs the icon shows the time. Goblin's own icon stays. It is off by default.
Capture menu settings#
Settings›Capture›General, under More›Menu Bar, has the switches Goblin keeps for capture in the menu bar:
| Setting | What it does | Default |
|---|---|---|
| Capture in the right-click menu | Shows the capture submenus at the top of the menu that a right-click on Goblin's item opens. | On |
| Show tools in the dropdown | Shows the row of buttons at the bottom of the dropdown. | On |
| Hide Desktop Icons while recording | Covers the desktop icons and widgets for the length of a recording. | Off |
| Let AI assistants see the screen | See Automation. | Off |
Hide Desktop Icons#
Hide Desktop Icons gives you a clean desktop for a screenshot or a recording. Goblin puts a picture of your current wallpaper over the icons and widgets of each display. Nothing is moved or changed: Goblin doesn't restart Finder or change any Finder setting, and the desktop under the picture keeps working, because clicks go through it.
- Right-click Goblin's menu bar item and choose Screen Tools›Hide Desktop Icons.
- Take your screenshot or start your recording.
- Choose Screen Tools›Hide Desktop Icons again to bring the icons back. They also come back when Goblin quits.
You can also turn it on and off with goblin capture icons on|off|toggle, a goblin://capture/hide-icons link, the Shortcuts action Hide Desktop Icons, or AppleScript (hide desktop icons, show desktop icons). Goblin follows displays and wallpaper changes while it is on.
With Hide Desktop Icons while recording on, the icons go away when a recording starts and come back when it ends. If you had hidden them yourself before the recording, they stay hidden.
Hide desktop icons and Hide desktop widgets under Settings›Capture›General›Capture are different: they hide them only for the moment a capture is taken.