 Goblin
Storage Explorer shows where your space goes. Scan a disk, a folder or a cloud account, and Goblin draws it as rings: the folder you're looking at in the middle, what's inside it around it, and what's inside those further out. The bigger the slice, the more space it takes. Follow the big slices to find what's filling your disk, select what you don't need, and review it before anything is removed. Scanning only reads; nothing changes until you confirm a removal review.
Scan a disk or folder#
- Click Disk in the main window's tab bar, then Storage Explorer in the sidebar (under Storage).
- On Disks & folders, click Scan Disk on a disk's row, or click Choose Folder… at the top and pick a folder. The folder shortcuts (Users, Home Folder, Downloads) scan in one click. You can also drop a disk or folder from Finder onto the window.
- Watch the status card while it reads. Cancel Scan stops it.
- When it's done, the ring map appears with the list of what's in the folder beside it. Click a big slice to zoom into it, and keep following the big slices to find what is using the space.
To go back to the start screen, click ‹ Disks & folders above the map.
Tip: Turn on Full Disk Access first for a complete scan of a whole disk. Without it, Goblin lists the folders it couldn't read.
Disks & folders#
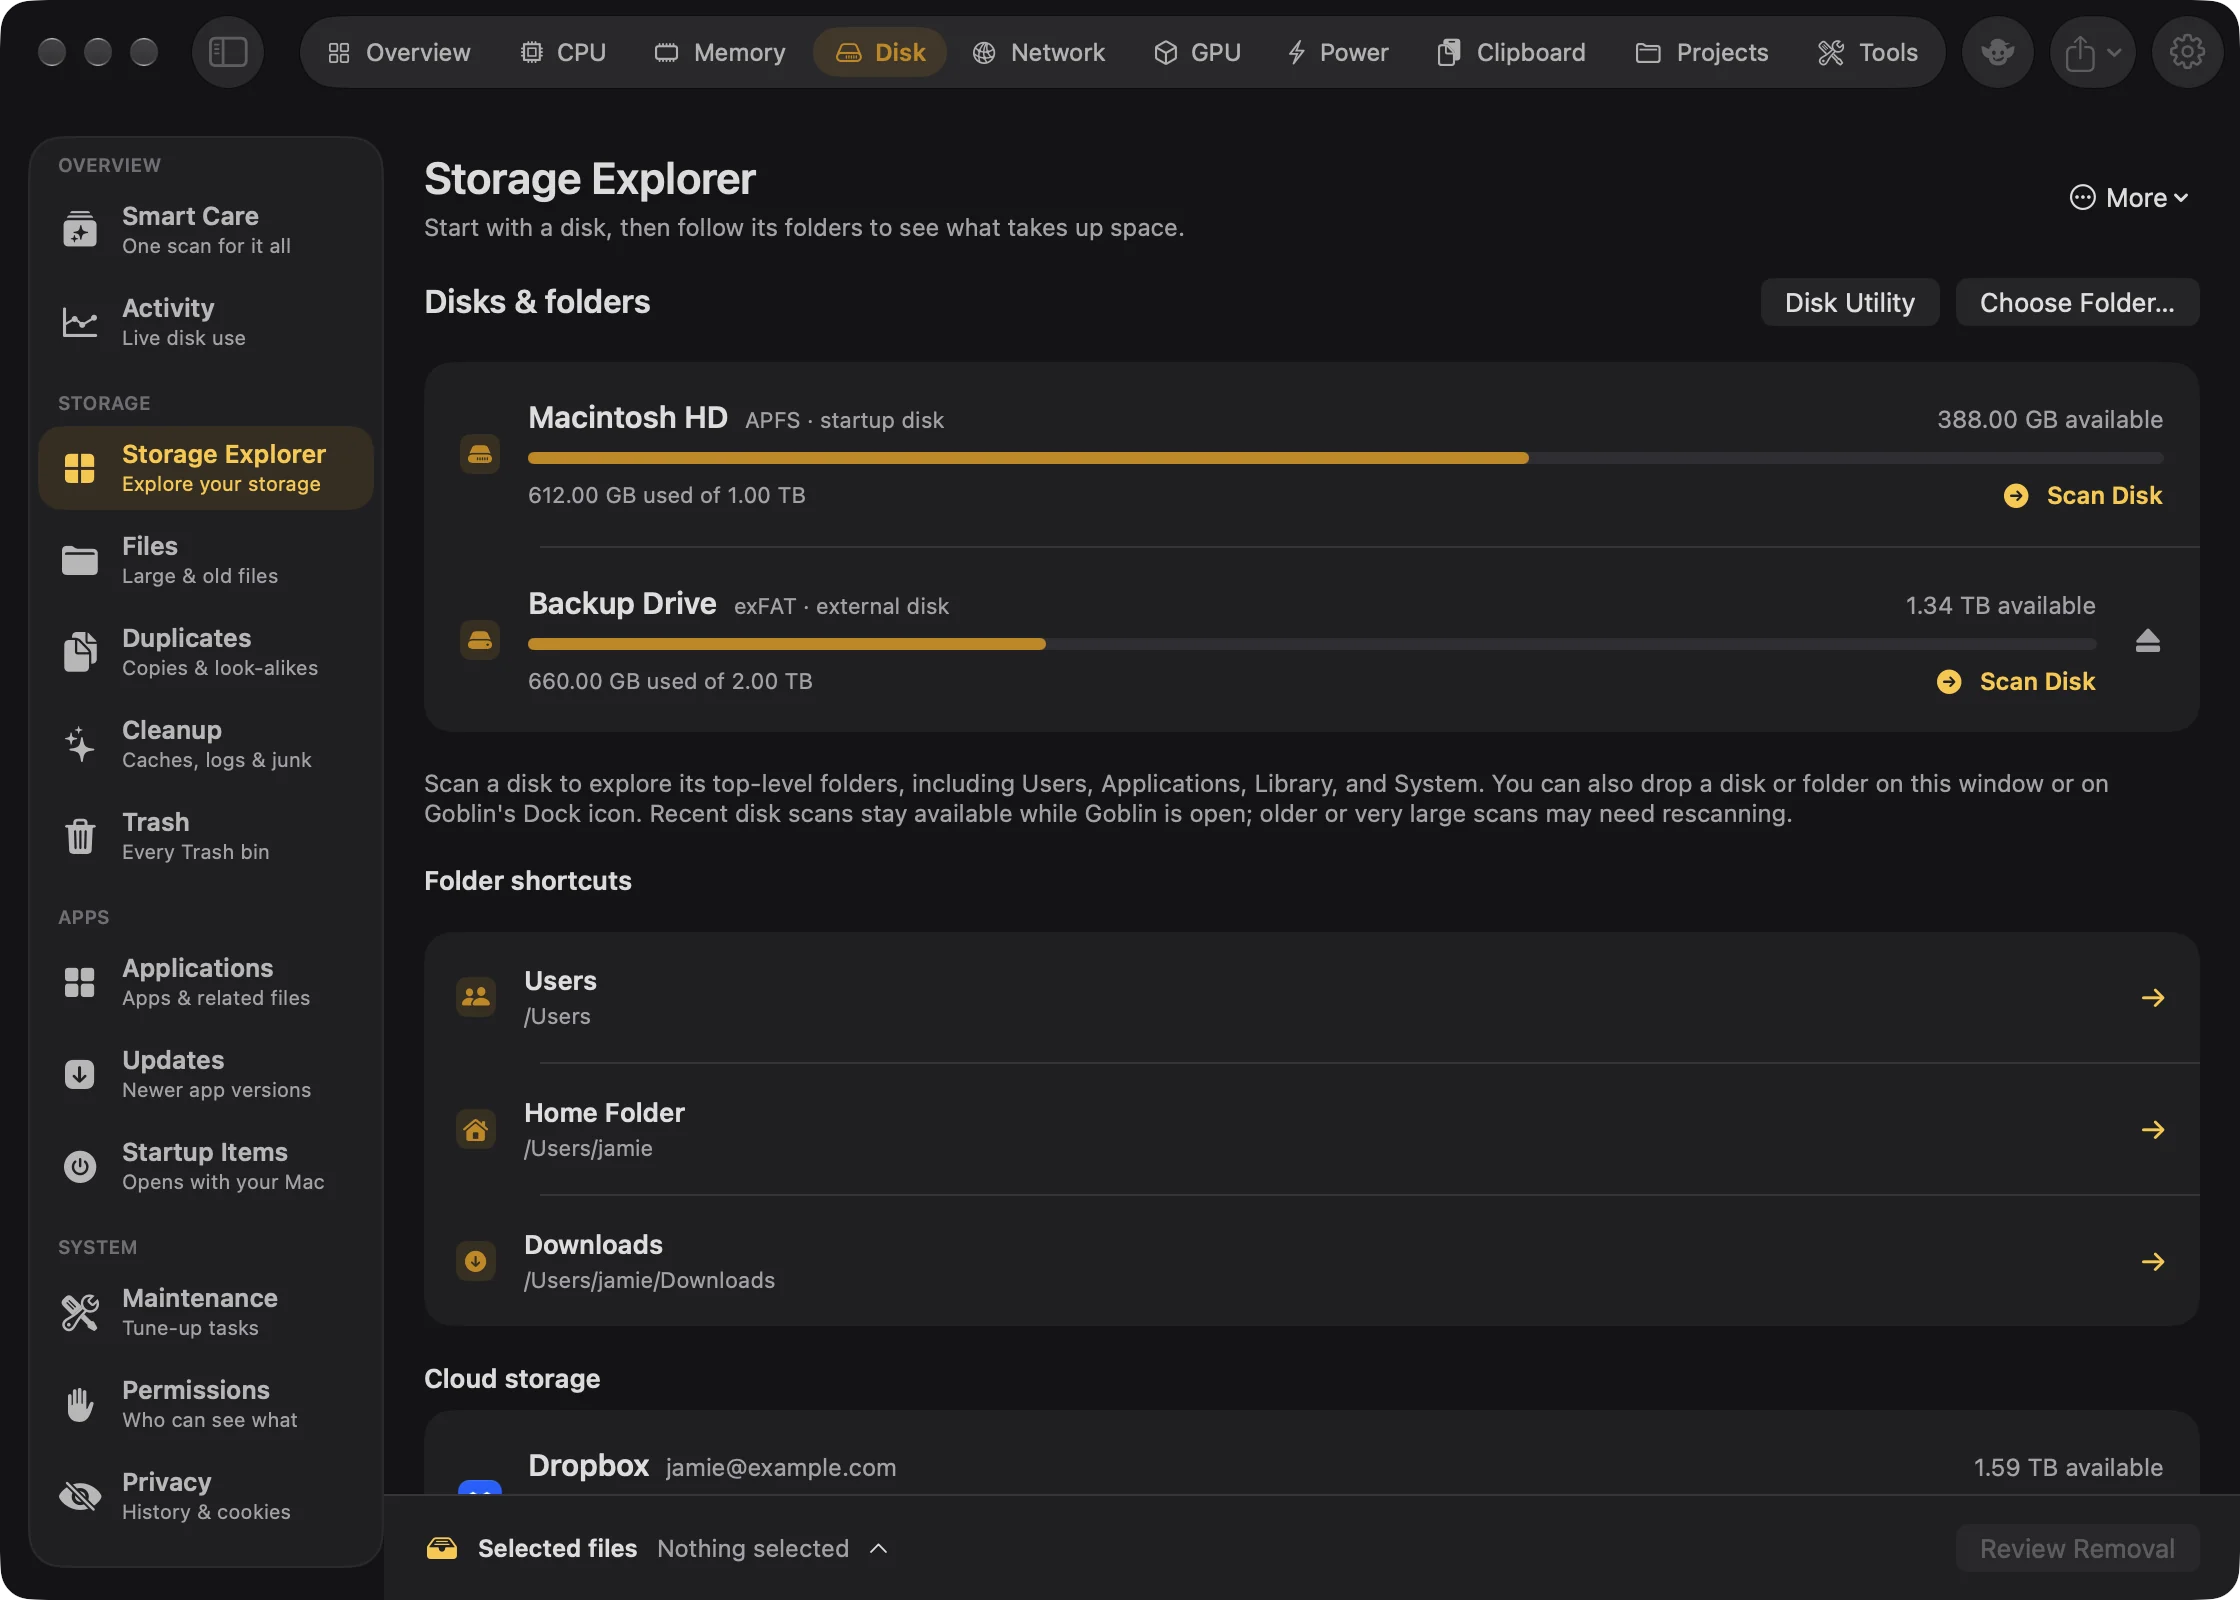
Storage Explorer opens on Disks & folders. It never starts a scan by itself.
Disks. Each mounted disk has a row with its name, what kind it is (for example "APFS · encrypted · startup disk", "external disk", "removable disk", "network share" or "read-only"), the space available, a usage bar, and how much is used. Purgeable space counts as free, as it does in Finder; hold ⌥ to count it as used instead. Click the row or Scan Disk to scan it. Disk scans always include hidden items. Resume Scan appears instead when Goblin still remembers an earlier scan of that disk (see Remembered scans). Disks you can eject have an eject button; the startup disk doesn't.
At the top, Disk Utility opens Apple's Disk Utility, for checking a disk with First Aid, erasing or partitioning it. Choose Folder… picks any folder and scans it straight away.
Further down:
- Folder shortcuts scan Users, your Home Folder or Downloads in one click.
- Pinned folders lists folders you've pinned (see Pin a folder).
- Cloud storage connects and scans Dropbox, Google Drive, OneDrive and Box accounts. See Cloud storage.
- Return to … scan takes you back to the scan you were looking at.
- Forget other remembered scans appears when Goblin remembers more than one scan.
You can also drop a disk or folder from Finder onto this window, or onto Goblin's Dock icon, or choose Open With›Goblin in Finder. Goblin opens Storage Explorer and scans it. Several folders at once scan side by side.
Scanning#
A scan reads every folder, starting with the shallowest, using many readers at once on fast disks and one at a time on spinning hard disks. Along the way it:
- never follows symbolic links;
- never downloads files that are only in the cloud (iCloud Drive with Optimize Mac Storage, Dropbox, Google Drive and the like). It doesn't even open their folders, because that would make macOS fetch them; it counts them as "cloud-only";
- stays on the disk it started on. Other disks show as Separate volume. On the startup disk, the System and Data volumes are scanned together as one;
- measures apps and other packages as a whole. You can open them like folders to look inside, but not remove parts of them;
- skips anything on the Every Section ignore list.
While it scans, a status card shows how many items have been checked, the folder being read, a percentage and an estimate such as "About 4 minutes left", and the map grows as folders are measured, with "Scanning…" in the middle.
New: Coming in the next update. The live map shows which parts are done. A folder still being counted is drawn in a muted color, and takes its full color once its size is final. The map glides between updates instead of stepping, and in the list a size with ≈ in front is an estimate that can still drop when the scan ends and shared copies are counted once.
The percentage is based on the last full scan of that location, or, for a whole disk, the number of files the disk reports. If nothing new arrives for 5 seconds, the card explains that macOS may be waiting for you to answer a file-access prompt, with buttons to open the right System Settings; see How scans work. When a macOS access prompt takes the focus, Goblin brings its window back to the front afterwards.
After the walk, Goblin calculates folder sizes, accounts for files that share space, and checks the disk's snapshots.
If a scan takes 10 seconds or more and you've switched to another app, Goblin sends a "Scan finished" notification with how long it took and the size. Turn it off with Notify when a disk scan finishes in the background in Settings › Alerts.
Background scans#
Storage Explorer can scan more than one place at a time. If you pick a disk or folder while another Disk scan is running, the new one scans alongside it. Different disks scan in parallel; two scans on the same spinning hard disk take turns. The rows show "Queued", the number of items so far, then View Scan when it's ready.
A Background scans card lists them, with what each is doing ("Waiting for the other scan on this hard disk", "Starting…", "Ready · scanned …") and buttons to View, Discard, Dismiss or Cancel it. A background scan you started while another section was scanning opens by itself when it's ready.
The location bar#
Once a scan is on screen, the bar above it has:
- ‹ Disks & folders to go back to the start screen, and when the scan was made.
- The location picker: Downloads, Home Folder, Applications, your pinned folders, and connected drives. Choosing a drive scans it at once. Choosing a folder only sets the location; press Scan to scan it.
- Choose Folder… sets the location to any folder. Unlike the button on the start screen, it doesn't scan until you press Scan.
- Scan as Administrator… (see Scan as administrator).
- Pin Folder or Unpin.
- Include hidden items, on by default. Disk scans always include them.
- More (⋯): Ignored Items… and Removal History….
- Scan, which rescans the chosen location with the chosen hidden-items setting, and Cancel Scan while it runs.
If you change the location or the hidden-items setting, a note reminds you to scan again to apply them.
New: Coming in the next update. Include hidden items is remembered between launches and syncs with the Disk & Cleanup category in Settings › iCloud Sync. Disk scans still include hidden items.
Reading the map#
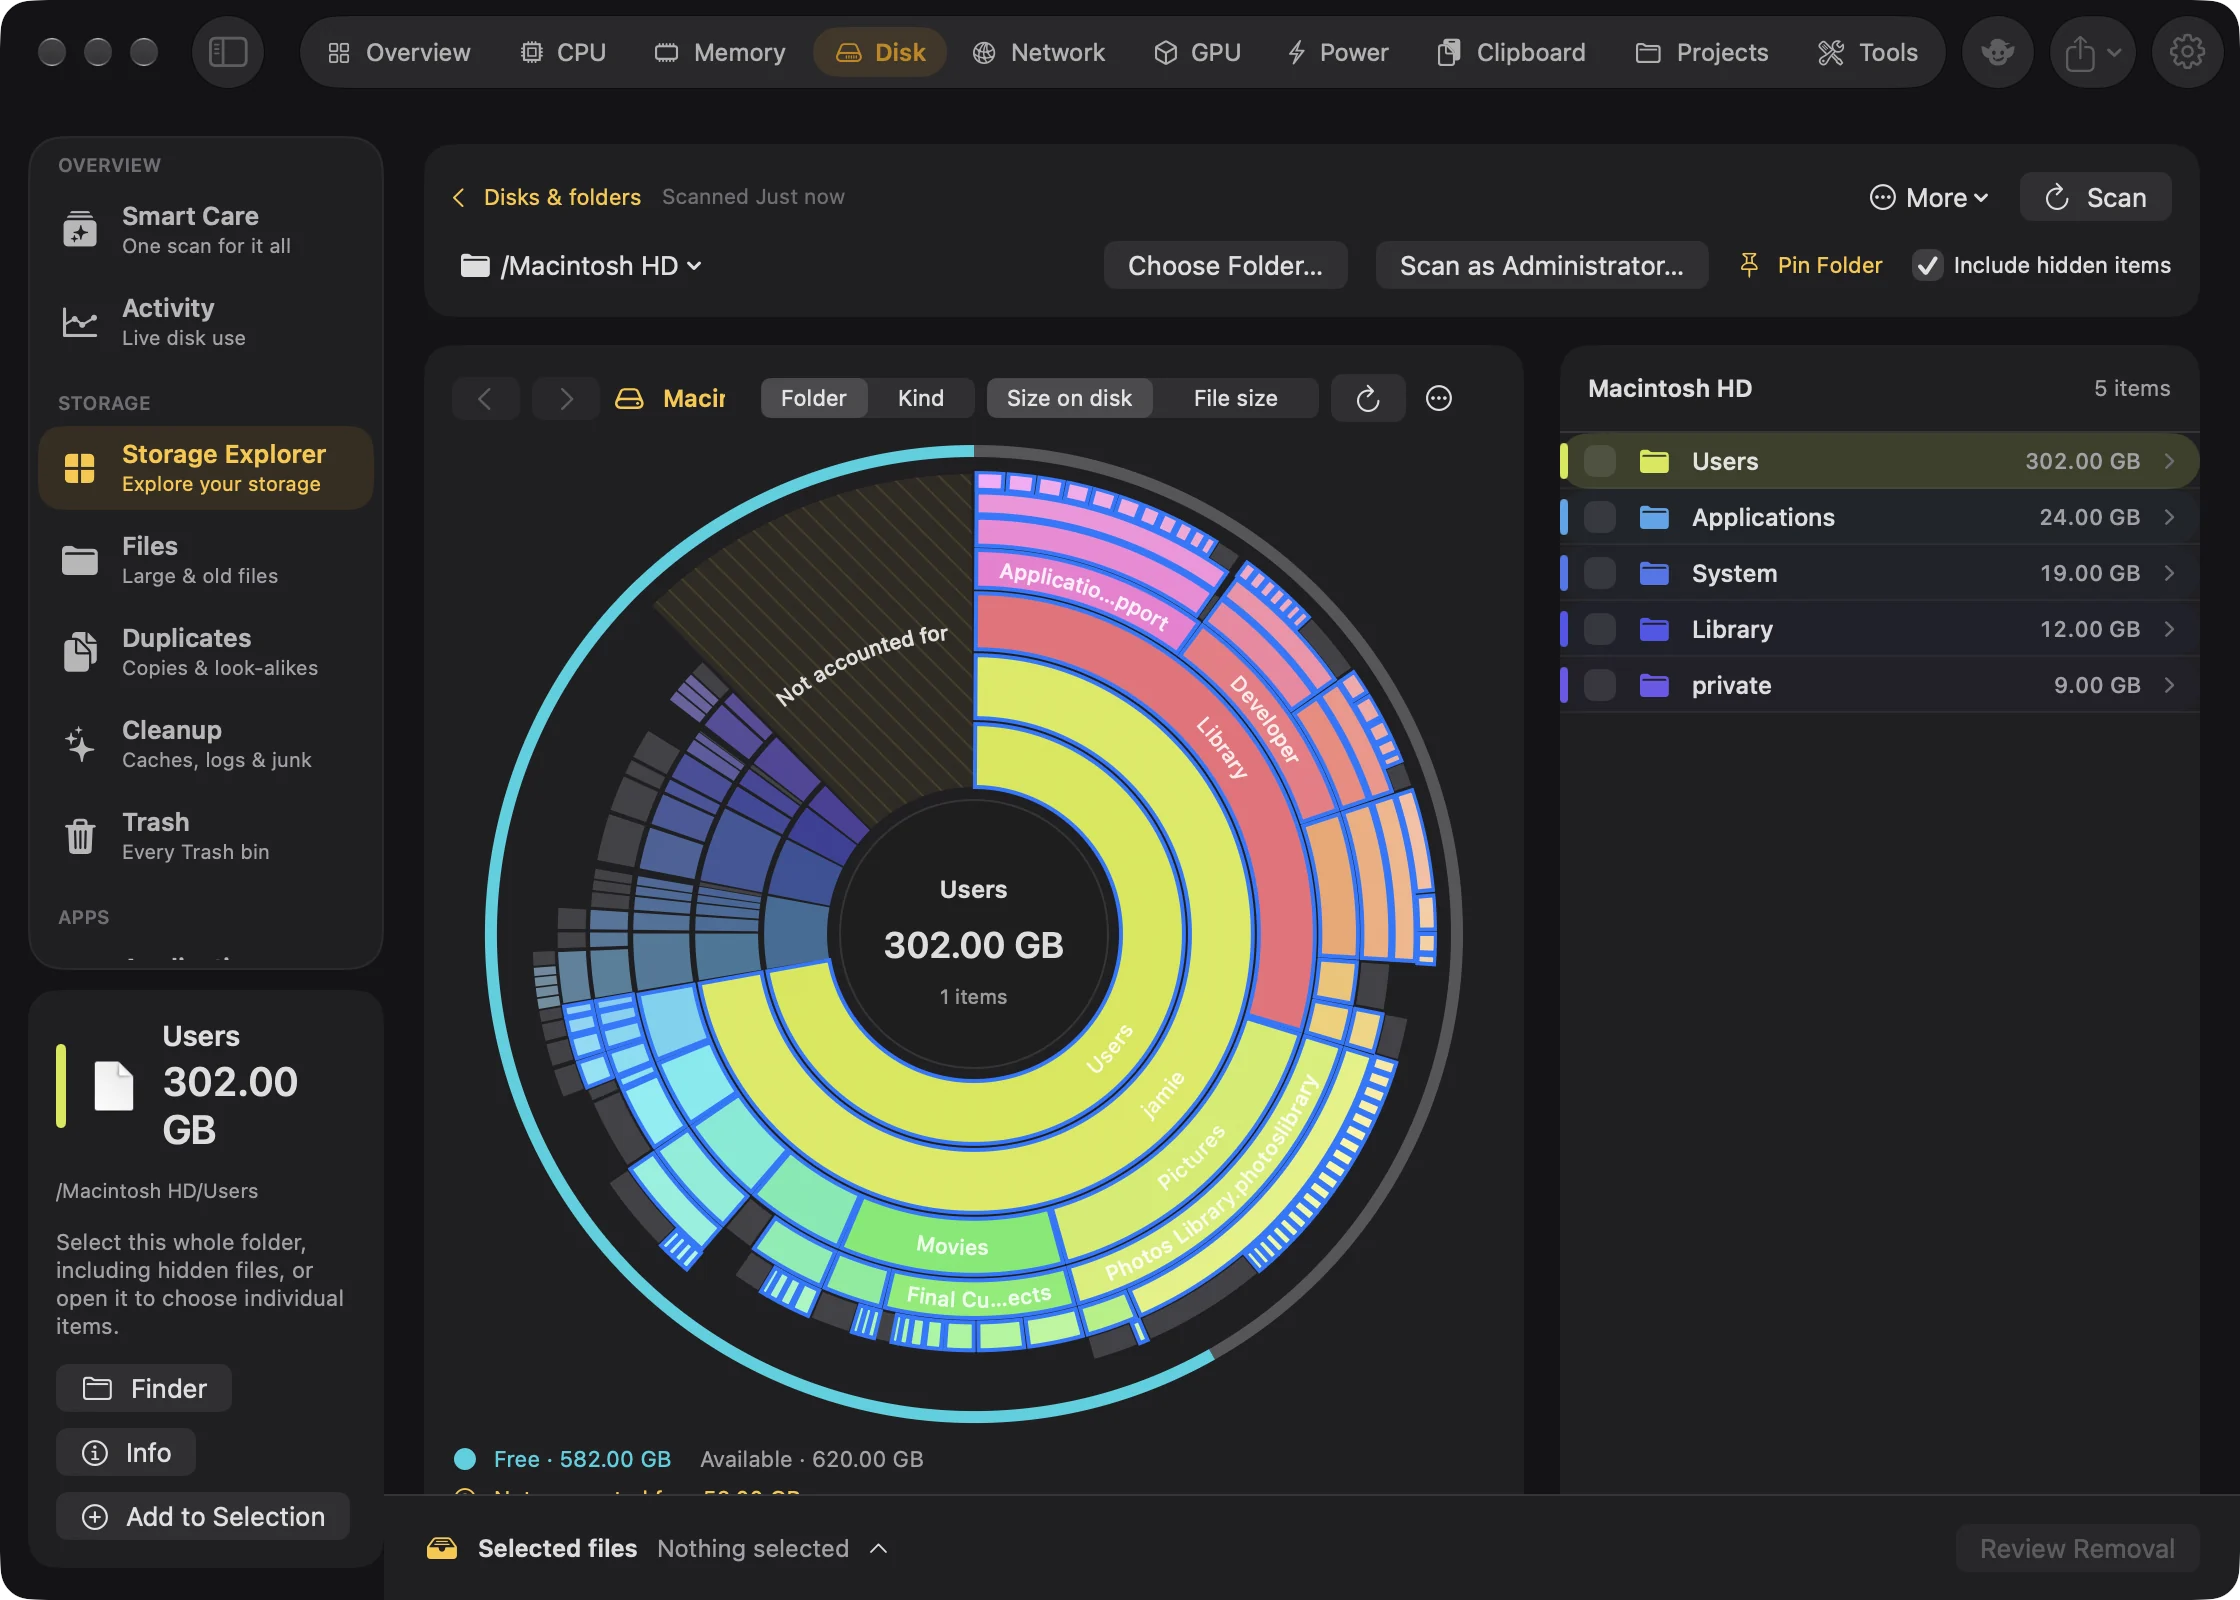
- The middle is the folder you're looking at. Its name and size are shown there, with "↑ Go up" (or "↑ Disks & folders" at the top level).
- Each ring further out is one level deeper, up to 7 rings. The angle of a slice is its share of the space.
- Small items under about 1° are grouped into a grey "N smaller items" slice. Each folder shows up to 48 items.
- Colors come from where a slice sits around the circle, so everything inside a folder shares related colors. Files are a touch lighter than folders, and deeper rings are softer. The list beside the map uses the same colors. The Folder / Kind switch above the map changes this; see Color by kind.
- Faded, hatched slices are items deleted or moved since the scan.
- A thin outer ring on a disk scan shows the disk's capacity: used (grey), other volumes and pool overhead (purple, one stretch for each volume), and free (teal).
- An amber striped wedge, "Not accounted for" (or "Not readable", see below), appears on a disk scan at the top level in Size on disk. It's used space that isn't in any file the scan could measure. See Not accounted for.
Point at a slice to highlight it with its parents and contents, and to see its name, size and a note in the middle, such as the number of items, "Restricted", "Shared copy", "Deleted since the scan" or the cloud service it syncs with. Names are written along slices that are big enough.
At the top level of a disk scan, a legend under the map gives the free, other-volume, available and unaccounted space. Available can be larger than the teal free arc because it includes space macOS can reclaim.
Color by kind#
New: Coming in the next update. Color by kind.
Choose Kind in the switch above the map, beside Folder, to color slices by what they are instead of where they sit. Each kind has its own hue, a touch lighter for each ring further out:
| Kind | What it covers |
|---|---|
| Apps | Applications |
| Downloads and Trash | Your Downloads folder, the Trash, and installers and archives such as .dmg, .pkg, .iso, .xip and .zip |
| Developer files | Code, build output and developer tools |
| Caches | Caches |
| Photos, video and music | Media |
| Documents | Documents |
| App data | Data that apps keep, such as Mail and Messages |
| macOS | The system |
| Other | Everything else |
A legend under the map lists the kinds in view, largest first. Point at one to pick it out in the map and fade the rest. Pointing at a slice adds its kind to the note in the middle. The choice is remembered. Kinds are guessed from names and places, so they help you look, and they never decide what's safe to remove.
Moving around#
To explore a scan: click a slice that looks big, or its row in the list, to zoom into that folder. Click the middle of the map, or press ⌘↑, to go up a level. Use the breadcrumbs above the map to jump to any level.
- Click a folder to zoom into it. Click a file to preview it with Quick Look.
- Click the middle to go up a level.
- Pinch open on a trackpad to zoom into the folder under the pointer; pinch closed to go up.
- Click the grey smaller-items slice to list them in the side list; Show all goes back.
- Breadcrumbs above the map jump to any level; ‹ and › go back and forward.
| Key | What it does |
|---|---|
| ⌘[ / ⌘] | Back / forward |
| ⌘↑ | Enclosing folder |
| ⌘R | Rescan this folder |
| ⇧⌘R | Rescan everything |
| ⌘⌫ | Select or deselect the item under the pointer (or the focused item) for removal |
| ⌘I | Get Info |
| ↑ / ↓ | Move through the list; Page Up / Page Down by 10, Home / End to the ends |
| Return | Open the focused folder or preview the focused file |
| Space | Quick Look |
| ← or Delete | Go up |
With Reduce Motion on, zooming happens without animation.
Right-click a slice for Open (or Preview), Select for Removal, Get Info, Show in Finder and Copy Path. You can also drag a slice onto Selected files to select it, or drag it out to Finder or another app to copy it.
Size on disk or File size#
New: Coming in the next update. Your size-basis choice is remembered and can sync to your other Macs.
The switch above the map chooses how sizes are counted:
- Size on disk (the default) is Goblin's estimate of the space allocated to files on the disk. Hard links and APFS clones that share data are counted once: the first file in the scan carries the size, and the others are marked Shared. Only this view shows "Not accounted for" and the capacity breakdown.
- File size is the length of each file's contents.
A ≥ in front of a size means part of that folder couldn't be read, so the real total is at least that. The switch isn't shown for cloud accounts. Your size-basis choice is remembered between launches and follows the Disk & Cleanup category in Settings › iCloud Sync.
Folder actions#
The … button above the map acts on the folder on screen:
- Show in Finder, Open in Terminal, Copy Path and Get Info (⌘I).
- Show Smaller Items in the Map draws every item in this folder instead of grouping small ones. Always Show Smaller Items does it everywhere and is remembered; it's off by default. With it on, each folder shows up to 1,000 items.
- Select Everything in "…" adds every item directly in this folder that can be selected to Selected files.
- Clear Selected Files.
- Export "…" as CSV… (see Export as CSV).
- Rescan This Folder (⌘R) rescans only this folder and fits the result into the existing scan. On the scan's top level, or if your ignore list changed, it rescans everything. Rescan Everything (⇧⌘R) rescans the whole location.
The list#
Beside the map, Files & folders lists what's in the folder on screen, largest first, 100 at a time (Show more items for the rest). Each row has a checkbox to select it, its color, its name and size. Hover a row to highlight its slice; click it to open the folder or preview the file.
- A struck-through name was deleted or moved since the scan.
- A purple Restricted note means macOS didn't let Goblin read it, so its size isn't measured. Quick Rescan as Administrator can measure it.
- A red cloud icon means it syncs with a cloud service, and removing it deletes it on all your devices.
- If a checkbox is greyed out, hover it to see why. Inside a selected folder, items show as included and can't be picked one by one.
Right-click a row for Preview, Open, Select for Removal or Remove from Selection, Select Everything Inside, Get Info, Show in Finder, Open in Terminal and Copy Path.
Item details and Get Info#
The detail panel at the foot of the Disk sidebar describes the item you're pointing at, or else the focused or last clicked item, or else the folder on screen: its size, path, both sizes for a file, and notes such as why it can't be selected. Its buttons are Preview, Finder, Info and Add to Selection. The panel is hidden while the sidebar is.
Get Info opens Goblin's own info sheet, not Finder's. Besides the name and size it shows the kind, where it is, size on disk and file size in exact bytes, how many items it contains, whether it shares space with another file, which cloud service it syncs with, whether it was fully measured, why it can't be removed, its created, modified and last-opened dates, the owner and the permissions.
Selecting and removing#
Selected items collect in Selected files at the bottom, with their count and how much removing them frees. Click the bar to see the list; click an item to find it in the map, or ⊗ to drop it. Clear empties the selection. A red "Includes cloud-synced items" warns you before you even open the review.
New: Coming in the next update. The bar says what removing the selection really gives back to the disk, such as "12 · frees 3.1 GB", instead of adding up file sizes. Goblin counts it the way APFS does: a hard-linked file frees its space only when every name for it is selected, and a clone frees only its own blocks unless all its copies go too. "Frees at least" means some items couldn't be read, so it may be more. A folder scan can't see copies elsewhere on the disk, so it may add "up to" a larger figure that holds if those copies are all in the selection. Hover the figure for the details. Moving files to the Trash frees the space once the Trash is emptied, and local Time Machine snapshots can hold it for a while. While it works the figure out, the bar says "working out what it frees…".
Select items with their checkbox, Select for Removal, ⌘⌫, or by dragging them onto the bar. Selecting a folder takes in everything inside it, hidden files too, and any of its contents you'd selected separately merge into it. Your selection stays while you switch Disk sections, but it belongs to this scan.
Remove files from the map#
- In the list beside the map, tick the checkbox of each file or folder you want gone. Or right-click a slice and choose Select for Removal, or press ⌘⌫ while pointing at it.
- Check Selected files at the bottom. It shows the count and how much removing them frees. Click it to see the list; click ⊗ on an item to drop it.
- Press Review Removal to open Review Storage Explorer items.
- Read the list and press Move to Trash. If a red warning shows, tick its checkbox first.
When it worked, the map updates without a rescan. Nothing is removed until you confirm in the review. When you do, Goblin checks everything again, including a whole folder's full list of contents: if anything in it changed since the scan, you'll be asked to scan again. See Reviewing a removal.
Selection rules#
Storage Explorer shows almost everything, but some places are for looking only. The reason appears when you hover a greyed-out checkbox.
| You can't select | Why |
|---|---|
| The scanned folder or disk itself | It stays in place; select something inside it. |
/, /Users, /Volumes, /private and home folders | Disks and home folders stay in place. |
| Desktop, Documents, Downloads, Movies, Music, Pictures and Public themselves | Standard personal folders stay; select items inside them. |
/System, /Library, /Applications, /usr, /bin, /sbin, /private/var, /private/etc, /dev, /opt, and every user's Library and Applications folders | Managed data. Remove apps in Applications and caches in Cleanup. |
.ssh, .gnupg, .aws, .kube, .azure, .password-store | Keys and credentials are inspection only. |
| Anything inside an app or other package | Packages are measured as a whole. |
| Online-only files | They aren't downloaded, so removing them frees nothing on this Mac. |
| Links, special files, and other disks | They aren't ordinary files on this disk. |
| Partly read items, and folders with unreadable or excluded contents | Goblin can't be sure what's inside. |
| A whole folder from a scan without hidden items | Turn on Include hidden items and rescan first. |
| Items on the ignore list, or deleted since the scan |
Inside your Library, two places are open for selection: items inside iCloud Drive, and items inside a cloud service's folder in ~/Library/CloudStorage. The service folder itself, and Google Drive's My Drive, Shared drives and Other computers, stay put. Everything here syncs, so the review shows the red cloud warning.
Scan as administrator#
Some folders are off limits even with Full Disk Access. Scanning as the system administrator (root) measures them too.
- Choose the location in the location bar.
- Click Scan as Administrator….
- Enter your Mac password when asked.
- Wait for the scan. When it worked, a banner says "Scanned as administrator: restricted folders were measured as root."
To rescan only the folders marked Restricted, use Quick Rescan as Administrator in the access panel instead (see below).
Goblin runs its own scanner behind the password prompt and writes the result to a file you own. Scanning as administrator only reads; it doesn't change what Goblin can access.
New in 1.1: With Goblin's system helper allowed under System Tasks in Settings › General, administrator scans run without a password prompt.
When access is missing#
If macOS refused access somewhere, a panel says Some locations need access with the number of gaps and where. What couldn't be read is missing from the totals. The panel offers:
- Files & Folders Settings, Full Disk Access Settings and Show Goblin in Finder;
- a tile you can drag straight into the Full Disk Access list in System Settings;
- Rescan after changing access, which repeats this scan;
- Quick Rescan as Administrator, which rescans only the restricted folders as root and fits them in, and Scan Everything as Administrator. Both need your Mac password.
New: Coming in the next update. Goblin notices when you switch on Full Disk Access. While this panel is up it checks every couple of seconds, and as soon as access is on, a green note says Full Disk Access is on now with a Rescan to Include Them button. You don't have to guess when to rescan.
Full Disk Access doesn't lift every restriction, which is why the administrator options exist. Goblin never changes access settings itself. See Full Disk Access.
Not accounted for#
On a disk scan, the space macOS reports as used is usually more than the files Goblin could measure. The difference is the amber striped Not accounted for wedge.
New: Coming in the next update. When folders on a local disk couldn't be read, most of that gap is those folders, so the wedge, the legend and the panel call it Not readable instead, and say how many locations macOS didn't let the scan read. Scan as Administrator measures them; even an administrator scan can't read some system areas. Cloud accounts and scans that read everything keep the name Not accounted for. It isn't a file, and it isn't something to clean up. Click it, or open
Why space differs in the Disk space panel, to see what this scan could identify:
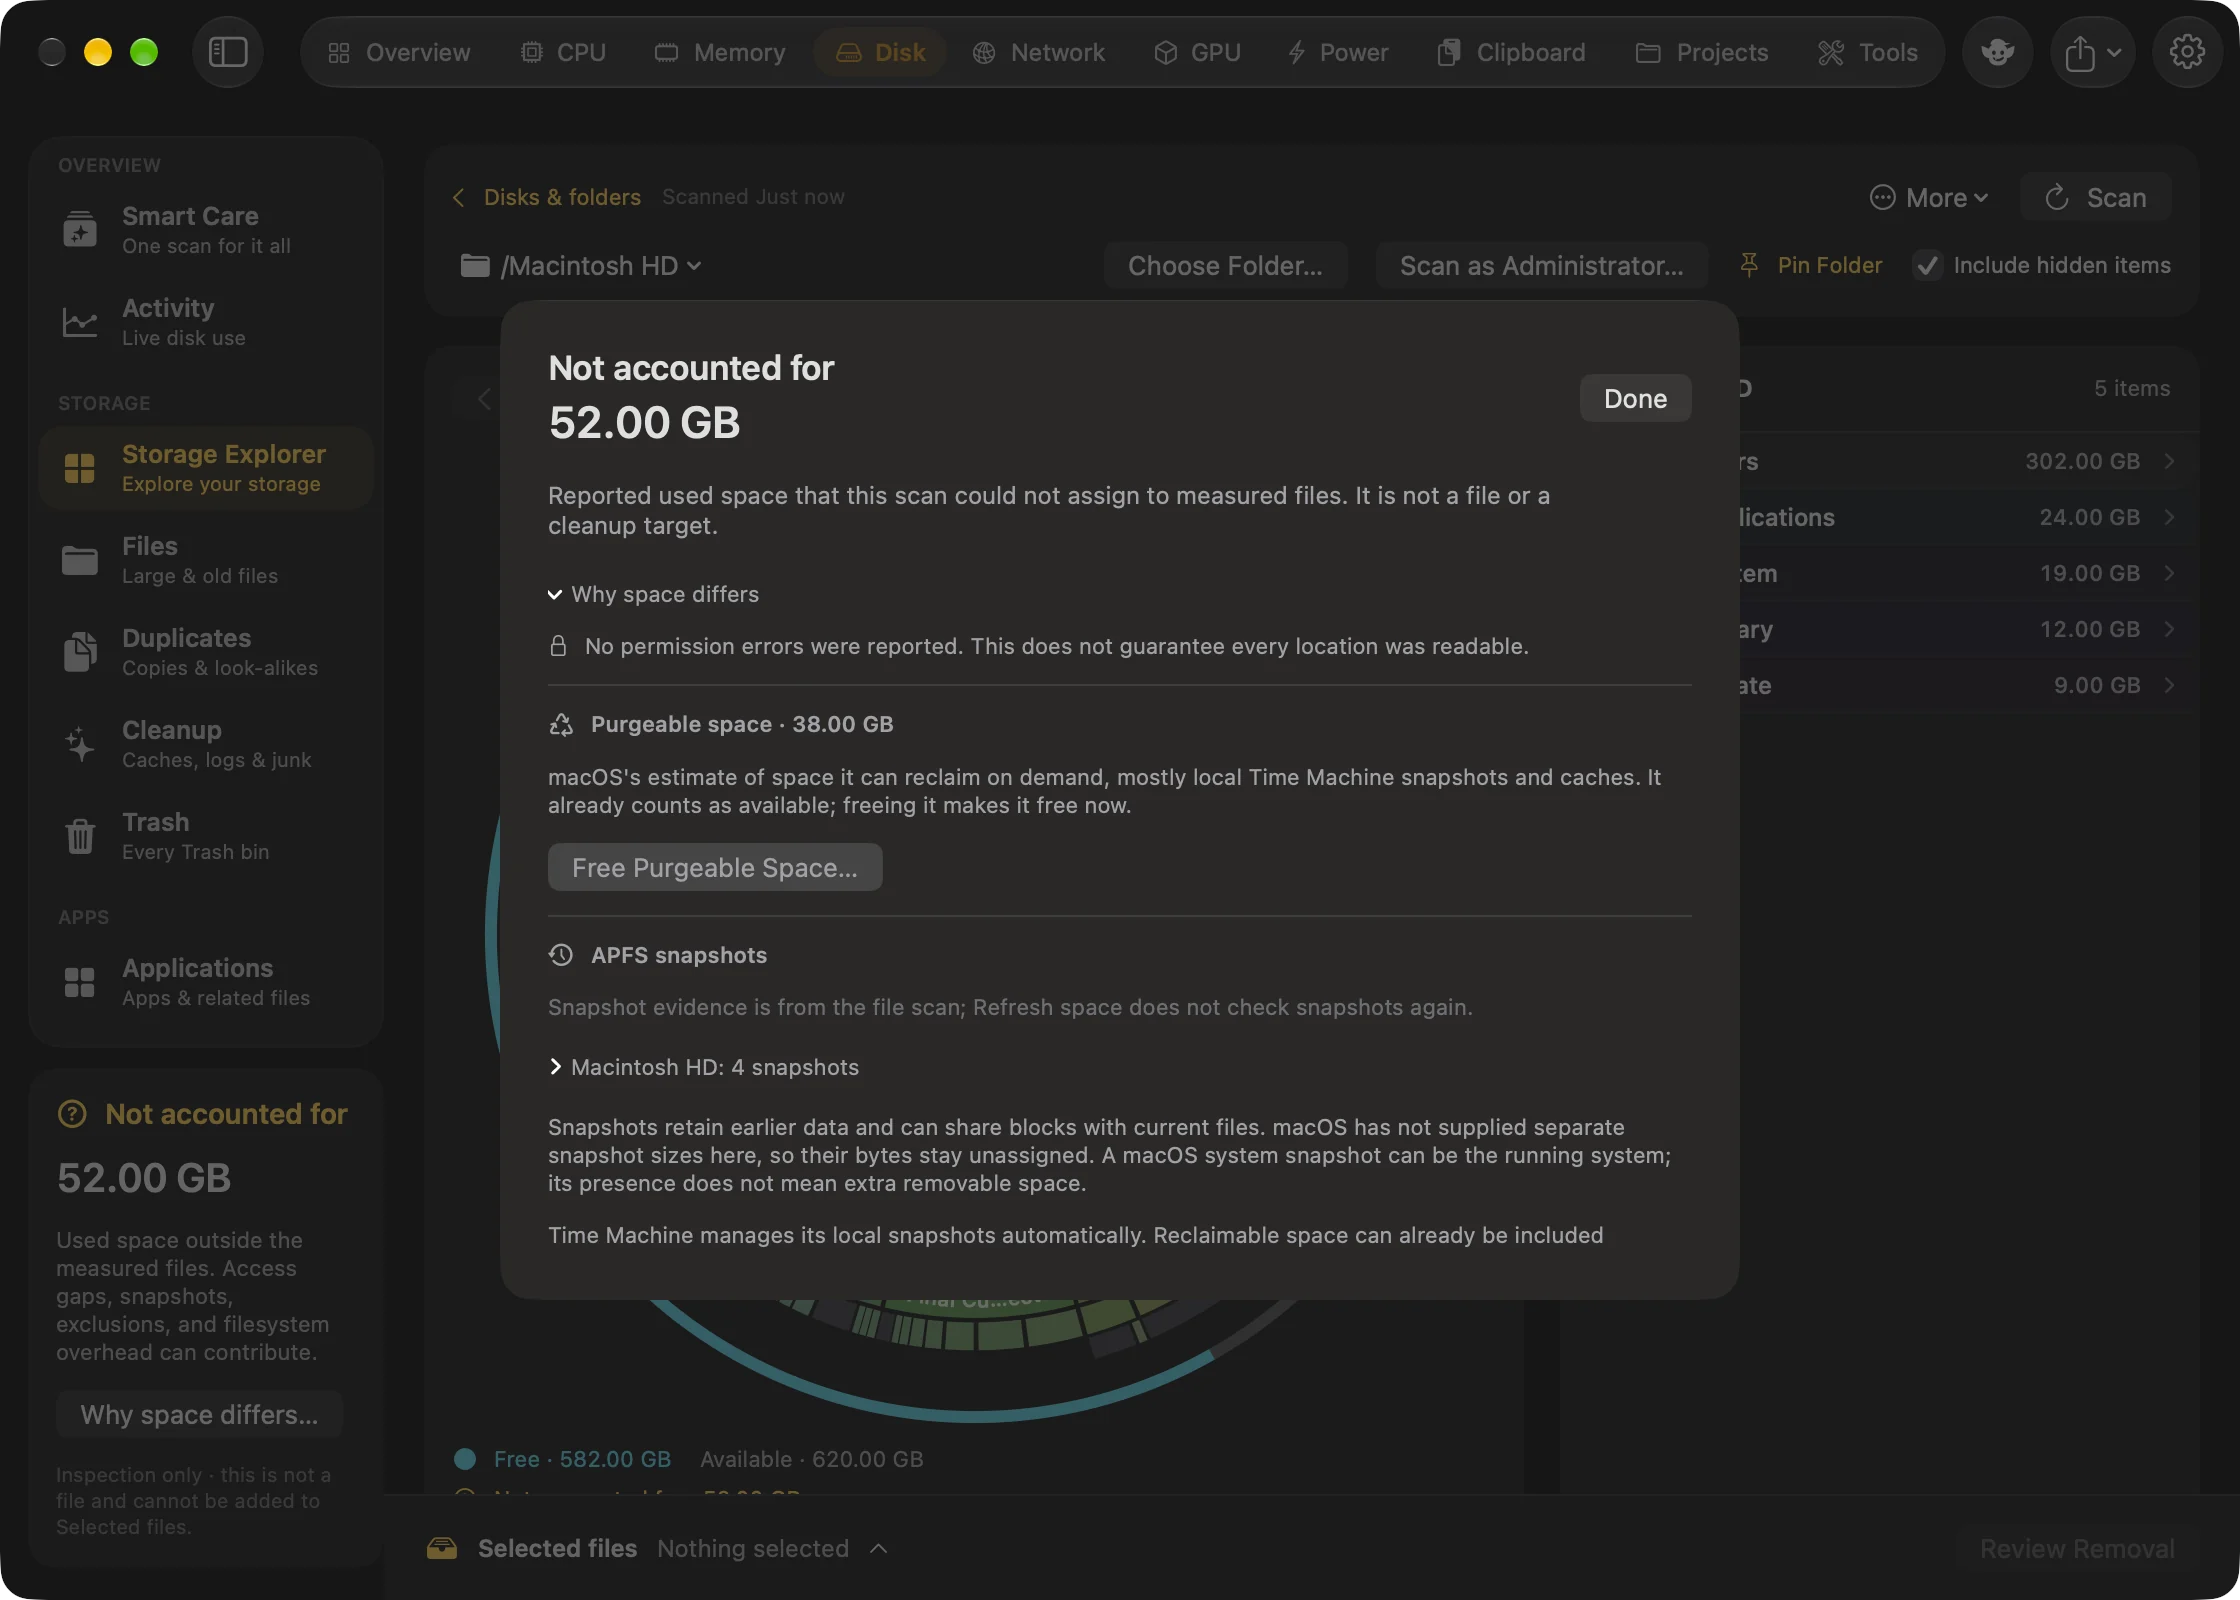
- Permission gaps and other read failures: folders Goblin couldn't read, with examples.
- Cloud-only items and other cloud items left out.
- Excluded locations: what your ignore list skipped.
- Purgeable space: macOS's estimate of space it can reclaim on demand, mostly local Time Machine snapshots and caches. It already counts as available.
- APFS snapshots: each volume's snapshots, counted as Time Machine, macOS system and other.
- Filesystem overhead and unresolved space: what's left.
Free purgeable space or delete snapshots#
- Scan the disk (not just a folder), then click the amber Not accounted for wedge, or open Why space differs….
- To reclaim purgeable space, press Free Purgeable Space…. It asks macOS to reclaim it now by thinning local Time Machine snapshots. It needs your Mac password, can take a few minutes, and free space may keep rising afterwards.
- To delete snapshots, press Delete… next to a Time Machine snapshot, or Delete All Time Machine Snapshots…. Confirm and enter your Mac password.
Warning: Deleting snapshots can't be undone: you lose the versions those snapshots could restore. Your backups on the Time Machine disk aren't touched. macOS system snapshots can't be deleted here.
Other volumes on the startup disk#
New: Coming in the next update. Other APFS volumes are named.
A Mac's disk is shared by several APFS volumes that draw on the same space. In a disk scan's legend and the Disk space panel, Other volumes on this disk lists each one the scan didn't cover, with its exact size: macOS, Preboot (startup files), VM (swap and sleep image), Update (macOS updates), Recovery, and any others by name. APFS overhead is the container's own bookkeeping and reserves. Point at a row for the volume's device name. They share the purple ring.
The Disk space panel#
Beside the map, the Disk space panel (Folder sizes for a folder scan, Cloud storage for an account) gives the numbers: disk used, measured files, not accounted for, and available, with a bar. It shows when the files were scanned and when the disk's space was last checked. Refresh space re-reads the disk's capacity without rescanning files. If the disk's reported use has changed a lot since the scan (by 256 MB or 1%, whichever is more), it suggests Scan to update files.
Files you move to the Trash still take space, so after a removal they count as "Not accounted for" until you empty the Trash. Hard links and unchanged APFS clones are counted once.
A folder scan can't compare against the disk; scan the disk itself to see unaccounted space.
Export as CSV#
- Open the folder you want to export in the map.
- Click the … button above the map and choose Export "<folder>" as CSV….
- Pick where to save it and click Save.
It saves the folder on screen and everything under it as a spreadsheet, named like "Downloads scan 2026-10-02.csv". It's unavailable while a scan is still running. Columns: Path, Name, Kind (File, Folder, Package, Link, Volume or Not local), Size on disk in bytes, File size in bytes, Modified (ISO 8601 date), and Complete (yes or partial). Each folder's contents are listed largest first.
Pin a folder#
- In Storage Explorer, choose the folder in the location bar (use Choose Folder… if it isn't listed).
- Click Pin Folder in the location bar.
When it worked, the button reads Unpin and the folder appears under Pinned folders in the location picker and on the start screen, so you can scan it again in one click. Click Unpin to remove it. Pins are remembered.
Remembered scans#
While Goblin is open, it remembers the scan on screen plus up to two others (up to 500,000 items between them), so you can go back without waiting. Only whole-disk scans can be resumed, and only with the same hidden-items setting and ignore list. Goblin checks first that it's the same disk and rescans if not. Where you were, your selection and the size view come back too. Quitting Goblin forgets them all, and so does changing the Every Section ignore list.
Goblin also watches the scanned location. Items deleted or moved outside Goblin are struck out, and a note counts the folders that changed: "Rescan Folder (⌘R) updates sizes."
Ask Goblin to prepare storage work#
Use “Scan Storage Folder /absolute/folder/path” to request an Explorer scan, then “List Storage Explorer Items”. Select an exact current path with “Select Storage Explorer Item /absolute/path”. “List Storage Explorer Selection”, “Deselect Storage Explorer Item /absolute/path” and “Clear Storage Explorer Selection” manage the native selection. “Review Remove Storage Explorer Selection” checks that the scanned items still match the files and opens the removal review. Confirm there after reading its cloud and administrator notices.
“Scan Storage Explorer Folder Again /absolute/path” refreshes a scanned folder. “Set Storage Explorer Size Basis allocated” or “Set Storage Explorer Size Basis logical” changes the displayed size basis. “Set Storage Explorer Hidden Files on” or “off” affects the next scan. “Refresh Storage Explorer Space” requests the native disk space reading; it does not delete purgeable files.
For the Files scanner, “Set File Scan Parameters {"folder":"/absolute/folder","minimumMB":100,"includeProjects":false}” validates all parameters before starting. “Find Filtered Scanned Files {"query":"archive","minimumMB":100,"olderThanDays":30}” reads matching current results. The unit is decimal MB. “Cancel Storage Scan” cancels the foreground scan. Background scans retain their separate controls.
“List Background Storage Scans”, “Start Background Storage Scan {"folder":"/absolute/folder","hidden":true}”, “Cancel Background Storage Scan ID” and “Show Background Storage Scan ID” use the native queued/background scanner. Show accepts a completed successful scan.
“Review Administrator Storage Scan /absolute/folder” and “Review Administrator Restricted Folder Scan” prepare exact scan reviews before the native password flow. “List Storage Local Snapshots”, “Review Delete Storage Snapshot ID”, “Review Delete All Storage Snapshots” and “Review Free Purgeable Storage” preserve the native administrator controls. Snapshot deletion cannot be undone; these requests do not claim space was reclaimed.
“List All Storage Ignore Entries” returns IDs that include their section. “Add Section Storage Ignore {"path":"/absolute/path","section":"files"}” changes the native list. “Remove Storage Ignore Entry ID” removes an exact current entry; rescan to include it.