 Goblin
Capture needs one permission from macOS, and a few optional ones for extras. Goblin never asks for any of them by itself. Each is asked for when you first use the feature that needs it.
The permissions#
| Permission | What for | Needed? |
|---|---|---|
| Screen Recording | Capturing other apps' windows and the screen: every screenshot and recording. | Yes |
| Microphone | Recording your voice with a screen recording. | Optional |
| Camera | Showing yourself in a corner of a screen recording. | Optional |
| Accessibility | Hover passthrough and element detection (capturing tooltips, hover states and single buttons while you select) and Auto Scroll in a scrolling capture. | Optional |
| Notifications | Showing the text Capture Text recognized. | Optional |
Screen Recording is the same permission Intelligent Clipboard uses to read the window you paste into, so one grant covers both.
Allow Screen Recording#
- Open Settings›Capture›General. The Permissions section is at the top.
- Find the Screen Recording row. If its note is red and starts with Off, press Set Up…. (If it shows a green On, you are done.)
- macOS may show its own prompt. Choose to open System Settings. Goblin's small helper bar appears beside System Settings, reading Drag Goblin into the list.
- In Privacy & Security›Screen Recording, turn Goblin on. If Goblin isn't in the list, drag the row from the helper bar into it.
- If macOS offers Quit & Reopen, choose it. Or press Quit & Reopen on the helper bar, which says "Screen Recording is on. Reopen Goblin to use it." Goblin comes straight back.
- Back in Settings, the row shows On.
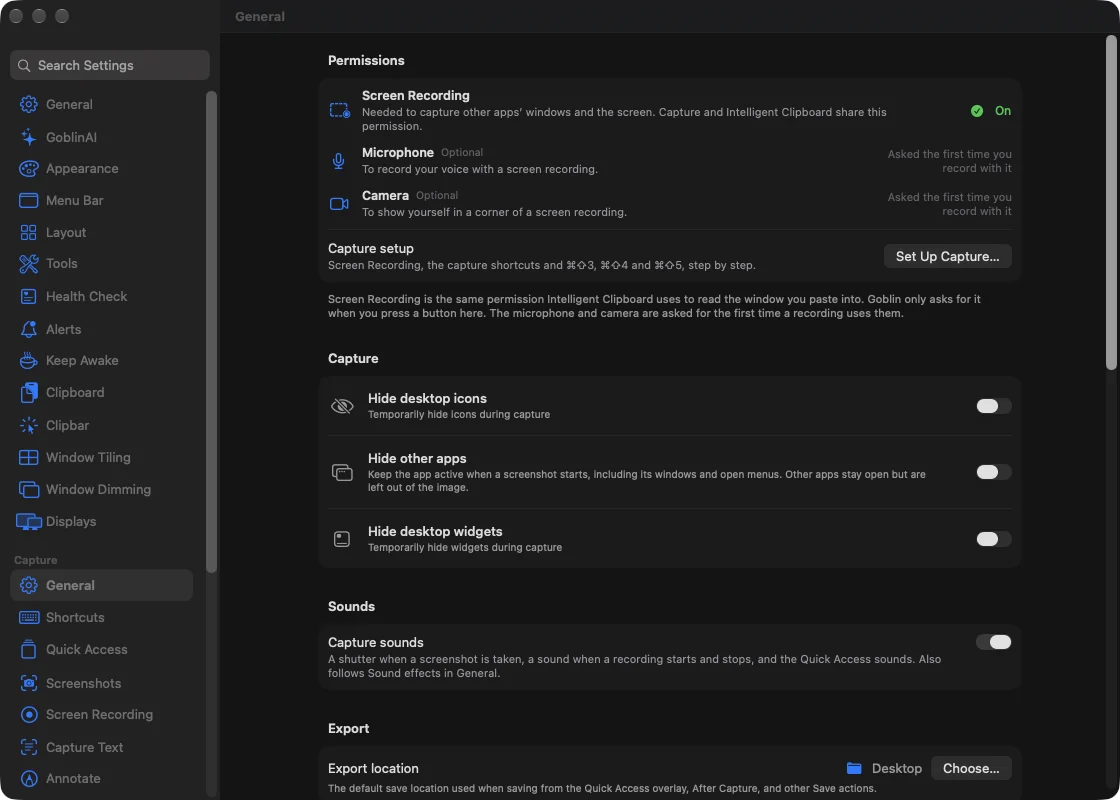
The same walkthrough is step 1 of Set Up Capture… (the button below the permission rows). If you start a capture before allowing it, Goblin guides you the same way.

Goblin uses the permission only when you take a screenshot or start a recording. Captures go into your clipboard history and the Screenshots pinboard, and nothing is sent anywhere unless you upload it.
Allow the microphone or camera#
You don't need to do anything ahead of time. macOS asks the first time a recording uses the microphone or the camera.
- Open Settings›Capture›General. The Microphone and Camera rows say Optional and Asked the first time you record with it until macOS has been asked.
- Turn the microphone or camera on in the recording toolbar (Recording). Answer macOS's prompt.
- If you said no, the row shows Open System Settings. Press it and turn Goblin on under Privacy & Security›Microphone or Camera.
If capture doesn't work#
- Capture says it can't take screenshots or recordings until Screen Recording is on. Open System Settings›Privacy & Security›Screen Recording and turn Goblin on, or press Set Up… in Settings.
- After you turn it on, macOS may need Goblin to quit and reopen before it takes effect.
- When a recording asks for the microphone or the camera and macOS hasn't allowed it, Goblin says which one and points you to System Settings›Privacy & Security.
- If a scripted capture (
goblin capture, a link, the Shortcuts app or an AI assistant) gets no answer, look at Goblin: it may be waiting for you to allow Screen Recording. - Hover passthrough and Also detect specific elements need Accessibility. Goblin asks when you turn them on, and captures work without it.