 Goblin
Settings › General holds the choices that affect all of Goblin: how it updates, whether it starts at login and sits in the Dock, the units it uses for temperatures, network speeds and app CPU, two optional network checks, the global keyboard shortcuts, which folders Goblin may look in, the Finder menu, and whether Goblin can run administrator tasks without asking for your password each time. Use this page when you want to change one of those. Each task below gives the steps first, then the details.
Open Settings#
- Press ⌘, while Goblin is in front. Or choose Goblin›Settings… in the menu bar.
- Or right-click (or Control-click) Goblin's menu bar item and choose Settings….
- Or click the gear button in the toolbar of Goblin's main window.
Settings opens on the pane you looked at last, and on General the first time. When another part of Goblin asks for a pane while Settings is already open, such as Preferences… in Keep Awake's menu or the settings button in the clipboard strip, the open window switches to that pane.

The panes#
A list of panes sits on the left and the chosen pane on the right. Each pane scrolls on its own. In order, the list holds:
- General, GoblinAI, Appearance, Menu Bar, Layout, Tools, Health Check, Alerts, Keep Awake, Clipboard, Clipbar, Window Tiling, Window Dimming and Displays.
- A Capture group: General, Shortcuts, Quick Access, Screenshots, Screen Recording, Capture Text, Annotate, Wallpaper, Upload and Advanced, then Measure.
- iCloud Sync, Firewall, Projects, History, Overlapping Apps, Siri Phrases and Help & Feedback.
Firewall is only listed when your copy of Goblin includes the firewall. A firewall notification or the firewall's setup tour can open Settings straight on it. When the window is narrower than about 840 points, the list folds into a button at the top left that shows the current pane's name. Click it to browse or search.
New in 1.1: The Clipboard and iCloud Sync panes. See Clipboard settings and iCloud Sync.
Search for a setting#
- Open Settings.
- Click Search Settings above the list, or press ⌘F to jump into it.
- Type a setting name, what it does, or a feature. The list narrows to the panes that match and says how many there are, such as "3 matching pages". Each result shows an excerpt of the matching text.
- Click a pane, or press Return to open the first one.
Press Esc or click the × to clear the search and bring back the full list.
Banners at the top of a pane#
Two kinds of banner can sit across the top of a Settings pane. Each has a small × in its corner; closing one keeps it closed until what it says changes, or until the problem clears and comes back.
- Shortcut clash. Goblin checks each global shortcut it holds against the ones macOS and your open apps use. When two use the same keys, one of them silently stops working, so Goblin warns you. A pane with a clash shows a warning sign beside its name in the list, and a banner naming the clash and which app holds the keys. On General the banner lists every clash in Goblin, each with a Show button that opens the pane to fix it. Give Goblin's shortcut another combination, or change or turn off the other one. Goblin checks again when apps open or quit.
- Overlapping apps. When apps on your Mac do things Goblin already does, a banner on General names up to three of them (more are counted, such as "2 more") and says which features overlap: "Goblin already does … See what you can keep." Its Compare button opens Overlapping Apps. Apps you've marked Keep both aren't named, and with none left the banner is gone.
New: Coming in the next update. The overlapping apps banner.
Check for an update#
- Open Settings›General.
- Look at the card at the top. It shows Goblin's version and build number and where updates stand.
- Click Check Now. It shows a spinner while Goblin checks.
- If a newer version exists, Goblin downloads and installs it straight away, then restarts. You can also choose Goblin›Check for Updates… in the menu bar.
If the update server can't be reached, the card says Couldn't reach the update server. Check your connection and try again.
The line under the version tells you what's going on:
- Checking for updates… or Downloading a version.
- <version> is ready. It installs the next time Goblin is out of sight or quits. A newer Goblin is downloaded and waiting. The button reads Restart Now: click it to install and relaunch Goblin at once.
- Version <version> is available. A newer Goblin exists but hasn't been downloaded. The button reads Install. It says …available on the download page and the button reads Download when this copy can't replace itself. Download opens
https://macgoblin.com/so you can get the new version yourself. - Up to date · checked some time ago, or Up to date.
See Updates for the whole story.
Turn automatic updates on or off#
- Open Settings›General.
- Find the Update automatically switch in the card at the top.
- Click it. On means Goblin installs new versions by itself. Off means a newer version only shows as available, and you choose Install (or Check Now) when you want it.
Goblin checks for a new version 45 seconds after it starts and then every 6 hours. If you turn Update automatically on while a version is offered as available, Goblin downloads and installs it right away and restarts.
Try beta versions#
- Open Settings›General.
- Next to Updates, click Beta. Production is the other choice and the default.
- Leave Install betas automatically on (it appears once you choose Beta) to have betas install on their own, or switch it off to make them wait for you to click Install. It is greyed out while Update automatically is off.
Beta gets early versions before everyone else, as well as every finished release. Going back to Production keeps the version you have until a newer release comes out. Finished releases still install on their own even when betas wait.
| Setting | What it does | Default |
|---|---|---|
| Update automatically | Downloads a newer version by itself and installs it at a quiet moment. | On |
| Updates | Production or Beta. | Production |
| Install betas automatically | On the Beta channel only. Off: betas wait for Install. | On |
| Uninstall… | Removes Goblin and the things it added to your Mac. See Uninstall Goblin. | none |
| What's New | Opens the What's New window with the release notes. | none |
| Check Now | Checks for an update now, and installs it if one is found. | none |
New: Coming in the next update. Inactive app-volume changes no longer hold up quiet updates.
When a downloaded update installs. Goblin waits until none of its windows, its menu bar panel or Settings is on screen, no app with a changed volume or mute setting has active or uncertain playback, no app is being watched until it's done, and no Keep Awake session is running (restarting would end it). It also installs when you quit Goblin. Quitting never hangs on your monitors: if Goblin's display controls can't put them back within a few seconds, Goblin quits anyway, so an update waiting to install does.
Copies that can't update themselves. A Goblin that runs straight from the disk image, from a folder you can't write to, or from the temporary spot macOS runs a newly downloaded app from until you move it, offers Download instead of installing. Move Goblin to your Applications folder to fix this.
Every download is checked against the update feed's checksum and against Higher Bar's Developer ID signature before it installs.
Start Goblin at login#
- Open Settings›General.
- Click the Open at login switch so it is on.
Goblin now starts when you log in. This is the same switch as Goblin in System Settings›General›Login Items & Extensions. With Clipboard on, it's also what starts recording your clipboard at login. Settings › Clipboard has no Open at login switch of its own, because the clipboard runs inside Goblin.
To stop it, click the switch again.
Note: The Welcome window's Open Goblin at login box is ticked to begin with, so most people already have this on.
Show Goblin in the Dock#
- Open Settings›General.
- Click the Show in Dock switch so it is on.
Goblin gets a Dock icon and a place in the ⌘⇥ app switcher. With it off, Goblin lives only in the menu bar. Choose the icon the Dock uses in Appearance.
Turn sound effects off#
- Open Settings›General.
- Click the Sound effects switch so it is off.
Sound effects covers Goblin's own short sounds: the uninstall spell, a finished Smart Care scan, a finished cleanup, freed memory, a connection alert, an ejected drive and a stopped dev server. It also gates the clipboard's copy, paste, pin and delete sounds, which have a second Sound effects switch of their own in Settings › Clipboard. Those play only while both are on.
Goblin's sounds also stay silent when Play user interface sound effects is off in macOS's Sound settings. The switch has nothing to do with app volumes in Goblin's Tools.
| Setting | What it does | Default |
|---|---|---|
| Open at login | Starts Goblin when you log in. | Off in the app, but the Welcome window ticks it, so usually On |
| Show in Dock | A Dock icon and a place in the ⌘⇥ switcher. | Off |
| Sound effects | Goblin's own short sounds. | On |
New in 1.1: The Sound effects switch.
GoblinAI#
Name, clothes, color, personality, optional Apple Intelligence, voice and local memory live in Settings › GoblinAI.
Change the units#
- Open Settings›General.
- Scroll to the Temperature, Network Speed and App CPU cards.
- Click the tile you want in each card. The tile shows a live example from your Mac, and the choice applies at once.
These cards change how numbers read everywhere in Goblin: the window, the menu bar panel, the menu bar item and alert texts.
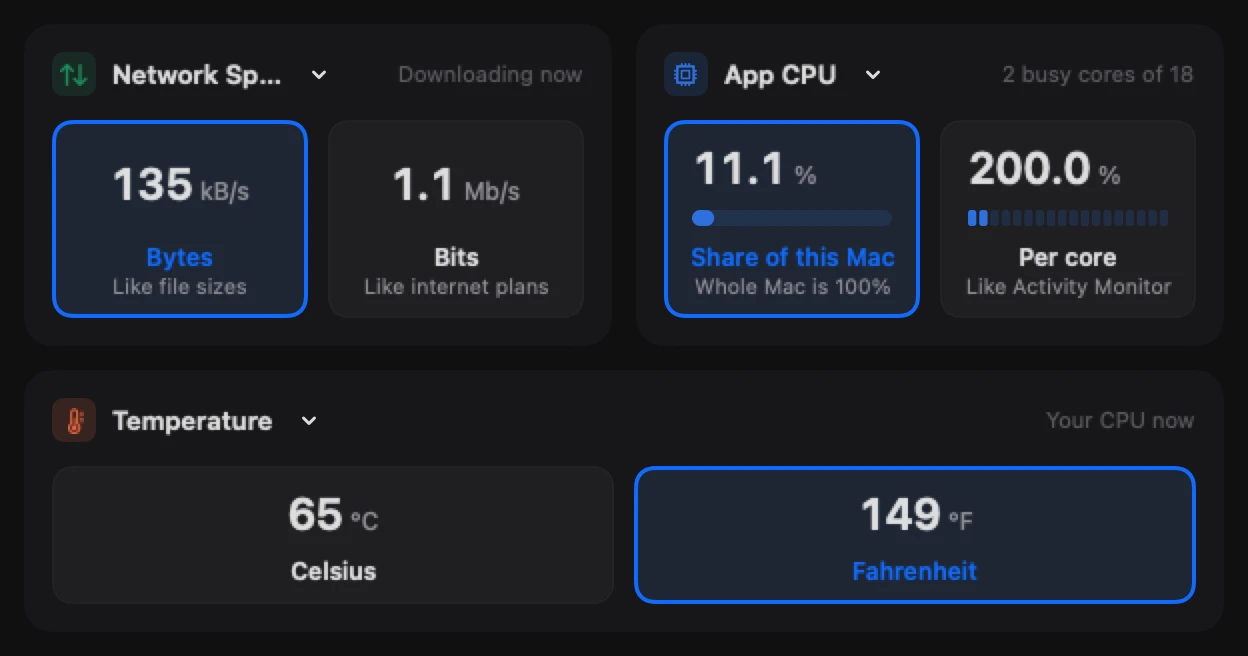
| Setting | Choices | What it does | Default |
|---|---|---|---|
| Temperature | Celsius, Fahrenheit | The unit for every temperature, including the threshold in the The Mac is running hot alert. | Fahrenheit if your Mac's region uses US measurements, otherwise Celsius |
| Network Speed | Bytes (Like file sizes), Bits (Like internet plans) | Shows network rates in bytes per second (MB/s), the way file sizes are measured, or bits per second (Mb/s), the way internet providers sell speed. | Bytes |
| App CPU | Share of this Mac (Whole Mac is 100%), Per core (Like Activity Monitor) | How an app's CPU use reads. Share of this Mac counts the whole Mac as 100%. Per core counts each core as 100%, as Activity Monitor does, so a busy app can show more than 100%. | Share of this Mac |
The App CPU choice also changes alert wording. With Share of this Mac an alert says something like "6% of this Mac's processing power (0.8 cores)"; with Per core it says "80% CPU". The Network Speed choice is the same setting as Traffic rate unit in Settings›Firewall›Advanced.
Turn connection quality checks off#
- Open Settings›General and scroll to Connection Quality.
- Click Check connection quality to turn it off. Click it again to turn it back on.
| Setting | What it does | Default |
|---|---|---|
| Check connection quality | Pings your router and 1.1.1.1 once a second to measure latency, jitter and loss. | On |
The pings only run while a Goblin window or the menu bar panel is on screen, and nothing else is sent. They feed the connection cards on the Network tab, the connection row in the panel, and the Connection check in Health Check. With this off, those show nothing, and the diagram on the card (This Mac, Router, 1.1.1.1) greys out.
Show my public IP address#
- Open Settings›General and scroll to Public IP Address.
- Click Show my public IP address so it is on.
- Open the Network tab. Your public address shows beside your Mac's own addresses.
| Setting | What it does | Default |
|---|---|---|
| Show my public IP address | Asks Cloudflare (https://1.1.1.1/cdn-cgi/trace) for the address the internet sees your Mac at, and shows it beside your Mac's own addresses. | Off |
Goblin asks while one of its windows or the menu bar panel is on screen, or while the My IP address changes alert in Alerts is on. It asks at most every 5 minutes, and again soon after your network changes. Your Mac's own (local) addresses never need this lookup.
Set a shortcut to open Goblin#
- Open Settings›General and scroll to Keyboard Shortcuts.
- Click Open dropdown from any app to open and close the menu bar panel, or Open window from any app to show the main window.
- Choose the modifiers in the first pop-up menu: ⌥⌘, ⌃⌘, ⌃⌥⌘ or ⌥⇧⌘.
- Choose a letter A to Z in the second one.
- Press your shortcut from any app to try it.
The pop-up menus are greyed out while their switch is off. The shortcuts don't need Accessibility or Input Monitoring permission. To change a shortcut later, use the same two menus. To remove one, switch it off.
| Setting | What it does | Default |
|---|---|---|
| Open dropdown from any app | Opens or closes the menu bar panel. | Off; ⌥⌘P when turned on |
| Open window from any app | Shows Goblin's main window. | Off; ⌥⌘S when turned on |
| Drop down from the menu bar when macOS or another app uses one of Goblin's shortcuts | Goblin tells you from the menu bar when another app takes keys one of its shortcuts uses. | On |
If macOS refuses a combination because something else already uses it, the card says This shortcut is in use. Choose another combination. in red. It doesn't say which of the two shortcuts clashed, so try changing one at a time. Goblin also warns, in red, when a combination is one of its capture shortcuts, and, in amber, when another app on your Mac is known to use it. The line begins Dropdown shortcut: or Window shortcut:.
In the panel, ⇥ and ⇧⇥ switch tabs, ⌘1–⌘0 jump to a tab and Esc closes it. On the panel's Clipboard tab, ⌘1–⌘9 paste clips instead, and Esc first closes a preview and clears the search. The clipboard's own global shortcuts, such as ⇧⌘V for the strip, are set in Settings › Clipboard. In the main window, ⌘1–⌘0 jump to the first ten tabs. For more shortcuts, such as opening the window on a particular tab, use the Shortcuts card in Settings›Menu Bar. See Keyboard shortcuts.
Give Goblin access to your folders#
Goblin only looks in Documents, Desktop and Downloads once you've allowed it, so macOS never asks out of the blue. You have two ways to allow it, and Folder Access is where you pick.
To allow everything with one switch (recommended):
- Open Settings›General and scroll to Folder Access.
- On the Full Disk Access row, click Allow…. A small guide opens beside System Settings.
- Follow it to turn on Goblin under System Settings›Privacy & Security›Full Disk Access.
- Come back to Goblin. The row now says On, and macOS won't ask about folders again.
Full Disk Access opens up emptying and sizing the Trash (and the Trash on each drive), clearing Safari, Chrome and Brave history and cookies, finding what deleted apps left behind, Mail attachments, iPhone backups and app permissions, projects in any folder, and projects and files on external and network drives. Most of this has no prompt of its own, so allowing folders one by one can't reach it. You can turn it off again any time in System Settings.
To allow only some folders:
- In Folder Access, click Rather not? Allow folders one at a time.
- On the Documents, Desktop or Downloads row, click Allow…. macOS asks. Click Allow in its prompt.
- The row changes to On.
These rows cover Projects and dev servers (and apps you run from those folders), screenshots saved to the Desktop, and Clipbar's offer to add an extension you download. Disk stays limited: the Trash, browser data and other apps' files still need Full Disk Access. If macOS has already been told no for a folder, the button reads Open System Settings. Turn the folder on in System Settings›Privacy & Security›Files & Folders.
The folder rows are hidden while Full Disk Access is on.
Turn on Goblin's Finder menu#
The Finder card adds Uninstall with Goblin to Finder's right-click menu. macOS keeps the extension off until you allow it.
- Open Settings›General and scroll to Finder.
- Click Turn On in System Settings….
- In the list System Settings opens, turn on Goblin.
- Come back to Goblin. The card reads On: Uninstall with Goblin is in Finder's menu.
Now right-click an app in Applications and choose Uninstall with Goblin to review it and its files in Goblin. Archives get Open in Goblin, Extract Here and Compress with Goblin. When the extension is on, the button reads Open System Settings… instead, in case you want to switch it off. The card checks again each time Goblin comes to the front. See Uninstall from Finder.
Reset all settings on this Mac#
New: Coming in the next update. A reset control in General.
- Open Settings›General and find Reset settings.
- Click Reset All Settings….
- Read the confirmation, then click Reset Settings and Restart.
Cancel leaves your settings and sync choices as they are.
Goblin ends active Keep Awake sessions and restarts with local preferences at their defaults. iCloud sync turns off on this Mac; your other Macs' settings stay as they are. History, pinboards, files, saved tool results, credentials, history encryption, custom Clipbar actions and firewall rules stay. This restart keeps history even if Clear history when Goblin quits is enabled. Clipboard turns off with the reset; turn it back on to use your retained clips.
System Tasks#
New in 1.1: The System Tasks card and its helper.
New: Coming in the next update. With the helper on, closed-lid Keep Awake sessions no longer ask for your password.
Some things Goblin does need administrator rights: removing files an app installed for every user, emptying items the system owns from the Trash, maintenance tasks, Time Machine snapshots, background items, privacy permissions, saved Wi-Fi networks, Keep Awake with the lid closed, Scan as Administrator and Capture Traffic. Without help, Goblin asks for your password each time. The System Tasks card lets you install a small helper so these run without asking. The helper only runs these tasks, and only for Goblin.
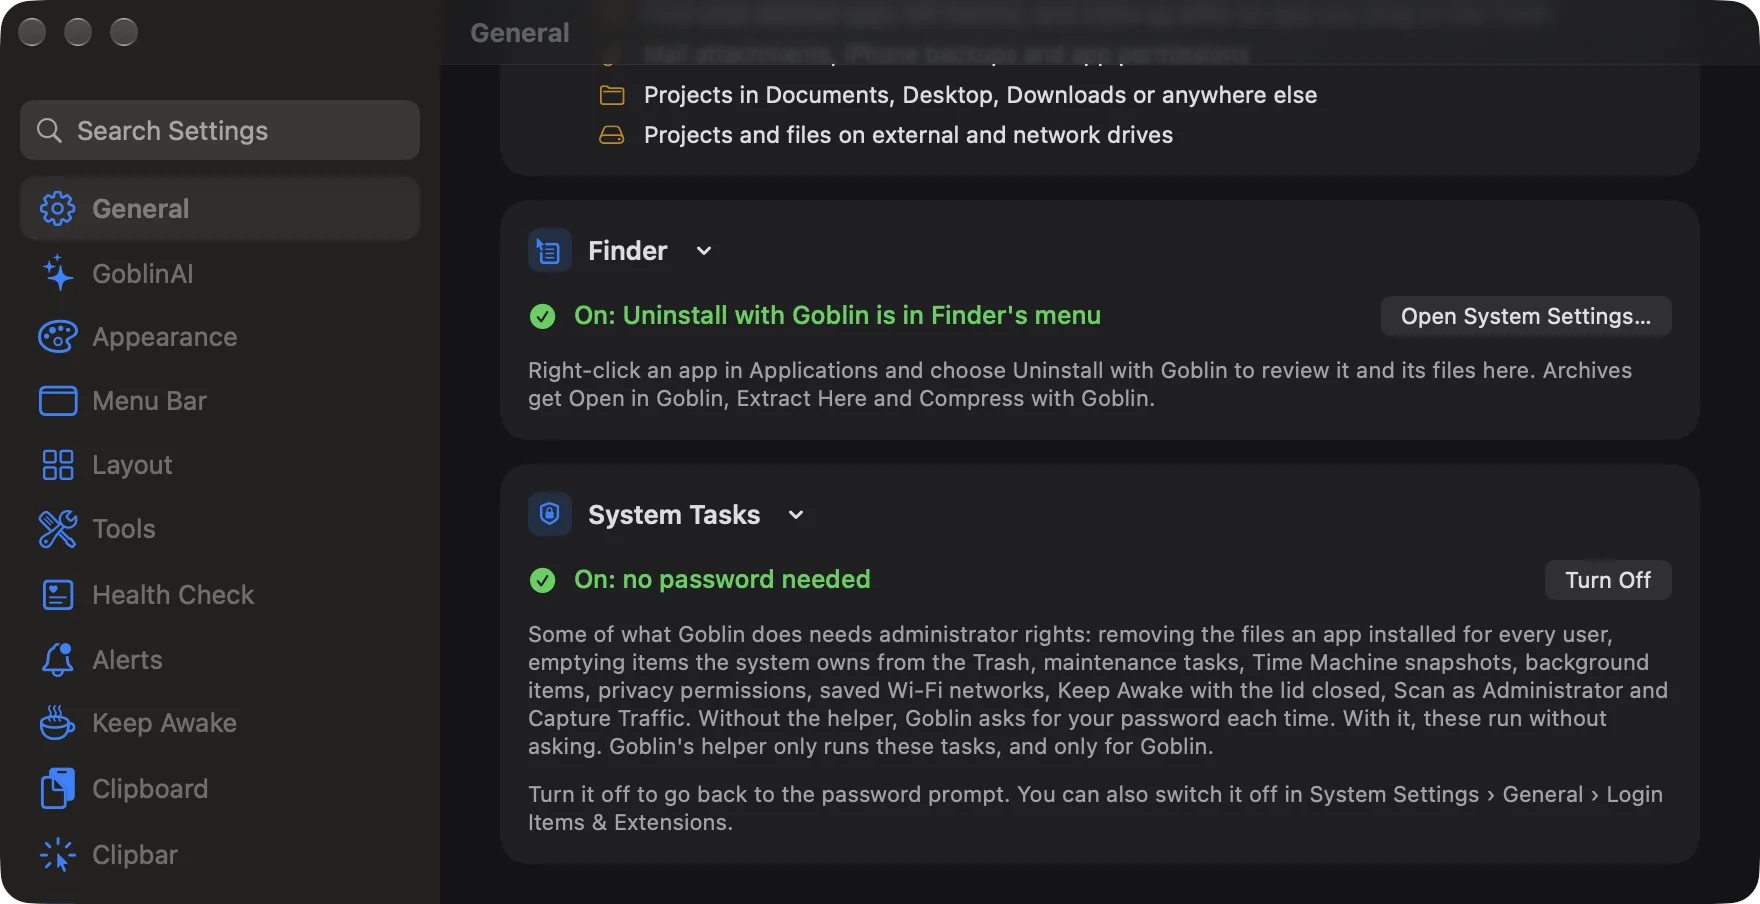
To turn it on:
- Open Settings›General and scroll to System Tasks.
- Click Allow Goblin to Run System Tasks…. Goblin registers the helper and opens System Settings›General›Login Items & Extensions.
- Under Allow in the Background, turn on Goblin. macOS asks for this once.
- Come back to Goblin. The card checks again each time Goblin becomes active, and changes to On: no password needed.
To turn it off, click Turn Off on the same card. Administrator tasks ask for your password again. You can also switch it off in System Settings›General›Login Items & Extensions. If the helper ever doesn't answer, Goblin falls back to asking for your password.
| Status | What it means | Buttons |
|---|---|---|
| Off: Goblin asks for your password | No helper. Every administrator task asks for your password. | Allow Goblin to Run System Tasks… |
| Waiting for your approval | The helper is registered, but macOS needs you to allow it. | Open System Settings…, Turn Off |
| On: no password needed | The helper is approved and working. | Turn Off |
| Not included in this build | This copy of Goblin doesn't have the helper. It asks for your password for each task. | none |
See Permissions.