 Goblin
Settings›Firewall holds every setting for Goblin's optional firewall. Use this page to find a setting, see what it does, and follow the steps to change it.
Open the firewall settings#
- Press ⌘, to open Goblin's Settings window, and click Firewall in the sidebar.
- Click a pane name in the strip along the top: General, Status Menu, Alert, Monitor, Profiles, Security, DNS, Notifications or Advanced.
Two shortcuts straight to the pane you used last: the gear button (Firewall Settings…) in the menu bar panel's Firewall card, and Firewall Settings… in the menu you get by right-clicking Goblin's menu bar item.
While the firewall is off, the pane shows only what turning it on involves and a Turn On… button; see Turning the firewall on. Once it's on, a strip along the top switches between nine panes: General, Status Menu, Alert, Monitor, Profiles, Security, DNS, Notifications and Advanced. This page goes through them in that order.
Note: If you've turned off Allow Settings Editing under Security and haven't unlocked yet, the Status Menu, Alert, Monitor, Profiles and DNS panes are greyed out, and other changes ask for Touch ID or your password first.
General#
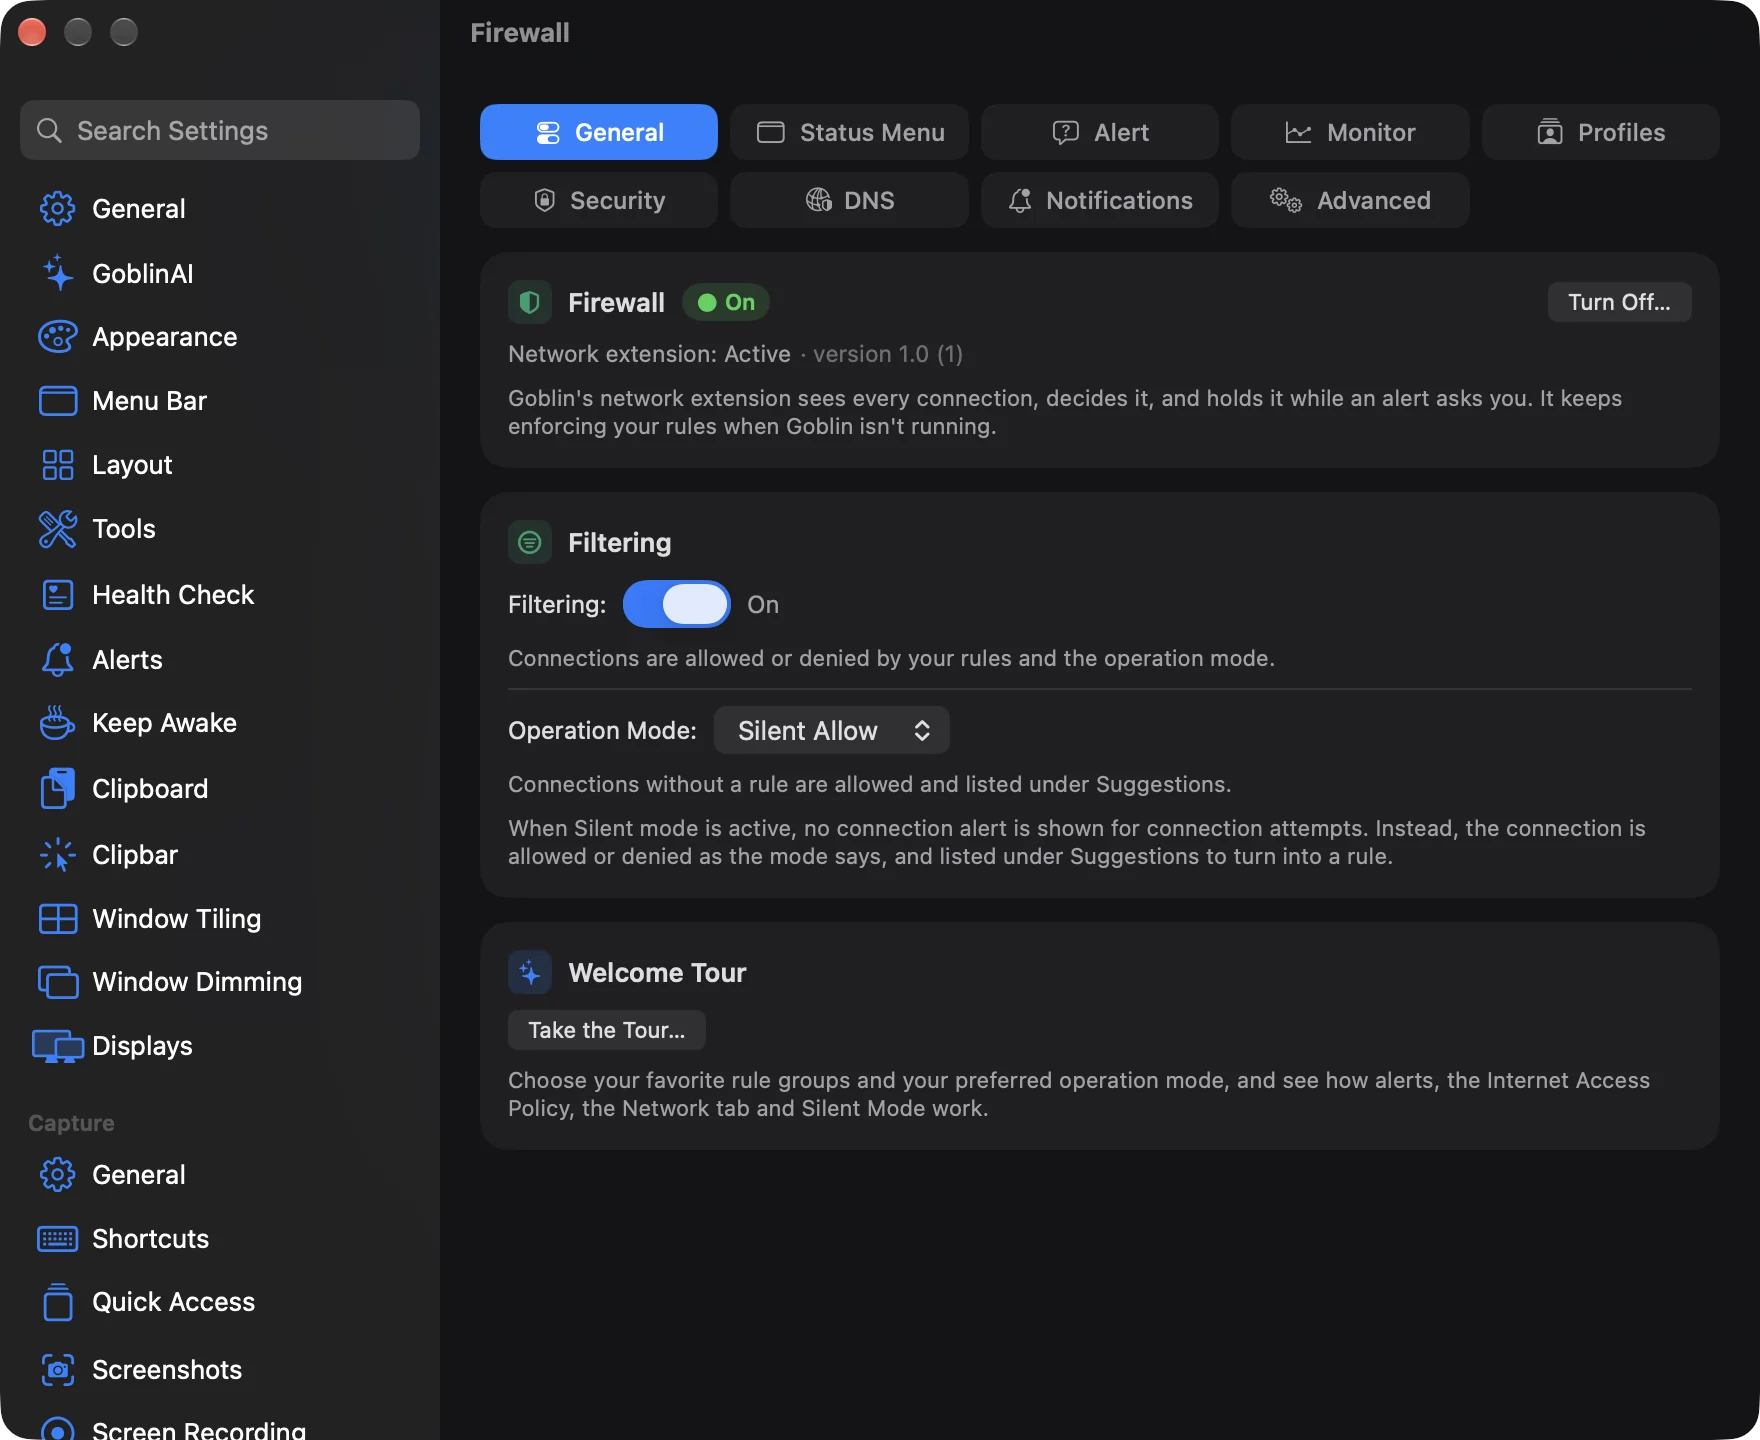
Firewall#
The card at the top shows the firewall On, the network extension's state and version, and:
- Set Up…, when the extension is off or waiting for your approval. It reopens the setup steps.
- Turn Off…, which asks how:
- Turn Off stops filtering. Alerts and the Rules screen go away and every connection is allowed. Your rules are kept for when you turn it on again.
- Turn Off and Remove the Extension does the same and uninstalls the extension. It may ask for an administrator password and finish after a restart.
The extension is the part that sees each connection, decides it and holds it while an alert asks you. It keeps enforcing your rules while Goblin isn't running.
Filtering#
| Setting | What it does | Default |
|---|---|---|
| Filtering: | On: connections are allowed or denied by your rules and the operation mode. Off: watching only; every connection is allowed and still listed in Connections. | On |
| Operation Mode: | What happens to connections no rule covers: Alert asks you, Silent Allow allows them, Silent Deny denies them. | Silent Allow |
In either Silent mode no alert appears for connections without a rule; they're decided by the mode and listed under Suggestions for you to turn into rules. Rules with the Ask action still ask. The same mode and filter switch are in the Rules header and the menu bar panel. More on the modes is in Operation modes.
Welcome Tour#
Take the Tour… runs the firewall's welcome tour again: choose rule groups and an operation mode, then see how alerts, the Internet Access Policy, the Network tab and Silent mode work. It's available once the network extension is active. Your choices are applied when you continue past the mode page.
Status Menu#
What the firewall adds to the menu bar. How the cues look next to Goblin's other figures is shown in The menu bar item.
| Setting | What it does | Default |
|---|---|---|
| Show the firewall in the menu bar panel's Network tab | Adds the firewall card to the panel: mode, profile, filter switch and recent activity. | On |
| Show firewall status in the menu bar | Lets the menu bar item show the four cues below. Off: none of them. | On |
| Numeric Traffic Rates: | Data sent over data received, at the end of the item. Off, Monochrome or Colored (purple and blue). | Off |
| Blocked Connections: | For 3 seconds after the firewall denies a connection: Off, Grey bars, or Red flash (flashes the icon). | Off |
| Silent Mode: | A tick while in Silent Allow, a cross in Silent Deny: Off, Outline or Colored. | Outline |
| Inactivity Warning: | A warning sign while filtering is off: Off, Outline or Colored. | Outline |
| Open the Network Monitor from any app | A global shortcut that opens Goblin's Network tab on Connections. | Off |
| Shortcut keys | The modifiers (⌥⌘, ⌃⌘, ⌃⌥⌘ or ⌥⇧⌘) and a letter A–Z. | ⌃⌥⌘M |
A Preview strip shows what the Silent Allow, filter-off and blocked cues look like with your choices. The Silent Mode and Inactivity cues appear only while the network extension is running. The Red flash recolors Goblin's icon, so it shows nothing if the icon is turned off under Menu Bar. If the shortcut is already taken by another app, a red line asks you to choose another combination.
Show or hide the firewall in the menu bar#
- Open Settings›Firewall and click Status Menu.
- To add or remove the firewall card in the menu bar panel, switch Show the firewall in the menu bar panel's Network tab on or off.
- To add or remove the cues on the menu bar item itself, switch Show firewall status in the menu bar on or off.
- With that switch on, set each cue with the buttons beside Numeric Traffic Rates:, Blocked Connections:, Silent Mode: and Inactivity Warning:. The table lists the choices for each.
The Preview strip at the bottom of the card shows the result straight away.
Set a shortcut that opens the Network Monitor#
- Open Settings›Firewall and click Status Menu.
- Under Keyboard Shortcut, switch on Open the Network Monitor from any app.
- Choose the modifiers from the first menu and a letter from the second. The combination appears beside them, ⌃⌥⌘M at first.
- Press the shortcut in any app. Goblin's Network tab opens on Connections.
If the combination is taken by another app, a red line asks you to choose another.
Alert#
How connection alerts start out, and what happens when nobody answers.
Change what a new alert starts with#
- Open Settings›Firewall and click Alert.
- Under Preselected Options, pick a value for Rule Lifetime, Profile, Domain or Host and Port and Protocol.
- Optionally, under Detail Level, choose how much of the connection the alert's sentence spells out.
- Optionally, switch on Show the options below the buttons right away so alerts open with their options showing.
The next alert starts with your choices. Changes save as you make them, and you can still change everything inside each alert.
Answer alerts automatically#
- Open Settings›Firewall and click Alert.
- Under Automatic Confirmation, switch on Confirm connection alert automatically.
- Choose Allow connection attempts or Deny connection attempts.
- Drag the slider to the delay, from 15 to 300 seconds. The number beside it reads like "45 seconds".
An alert nobody answers is now answered after that delay. To go back to waiting for you, switch the toggle off.
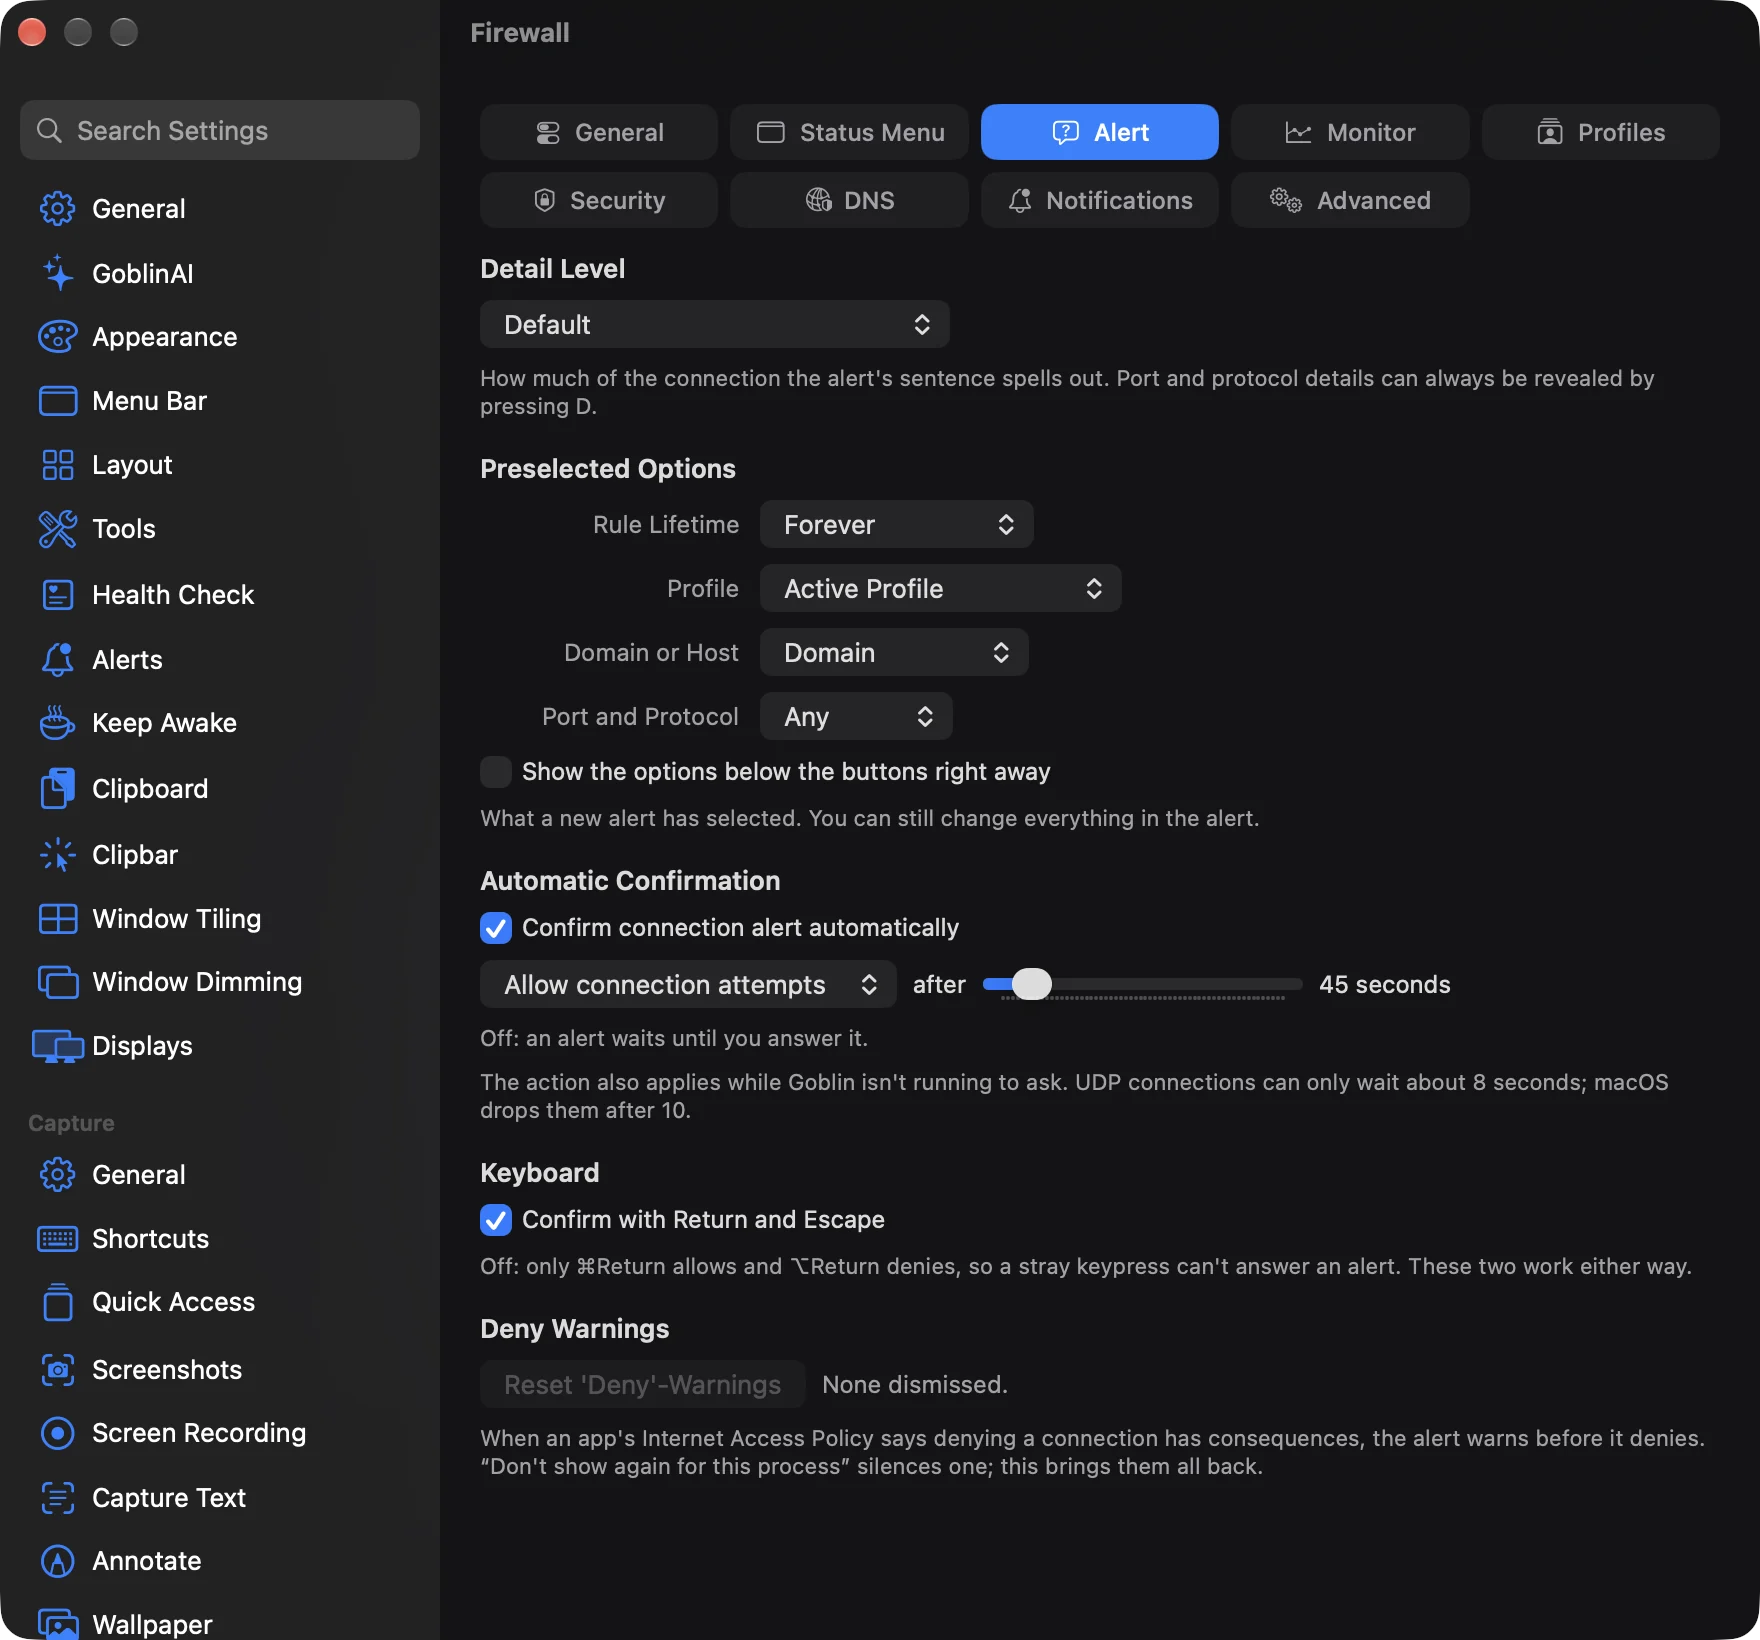
| Setting | What it does | Default |
|---|---|---|
| Detail Level | How much of the connection the alert's sentence spells out: Default, Show Port Details or Show Port and Protocol Details. Pressing D in an alert reveals the details either way. | Default |
| Rule Lifetime | What the alert's lifetime menu starts on: Once, Forever, Until Quit, Until Logout, Until Restart, or For 1 Minute up to For 30 Days. | Forever |
| Profile | Whether a rule from an alert goes into the Active Profile or is Effective in all profiles. | Active Profile |
| Domain or Host | Whether the alert offers the whole Domain or the Full Hostname first. | Domain |
| Port and Protocol | Whether the rule covers Any port and protocol or the Specific one the connection used. | Any |
| Show the options below the buttons right away | Opens the alert's options without clicking ⌄. | Off |
| Confirm connection alert automatically | Answers an alert by itself after a delay. | Off |
| Action and delay | Allow connection attempts or Deny connection attempts, after 15 to 300 seconds in steps of 5. | Allow, 45 seconds |
| Confirm with Return and Escape | Return allows and Esc denies. Off: only ⌘Return allows and ⌥Return denies, so a stray keypress can't answer an alert. | On |
| Reset 'Deny'-Warnings | Brings back every deny warning you silenced, with a count of how many. |
The preselected options are only where an alert starts; you can change all of them in the alert itself.
Automatic confirmation is stored with your rules, so the network extension applies it even while Goblin isn't running. The action you choose here is also what happens when there's nobody to ask: while Goblin isn't running, when a UDP connection can't wait any longer (macOS drops a held UDP connection after about 10 seconds, so Goblin gives up after about 8), and after a connection has waited 6 hours. That holds even with automatic confirmation off, so an unanswered alert doesn't wait forever; the action is Allow unless you've changed it.
Deny warnings appear when an app's Internet Access Policy says denying a connection has consequences. Ticking Don't show again for this process in the warning silences it for that app; the reset button brings them all back.
Monitor#
Settings for Connections, the list of what your apps connect to.
Change how much connection history Goblin keeps#
- Open Settings›Firewall and click Monitor.
- To change how many connections the list remembers, drag the Capacity slider, from 1,000 to 100,000.
- To change how long per-app traffic is kept for the chart, choose 7, 30 or 90 days beside Keep traffic history for.
- To start the stored traffic history again from now, click Reset Traffic History…, then Reset in the confirmation.
Float Connections above other windows#
- Open Settings›Firewall and click Monitor.
- Under Appearance, switch on Float on top of other windows.
| Setting | What it does | Default |
|---|---|---|
| Capacity | How many connections the list remembers, from 1,000 to 100,000. When full, the oldest closed connections go first. More reaches further back in time and uses more memory. | 20,000 |
| Include local network traffic | Counts traffic to devices on your own network in the chart, history and totals. Off: only the internet counts. | On |
| Show connections of other users | Lists connections by other users' and system processes. The same switch as in the Connections filter menu. | On |
| Activity bars | The meters beside each row: Color or Monochrome. | Color |
| Float on top of other windows | Keeps Goblin's window above others while Connections is showing. Same as Float on Top in Connections. | Off |
| Keep traffic history for | 7, 30 or 90 days of per-app traffic in five-minute steps. It feeds the chart for ranges of five hours and longer, and is kept whether or not Goblin's window is open. | 30 days |
| Reset Traffic History… | Deletes the stored history after asking. The chart's long ranges and each app's totals start again from now. | |
| Automatically update my location in map | Uses Location Services for where the map's arcs start. Off: your Mac's region, or the place you set on the map. | Off |
| Update the geolocation database automatically | Keeps the map's country database current. A status line shows its date, and Check for Update fetches it now. | On |
The map and its database are covered in The world map.
Profiles#
| Setting | What it does | Default |
|---|---|---|
| Enable automatic profile switching | Joining a known network activates the profile assigned to it. | On |
| When joining an unknown network: | Ask, Do Nothing, Deactivate Active Profile or Activate "X". | Ask |
| Save geolocations of networks | Records where each new network is, for the Known Networks map. Stays on your Mac. | Off |
| Distinguish OpenVPN remote servers | Treats each OpenVPN server as its own network, so each can have its own profile. | Off |
To switch automatic profile switching on or off, open Settings›Firewall, click Profiles, and use the Enable automatic profile switching switch. Turning it on asks macOS for Location Services if Goblin doesn't have it yet.
A line below says whether Wi-Fi networks can be identified by name, with Allow Location Access… or Open Privacy & Security. Why that needs Location Services, and everything else about profiles, is in Profiles and known networks.
Security#
Require Touch ID or a password to change the firewall#
- Open Settings›Firewall and click Security.
- Under Editing, switch off the areas you want protected: Allow Rule Editing, Allow Profile Switching and Allow Settings Editing. The table below says what each covers.
- Authenticate with Touch ID or your password when macOS asks. Every change to these three switches asks.
When it worked, a lock button appears in the Rules header. The next change in a protected area asks for Touch ID or your password, and then nothing asks again until you lock or quit Goblin. To lock again right away, click the lock button in the Rules header, or choose File›Lock Configuration while Rules is showing. The same item then reads Unlock Configuration…. To remove the protection, switch the three switches back on.
Note: With Allow Settings Editing off and not yet unlocked, the Status Menu, Alert, Monitor, Profiles and DNS panes are greyed out.
Editing#
Three switches decide who may change the firewall. Changing any of them always asks for Touch ID or your password.
| Setting | What it protects | Default |
|---|---|---|
| Allow Rule Editing | Rules, blocklists, rule groups and networks, plus importing and restoring. | On |
| Allow Profile Switching | Changing the active profile, from anywhere. | On |
| Allow Settings Editing | The operation mode, the filter switch and these settings. | On |
With a switch off, the first change in that area asks for Touch ID or your password, and then nothing asks again until you lock or quit Goblin. A lock button appears in the Rules header, and File›Lock Configuration in the menu. Goblin's rules apply to everyone who uses the Mac, so there's no separate switch for rules that cover all users.
Program Identity#
| Setting | What it does | Default |
|---|---|---|
| When a program's identity changed: | What happens to a program that no longer matches a rule made with an identity check, because it was modified or signed by someone else. Ask shows a connection alert, even in Silent mode, where you can accept the change or turn off the check. Deny refuses its connections without asking. | Ask |
Rules whose check fails are listed under Identity Mismatch on the Rules screen. The same setting covers an unsigned or ad-hoc signed tool connecting on behalf of an app that has a rule. For such a tool, the firewall waits until it knows where the connection is going before it decides, so an alert can name the destination.
Allow the goblin command to change the firewall#
- Open Settings›Firewall and click Security.
- Under Other, switch on Allow access via Terminal. If rule editing is locked, authenticate when asked.
- In Terminal, run a command such as
goblin network mode alert. Without this switch, only reading commands (status, rules, log) work.
Switch it off again when you're done if you'd rather no program you run could loosen the firewall.
Other#
| Setting | What it does | Default |
|---|---|---|
| Allow access via Terminal | Lets the goblin network command make changes: mode, filter, profile, rule groups, blocklists, updates and some settings. Reading (status, rules, log) always works. | Off |
| Allow GUI Scripting access to Goblin | Lets other programs click and type in connection alerts. | Off |
Terminal access is off because any program you run could use the command to loosen your firewall. The command itself is described in The goblin command.
With GUI Scripting off, connection alerts ignore clicks and key presses that another program simulates, so a program can't allow its own connection. Your own mouse and keyboard always work. When an alert ignores simulated input, Goblin can tell you with a notification (see Notifications).
DNS#
Encrypted DNS: sending your Mac's lookups to a DNS server over an encrypted connection. It has its own page, Encrypted DNS.
Notifications#
Choose which notifications you get#
- Open Settings›Firewall and click Notifications.
- Switch each kind on or off. Enable "Play Sound" Rules and Enable "Show Notification" Rules are under Rules; the rest are under Other Notifications.
- If nothing appears even with a switch on, open System Settings›Notifications›Goblin and allow notifications there.
Each switch turns one kind of firewall notification on or off. Clicking a notification opens what it's about: the blocklist, rule group, profile, Known Networks, the Suggestions list, or the waiting alert. macOS also has to allow Goblin's notifications, under System Settings›Notifications›Goblin.
| Setting | Shown when | Default |
|---|---|---|
| Enable "Play Sound" Rules | Turn off to silence every rule with the Play Sound action. | On |
| Enable "Show Notification" Rules | Turn off to stop every rule with the Show Notification action. | On |
| Automatic Profile Switching | A profile was switched on or off because the Mac joined a network. | On |
| Blocklist or Rule Group Updates | A blocklist or subscribed rule group updated itself. | Off |
| Failed Blocklist or Rule Group Updates | One of those updates failed. | On |
| Silent Mode Connections | Silent mode allowed or denied a connection for an app for the first time. | On |
| Connection Alert | An alert has been waiting about 5 seconds while minimized or out of sight. | On |
| Connection Alert Timeout | An alert was answered automatically because nobody replied in time. | On |
| Denied Connections during macOS Update | A connection was denied automatically while macOS was updating. | On |
| Connections During Login | Connections were decided automatically before Goblin was running, such as while you logged in. | On |
| Ignored Simulated User Input | An alert ignored a click or key press another program simulated. At most once a minute. | On |
The first two are on/off switches for whole kinds of rules rather than notifications of their own.
Advanced#
Rules#
| Setting | What it does | Default |
|---|---|---|
| Mark new rules as unapproved | Rules made from a connection alert or from Connections get a blue dot until you review them. | On |
| Mark new blocklist entries as unapproved | Entries a blocklist update adds get a blue dot until you approve them. They block in the meantime. | On |
| Approve rules automatically | Selecting an unapproved rule in the list approves it. Off: approve by hand with ⌘K. | On |
The blue dot is explained in The Rules screen.
Traffic#
Traffic rate unit: Bytes/s or Bits/s, for rates in the menu bar, the panel and the Network tab's inspector. It's the same setting as the network unit in Settings › General; the default is Bytes/s.
Add your own network ranges#
- Open Settings›Firewall and click Advanced.
- Under Local Network, click in the Additional IP Ranges in Local Network: box and type one range per line, like
10.20.0.0/16. - Stop typing. The rules follow about a second later. If a red line names a range, correct it.
Local Network#
Additional IP Ranges in Local Network: adds address ranges that count as your local network besides the private ones (10.0.0.0/8, 172.16.0.0/12, 192.168.0.0/16, link-local and so on), such as a company network or a VPN. Enter one range per line, like 10.20.0.0/16; commas, semicolons and spaces work too. Rules for Local Network cover these ranges as well. Changes apply a moment after you stop typing, and a red line names any range Goblin can't read.
Network Extension#
Shows the extension's state and version, with Set Up… when it's off or needs approval, and Uninstall…. Uninstalling removes the filter and the extension, so Goblin stops filtering until you set it up again. Your rules are kept. macOS may ask for your password and finish removing it after a restart.
Note: Uninstall… here, and Turn Off in the Connections banner, leave the firewall switched on, so the Rules screen stays and shows your rules as not enforced. To switch the whole firewall off, use Turn Off… in General.
Export and restore your configuration#
- Open Settings›Firewall and click Advanced.
- Under Backup, click Export Configuration…, choose where to save, and click Save. The file is named
Goblin Firewall Backup.json. A line under the buttons says "Exported 42 rules." (with your count). - To restore it later, click Restore Configuration…, choose the file, and click Open. Authenticate if rule editing is locked. The line reads "Restored 42 rules. Downloading blocklists…".
Warning: Restoring replaces your rules, profiles, rule groups, blocklist subscriptions and known networks with the file's. There's no confirmation, so export first if you might want today's setup back.
Backup#
Export Configuration… saves your rules, profiles, rule groups, blocklist subscriptions and known networks to one file, Goblin Firewall Backup.json. Restore Configuration… replaces them with a saved file; blocklists are downloaded again afterwards. These are the same as Create Backup… and Restore from Backup… on the Rules screen.
Moving from another firewall app#
- Make a backup in the other firewall app. The note under the import button tells you how.
- In Goblin, open Settings›Firewall and click Advanced.
- Under Backup, click the import button below Export Configuration… and Restore Configuration…. It's named for the other app, and imports from a
.lsbackupor.jsonfile. - Choose the backup file and click Open. Goblin reads it and shows a summary of what it holds.
- Click Import to add it, or Cancel to change nothing.
- A final message, "Imported from…", lists what was added.
This is for people moving their setup over. Goblin reads the file and says what it holds before it changes anything. If you agree, rules, rule groups, blocklists and profiles are added to yours. Nothing of yours is replaced or deleted, rules that match ones you already have aren't added twice, and importing the same file again adds nothing. Subscribed rule groups and blocklists are downloaded right after. The import is one step in the Rules screen's undo history, and the rules lock applies to it.